Как се отървах сама у дома от папиломите и успях да елиминирам всички паразити, които отравяха тялото ми

Според различни експерти, основната причина за появата на папиломи обикновено е наличието на паразити в тялото. Най-бързият и безопасен метод за отърваване от тези досадни брадавици и израстъци е пълното почистване на организма от паразити.
В моя блог ще откриете:
Защо папиломите могат да бъдат опасни и как могат да предизвикат рак на кожата;
Каква е връзката между появата на папиломи и заразяването с паразити;
Как успях да елиминирам папиломите у дома, с минимални разходи и без да навредя на здравето си.
Здравейте на всички мои скъпи читатели! Казвам се Мария Петрова. Живея в околностите на Пловдив и съпругът ми се занимаваме с малко семейно земеделие. Имаме няколко кози и кокошки, плюс малка градинка. Не е голям бизнес, но ни позволява да живеем достойно. Вече сме малко по-възрастни и се уморяваме бързо, така че всичко върви по-бавно, но още се справяме.
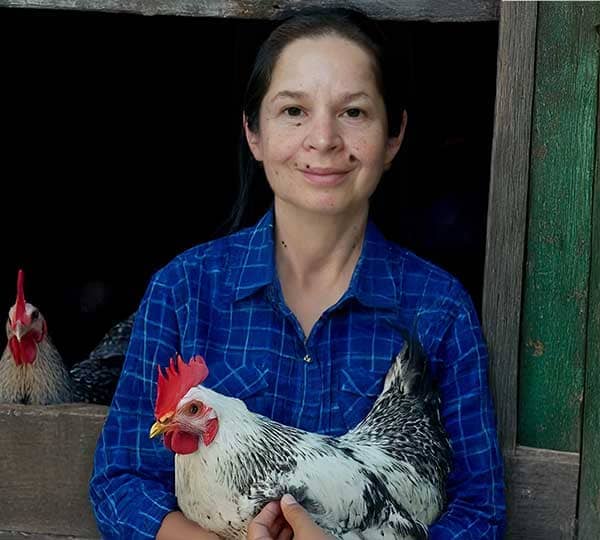
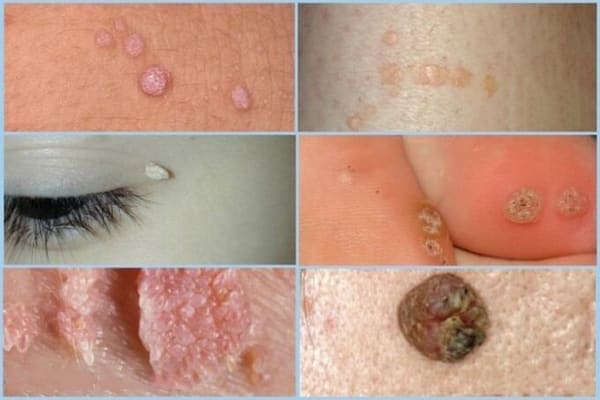
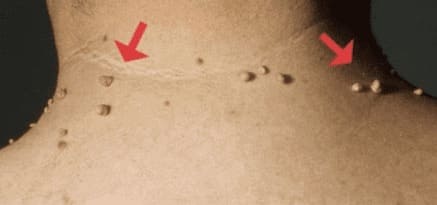
Преди приблизително два месеца забелязах появата на папиломи по тялото си, нещо което никога преди не съм имала. По-късно се появиха няколко брадавици на ръката ми, а после още папиломи на различни места. За да отида при специалист в града трябваше да се организирам няколко дни (да си взема час, да чакам...), а честно казано в този момент ми беше много трудно да оставя къщата и животните сами. Съпругът ми също беше доста изтощен, а ежедневната работа не спира.
Дори не си представях ужасната заплаха, която се развиваше вътре в мен
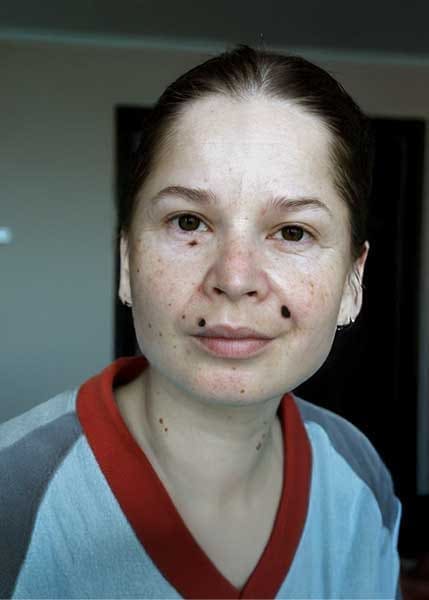
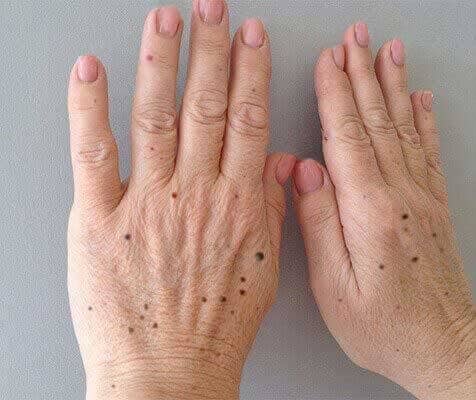
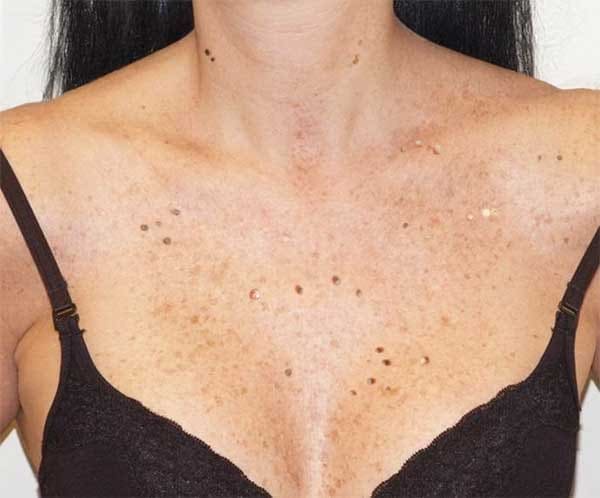
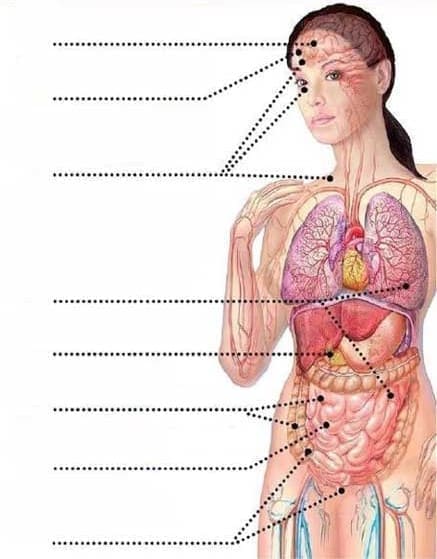
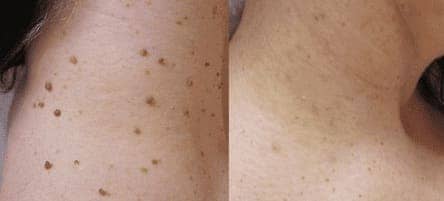
Проблемът се влошаваше ден след ден. Първо се появиха още брадавици, после някои бенки и папиломи по лицето, по ръцете и по тялото. Беше много неудобно и дори срамно.
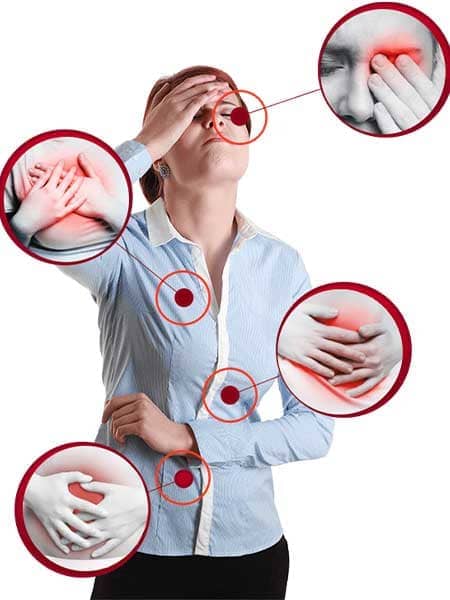
Напоследък освен това често се разболявах: покачваше ми се кръвното, болеше ме стомахът и се чувствах много слаба. Понякога имах диария, друг път запек. Понякога внезапна температура, гадене и голяма умора.
Дори усещах странно чувство , сякаш нещо се движи вътре в мен. Споделих със съпруга си и на шега той каза: "Може да си бременна", но на мен изобщо не ми беше смешно.
Отиването при общопрактикуващ лекар не помага много
Здравната ми осигуровка покрива само най-основното, така че отидох в районната поликлиника. Препоръчаха ми да "променя малко храненето си" и да "не се стресирам". Излязох от там също толкова объркана.
Малко след това разбрах, че съседка, която също имаше папиломи и различни бенки, внезапно почина. Казват, че й се размножили папиломите, после различни обриви, а лекарите не могли да направят нищо.
При аутопсията намерили паразити разпръснати из цялото й тяло: в стомаха, в черния дроб, дори в сърцето... Беше ужасяващо!
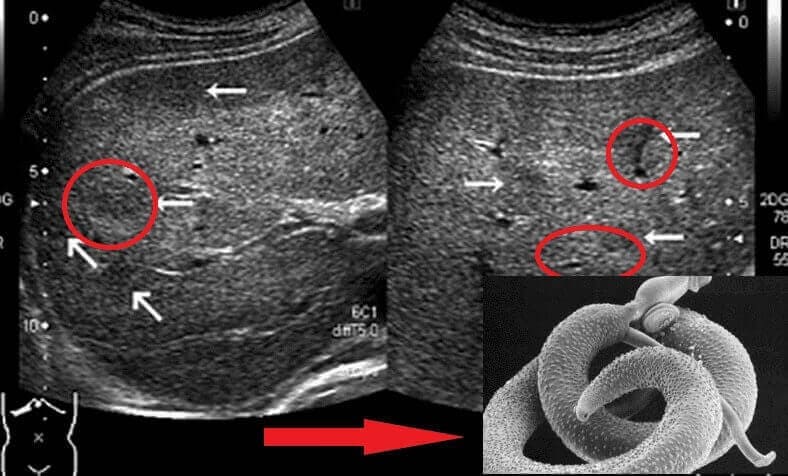
Според това, което ми разказаха в кабинета, в 95% от случаите паразитите са истинската причина за папиломите.
Уплаших се като никога преди . Не можех да спя. Започнах да търся в интернет и се притесних още повече.
Казват, че в 90% от случаите папиломите могат да се превърнат в рак на кожата.
Когато стана по-съзнателна за симптомите си, разбрах колко изтощена бях. Кръвното ми продължаваше да се покачва и понижава, а продължавах с гадене и главоболие. Работейки във фермата, завършвах изтощена.
В кабинета ми обясниха, че не са специалисти по паразитология и че трябва да видя експерт в София или Варна, но осигуровката ми не покриваше този тип грижи и беше много скъпо.
Конвенционално медицинско лечение - много скъпо и с несигурни резултати
Най-накрая се отправих към голяма клиника в София, където ми направиха множество изследвания, включително някои специфични за паразити.
Анализите потвърдиха наличието на паразити. Докторът ми каза, че това е нещо много често срещано, "дори при голяма част от българското население". Най-очевидният симптом: папиломите.
Предписаха ми някои много скъпи, но агресивни за черния дроб и стомаха лекарства. Страхувах се от страничните ефекти, затова започнах да търся нещо по-естествено.
Всичко се влоши и болките станаха все по-силни
Често имах спазми в корема, сякаш ме режеха с нож . Едва можех да спя, а сутрин бях замаяна и с желание за повръщане. Чувствах се все по-зле.
Търсейки в интернет открих, че някои паразити наистина трудно се премахват: могат да се залепят за органите и, въпреки че умират , яйцата им оцеляват. След няколко седмици тези яйца отново се излюпват и се образува порочен кръг.
Намерих информация, която ме ужаси още повече:
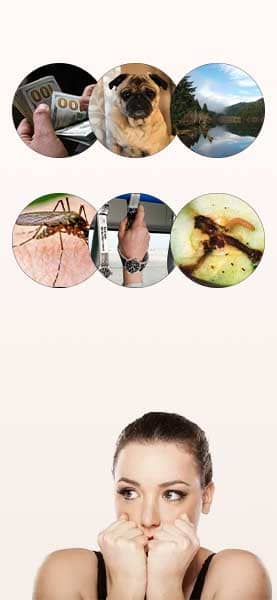
Пари
Домашни животни
Открити води (реки, езера)
Насекоми
Обществени места
Храни
СПОРЕД СТАТИСТИКИ:
Над 15.000.000 души умират годишно от инфекции и тумори, причинени от паразити
Голяма част от населението в България страда от паразити, без да го знае
Вече бях извън себе си . Върнах се при лекаря и ми предписаха серуми и куп хапчета, но след няколко седмици всичко се връщаше към нормалното: симптомите се връщаха.
Бях на ръба на отчаянието. Лекарите не намираха решение, докато паразитите продължаваха да атакуват тялото ми отвътре.
Колкото повече забавяш лечението, толкова по-зле ще бъде
Както прочетох в различни форуми, много паразити оставят много устойчиви яйца. И ако имунната ти система е слаба, вирусът на човешката папилома (ВЧП) процъфтява в кожата ти, причинявайки нови папиломи. Затова наличието на папиломи обикновено е ясен сигнал за паразитоза.
Съществуват десетки видове паразити, някои са дълги червеи, които могат да се открият по-лесно, но други са микроскопични и пътуват през кръвообращението, бавно отравяйки тялото ти с токсините си.
Сестра ми Елена, която живее във Варна, се оплакваше от много подобни симптоми: папиломи, мигрени, чревни болки и нестабилно кръвно. Разговаряйки с нея, разбрахме, че всичко прилича твърде много и ни стана много страшно .
Видео, което ми спаси живота
Един ден случайно намерих изявление на паразитолог, който обясняваше, че когато някой е силно нападнат от паразити, се появяват папиломи. Неговият съвет беше да се почисти организмът, за да изчезнат тези папиломи сами.

Започнах да изследвам кои естествени съставки ефективно се борят с паразитите и техните яйца, освен че укрепват имунната система.
За щастие, намерих интервю с професор д-р Стоян Георгиев, експерт паразитолог с голям опит и автор на няколко научни изследвания.

Ето какво научих от неговото свидетелство:
ВЧП (Вирус на човешката папилома) е един от най-разпространените вируси в света и може да бъде много опасен, дори да причини рак на кожата. Експертите от дълго време търсят препарат, който може да елиминира паразитите, да укрепи имунната система и така да намали риска от онкологични заболявания.
Д-р Георгиев обясняваше:
– Вярно ли е, че ако се появят папиломи по тялото, почти със сигурност означава, че има паразити?
– Точно така. Папиломите обикновено са много надежден маркер за паразитна инфестация. Последните изследвания го потвърждават. Но паразитите не само предизвикват папиломи. Те отделят много опасни токсини , абсорбират жизненоважни хранителни вещества и отслабват защитните сили , съкращавайки продължителността на живота ни до 10 или 20 години.
Освен това яйцата на паразитите са много устойчиви. Въпреки че се убият възрастните, яйцата остават и след кратък период се превръщат в нови паразити. Затова много хора години наред се чувстват зле, без да знаят истинската причина.
Най-надеждният сигнал за наличие на паразити са папиломите и брадавиците, които никнат безконтролно.
– Тогава какво да правим, ако забележим папиломи? Как да елиминираме както паразитите, така и тези брадавици?
Най-добре е да не експериментираме с домашни средства, защото обикновено не са достатъчни и могат да влошат проблема.
Съществува съвременен препарат на базата на естествени екстракти, който унищожава паразитите и е напълно безвреден за организма.
Резултати от клиничните изследвания на Detoxil Water

Участници

Елиминиране на паразити (%)
Нормализиране на храносмилането и метаболизма (%)

Загуба на тегло (%)

Подобряване на общото здравословно състояние (%)

Без повторно заразяване (%)
На международен конгрес на специалисти бяха представени доклади за резултатите от клиничните изпитания на това средство. То е напълно естествено и тайната му се крие в уникална формула, с точни пропорции на растителни съставки.
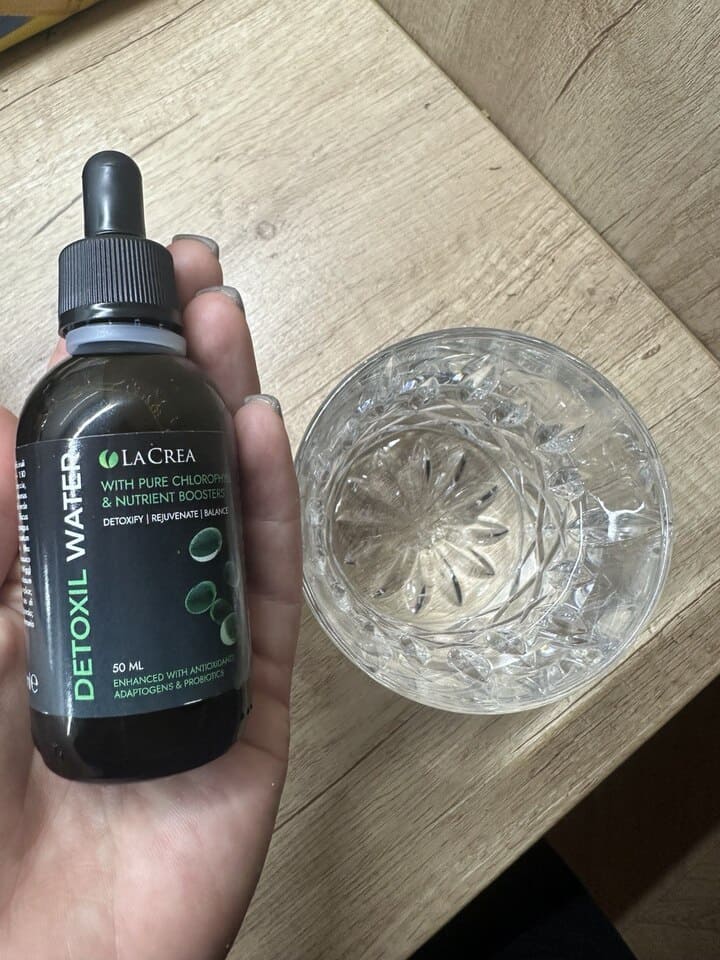
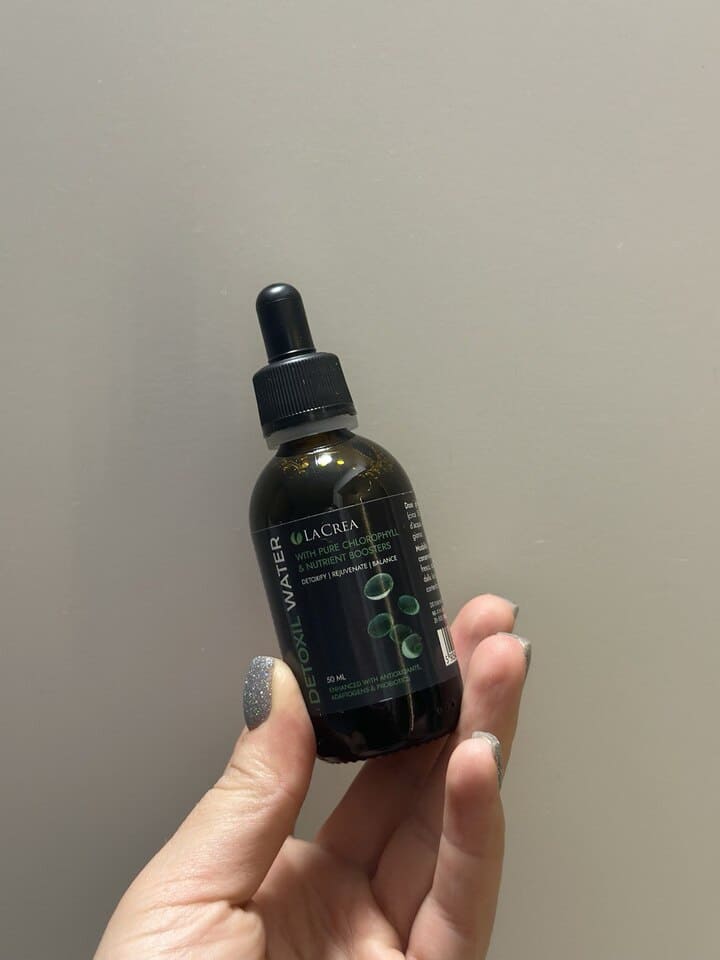
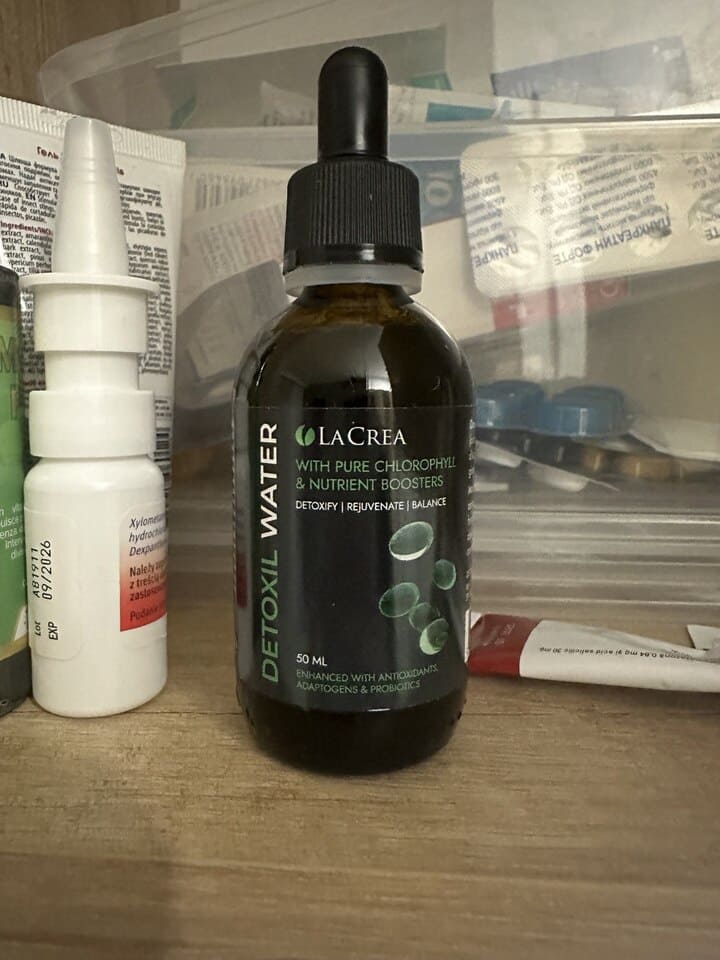
Този продукт се казва Detoxil Water и е достъпен в капков формат . Препоръчва се да се вземат 20 капки разтворени в 100 мл вода, два пъти дневно, за да се елиминират възрастните паразити и да се предотврати тяхното развитие от яйцата.
Само след няколко дни от започване на употребата на Detoxil Water в капки, хората вече забелязват голямо подобрение : паразитите спират да крадат хранителни вещества и тялото престава да страда от отравяне с токсини.
За пълно почистване и изчезване на папиломите, се препоръчва лечение от около 8 седмици . През този период организмът се пречиства напълно, укрепва се имунитетът и се нормализира храносмилането. При укрепване на защитните сили, ВЧП отстъпва и папиломите се изсушават и отпадат сами.
Затова много специалисти препоръчват: "Първо почистете тялото си с Detoxil Water и ще видите как папиломите изчезват сами."
Намерих решението на проблемите си!
Най-накрая открих растителния препарат, който търсех. Бях много развълнувана.
Опитах да го намеря в аптека в Пловдив, но не го намерих. Потърсих в няколко аптеки и също нямаше. Започнах да се притеснявам.
Когато се свързах отново с лекаря, той ми обясни, че Detoxil Water не се продава в обикновени аптеки, "защото на голямата фармацевтична индустрия не й се струва": здравите хора не генерират печалби .
Но ми даде линк за поръчване на Detoxil Water директно от производителя. И се оказа, че имат специална оферта за България!
Веднага поръчах две бутилки: една за мен и една за сестра ми Елена.
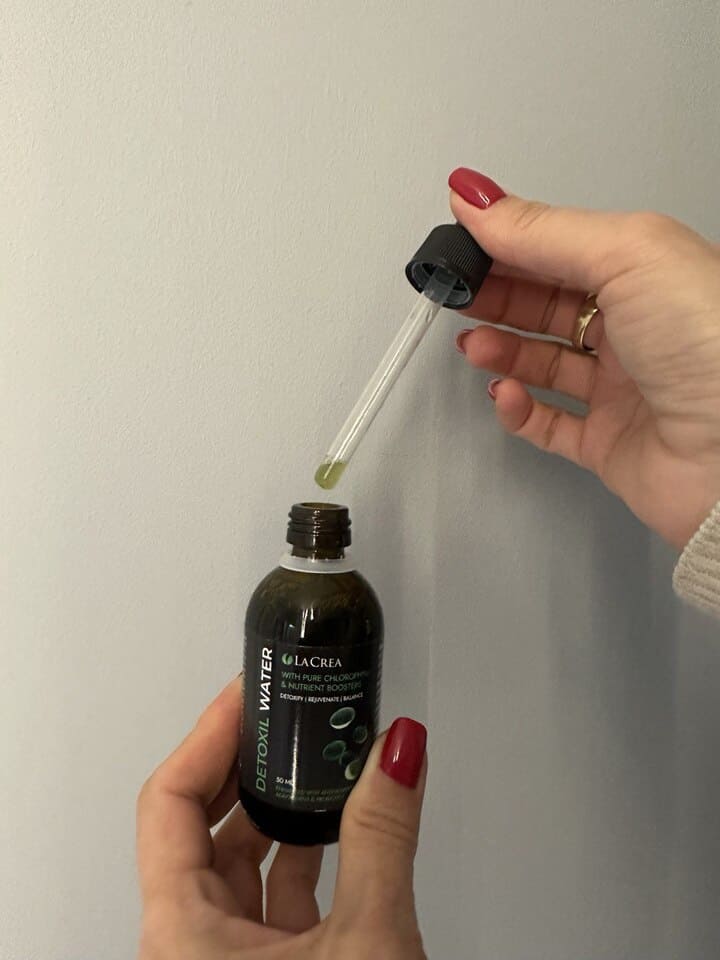
Пакетът ми стигна за три дни. Започнах лечението точно както указваше : 20 капки в 100 мл вода, два пъти дневно. На третия ден вече почувствах голямо облекчение ! Стомахът ми спря да ме безпокои и умората постепенно изчезваше.
Но най-хубавото беше, че папиломите ми започнаха да се изсушават и да отпадат сами.
Ето какво забелязах с Detoxil Water:
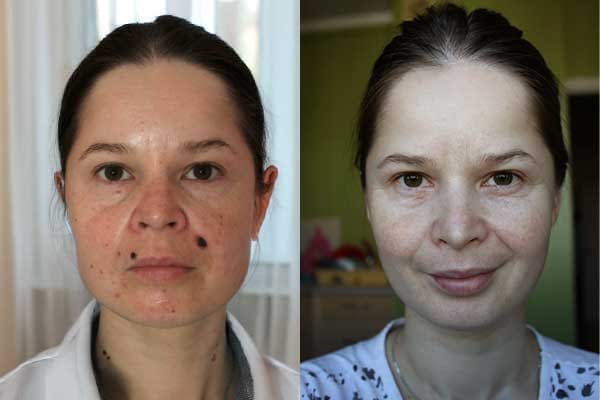
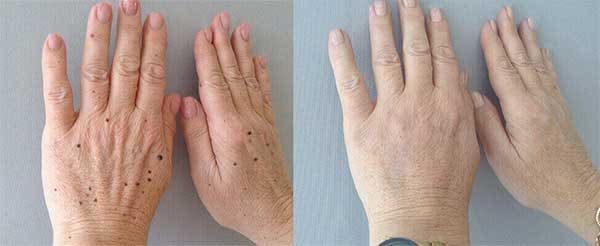
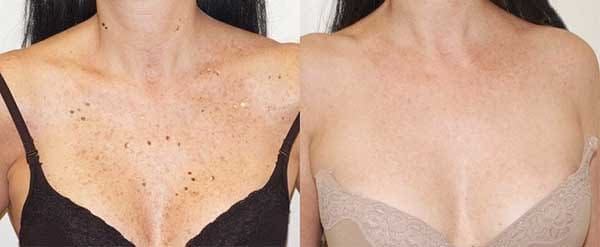
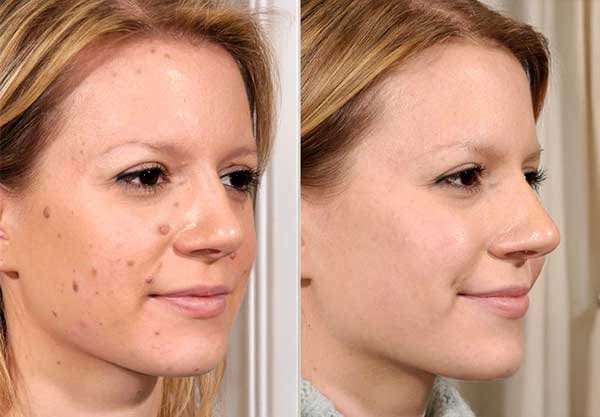
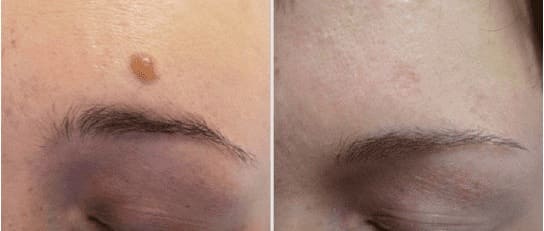
1. Изчезнаха папиломите!
Ден след ден всеки папилом се изсушаваше до отпадане. Най-малките се разпадаха бързо; по-големите отнеха малко повече време. След месец кожата ми беше чиста. Не можех да повярвам!
2. Възвърнах енергията
Изчезна хроничната умора и почувствах голям прилив на жизненост. Преди се уморявах след няколко часа в градинката, сега издържам по-добре деня.
3. Кръвното ми налягане се стабилизира
Преди ми достигаше до 160, сега съм на 120/80 средно. Detoxil Water подобри общото ми състояние.
Много потребители също твърдят:
По-добра концентрация и памет;
По-възстановителен сън, без замайване;
Изчезване на нервност и шум в ушите;
Никакви главоболия.
Наистина се подмладих .
4. Урегулира се храносмилането ми
Изчезнаха болките в стомаха, запекът и диарията. Сбогом на киселините и коремното подуване. Сега мога да ям спокойно, без дискомфорт.
5. Намаляха задържанията на течности
Detoxil Water подобрява бъбречната функция, така че излишните течности се отделят по-лесно. Вече не ми се подуват краката и корема ми се чувства лек.
6. Отслабнах
Като нормализирах метаболизма и чревната флора, свалих 8 килограма за месец, без да спазвам диета.
7. Подобри се сърдечното ми здраве
Почистването от паразити благоприятства сърцето. Изчезнаха ми аритмиите и тахикардиите. Казват, че рискът от инфаркт се намалява до 17 пъти.
Стабилен пулс;
Изчезнаха болките в гърдите;
По-малък риск от инфаркт.
8. Имунната система функционира по-добре
Detoxil Water укрепва костния мозък, който произвежда имунните клетки, така че тялото се бори с вируси и бактерии по-ефективно. Забелязах го веднага, тъй като у дома няколко души хванаха настинки този сезон, освен мен.
Detoxil Water помогна и на сестра ми Елена
Тя страдаше от подобни симптоми: папиломи, главоболие, раздразнен стомах, високо кръвно налягане. След като опита Detoxil Water , ми написа:
"Мария, скъпа, благодаря ти! Тези капки Detoxil Water ми спасиха живота . Имах папиломи и се чувствах ужасно, и наистина беше заради паразити."
Започнах да взимам по 20 капки два пъти дневно и се уплаших да видя какво излезе от тялото ми. Лудост! Но сега се чувствам много по-добре."
Вече ми отпадат папиломите без да правя нищо . Съпругът ми също ги взима и казва, че му се оправиха стомашните неразположения и високото кръвно. Хиляди благодарности отново!"
Не игнорирай проблема, започни лечението колкото се може по-рано
Може дори да не знаеш, че имаш паразити, докато те те отслабват ден след ден и крадат жизнената ти енергия.
Затова споделям с теб единственото наистина ефективно средство което действа бързо срещу паразитите, с достъпна цена и 100% естествен произход.
Сега знам, че трябва да атакуваме причината, а не симптома!
Ако забележиш папиломи, брадавици или странни бенки, не го оставяй: това показва почти сигурно, че имаш паразити .
Много хора ме питат къде и как да си набавят Detoxil Water . Затова ти оставям официалния линк на производителя по-долу.
В момента е в промоция, така че имаш възможност да го придобиеш с голяма отстъпка. Кликни върху някое от знамената и провери каква отстъпка ти се е паднала.
Опитай късмета си! Натисни върху едно от знамената и може да получиш Detoxil Water с отстъпка.


Току-що получих поръчката си от Еконт! Утре започвам с капките, дано ми помогнат с папиломите и да укрепя имунитета си. Стигна много бързо, впечатлена съм.

Прочетох историята ти и доста се уплаших. Имам няколко папилома и също понякога ме боли стомахът... Вече поръчах две бутилки Detoxil Water с офертата, да видя как ще ми се отрази.

Години наред имам проблеми с инфекции и доста слаба имунна система. Лесно се простудявам. Може паразитите да имат нещо общо с това. Ще го пробвам, благодаря.

Това с паразитите не е никаква шега. Чичо ми имаше сериозни проблеми с черния дроб и се оказаха червеи в черния му дроб. Трябва да се пазим.

Мария, историята ти ме впечатли доста. Аз също току-що получих моя Detoxil Water и съм готова да започна. Надявам се да работи толкова добре, колкото разказваш.


Благодаря за съвета. Аз също имах папиломи и лекарят ми говореше за паразити. Предложи ми много скъпи лекарства, но предпочетох нещо по-естествено. След като използвах Detoxil Water, папиломите ми се изсушиха и отпаднаха. Беше невероятно.

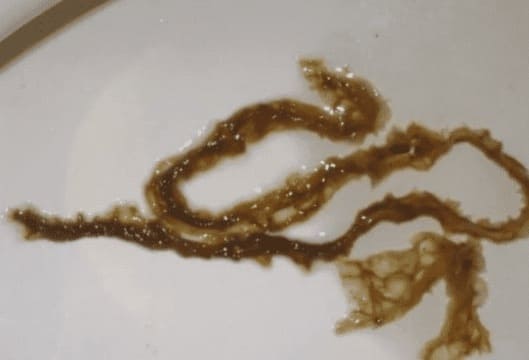
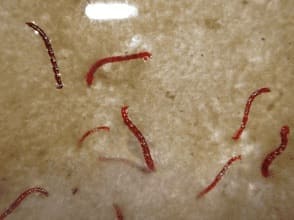
Започнах с Detoxil Water и изхвърлих доста шокиращи неща. Беше много неприятно, но поне знам, че вече не ги имам вътре в мен.
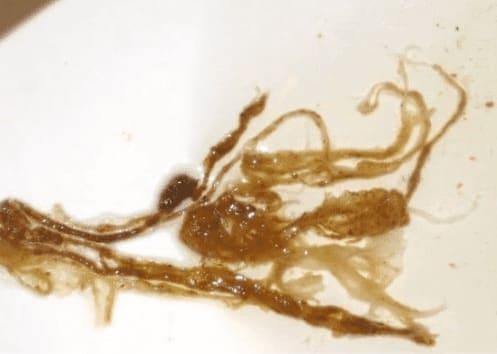

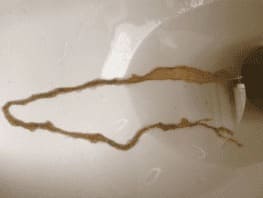
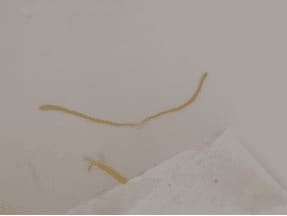
С мен се случи същото. След няколко дни приемане на Detoxil Water започнах да изхвърлям огромни червеи. Не знаех, че такива неща могат да живеят в мен. Също имах папиломи... За щастие изчезнаха.

Месеци наред имам болки в корема. Мислите ли, че мога да взема Detoxil Water без да съм правила специфични изследвания? Лекарят ми дава час чак след доста време...

Да, разбира се. Това е натурален продукт и няма да ти навреди. Аз дори не си правих изследвания и ми помогна чудесно.

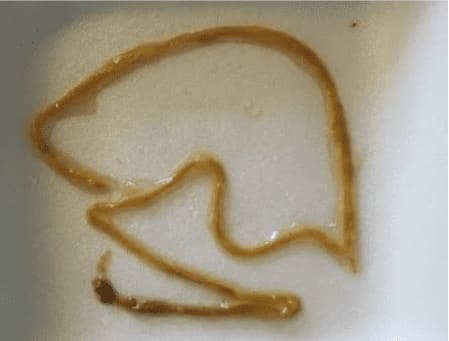
Погледнете какво изхвърлих аз след няколко дни с Detoxil Water. Дори апетитът ми се изгуби, като го видях, хаха. Имах много папиломи и сега са много по-добре.

Имам куче и котка у дома, сигурна съм, че рискът от паразити е висок. Вече поръчах моя Detoxil Water, за да не се разпространи нищо.

Благодаря, че сподели историята си. Взех го с промоцията и също ще почистя цялото семейство. Не се шегувам с тази тема.

Аз също използвам Detoxil Water от известно време. Харесва ми, че е естествен и унищожава паразитите без агресивни странични ефекти.

Не може да се подценява темата за паразитите, особено ако живеете в селски райони или имате домашни любимци. Много е важно да почиствате организма периодично.

Опитах Detoxil Water и почувствах невероятна промяна. Преди имах високо кръвно налягане и аритмия, сега съм чудесно. Освен това папиломите ми изчезнаха без лазер или нещо такова.

Като медицински професионалист потвърждавам, че паразитите са много по-чести, отколкото хората си мислят. Брутално е това, което могат да направят в тялото. Радвам се да знам, че Detoxil Water работи толкова добре.

Аз също работя в областта на здравеопазването. Има хора, които не вярват, докато не го видят под микроскопа. Прикачвам снимка от лабораторията (ужасно е, но е истинско).

Един лекар приятел ми препоръча Detoxil Water, защото имах слаба имунна система. Каква разлика след няколко седмици! Вече не ми излизат папиломи и почти не се простудявам.

Взех го с голяма отстъпка. Радвам се, че мога да почистя тялото си, без да харча твърде много. Пристигна супер бързо, за 3 дни.

Винаги е имало паразити, но ние можем да направим нещо. С добра хигиена и лечение от време на време, като Detoxil Water, разликата се усеща много.

Аз също взимам Detoxil Water сутрин и вечер, и само за няколко дни започнах да изхвърлям всякакви неприятни неща. Беше шокиращо, но предпочитам да го изкарам отвътре.

Видях документален филм, който показваше как някои червеи могат да стигнат до мозъка или сърцето, какъв ужас! По-добре да се предпазваме и да се почистваме от време на време.

Чух, че Detoxil Water изхвърля дори най-опасните тении. При мен премахна алергиите и хипертонията. Също така изчезнаха папиломите.

Колко ме плаши всичко това за паразитите! Аз вече направих поръчката си, не искам дори да си представя какво може да живее в тялото ми.

Чел съм, че паразитите могат да причинят артрит и много възпаления, дори да ускорят стареенето. По-добре да ги елиминираме възможно най-скоро.

Аз също изхвърлих невероятни неща с Detoxil Water. Не мога да опиша отвращението, но се чувствам много по-добре сега.

Страдах от болки в стомаха и сърцебиене, и в моя случай се оказаха паразити. Препоръчвам Detoxil Water на всички, промени живота ми.

Напълно съм съгласен. Почистването на тялото е ключово. В моя случай Detoxil Water ми нормализира храносмилането и също изпаднаха папиломите.

Вече направих поръчката, защото напоследък се чувствам зле и може да са паразити. Добре че хванах промоцията. Надявам се скоро да се подобря.

С всички тези свидетелства вече не ми остават съмнения. Не знаех, че такава "фауна" може да живее в човек. Поръчах Detoxil Water.

Чела съм, че голяма част от хората имат паразити и дори не го подозират. Семейството ми и аз вече взимаме Detoxil Water около 4 седмици годишно и се усеща брутално подобрение.


Имаме куче у дома и обикновено му даваме антипаразитни, но не бяхме мислили за себе си. Вече поръчах Detoxil Water. Благодаря за информацията.

Взимам Detoxil Water от две седмици и мислех, че съм здрава... колко бях грешала! По-добре навън, отколкото вътре, определено.

Нито искам да видя какво може да излезе от мен, ще получа инфарkt! Но все пак ще го взимам, здравето е на първо място.

Само като взимаш Detoxil Water два пъти на ден, почистваш цялата тази вътрешна мръсотия. Много от нас можем да имаме килограми паразити в червата, наистина плаши.

Аз съм медицинска сестра и съм виждала случаи на паразити в сърцето. Ужасно е. Правя редовно почистване от паразити и Detoxil Water е много ефективен и деликатен едновременно.

Лекарката ми призна, че ако не почистя тялото си от паразити, алергията и интоксикацията ще се влошат. Взех Detoxil Water и беше чудесно. Вече поръчах още едно шише за повторение на курса.

Инструкциите казват, че трябва да завършиш целия курс. За щастие, с отстъпката не ми струва толкова скъпо. Взимам сутрин и вечер, 20 капчици в 100 мл вода.

Медицинските изследвания потвърдиха, че имам паразити. Лекарят ми предложи силни лекарства, но имам проблеми с бъбреците и захарта, затова предпочетох нещо природно като Detoxil Water. Не ми даде странични ефекти и съм много по-добре.

В началото не вярвах, че имам паразити, но всички симптоми се отместваха: папиломи, болка и тахикардия... Започнах с Detoxil Water и скоро папиломите изпаднаха. Без съмнение бяха паразити.
THANKS

