The most expensive thing is information and that is why I want it
to provide it to you for free. In this way I feed my soul.
Health, Computer help, Thoughts, Sarcasm, Jok's and . . .
Thanks for taking the time to support an open source initiative.
I believe all information should be free and available to everyone. Subscribe to this blog to get more amazing news curated just for you right in your inbox on a daily basis.
Accidentally pressing the Delete key, someone deliberately deleting your valuable data or perhaps a software bug creeping into the system causing your hard disk to go corrupt- a recipe for havoc isn’t it. Instead of crying out loud and cursing -“Why? Why did it have to happen to me” or “What the hell was I thinking while doing so?” you would definitely prefer to recover the data back at any cost without any fuss. Here is where the data recovery software come in handy. Although truly speaking the best way to avoid such a harrowing experience is to regularly take a good old real-time backup! But just in case you don’t, we have some of the best free data recovery software for you.
We compiled this list of best free data recovery software considering factors such as whether the software can recover RAW, Unallocated, Corrupt or Formatted Hard Disk, its ability to recover from different file systems such as FAT, FAT32, HFS, NTFS etc., the array of devices supported, time taken for file recovery and user friendliness to name a few.
With looks of a typical Office application the Undelete 360 is built on a fast yet efficient algorithm which enables the user to undelete files from a variety of devices such as Digital cameras, USB’s etc. It includes a data-wiping tool, a Hex Viewer along with the ability to preview files before recovery.
It does a great job in recovering recently deleted files as compared to other free data recovery software and is also able to recover files of a wide variety of types such as DOC, HTML, AVI, MP3, JPEG, JPG, PNG, GIF, etc. Scanning speed needs major improvement and it also lags out its competition in terms of recovering data.
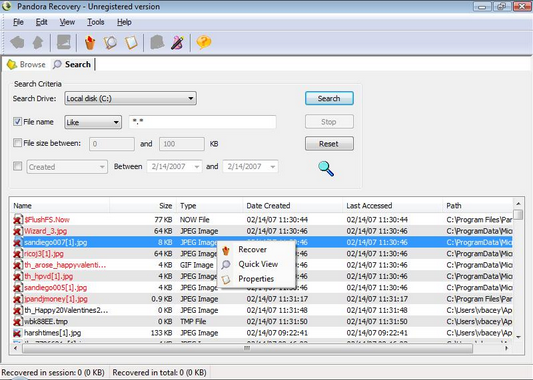
Pandora recovery is one of the most reliable and effective free data recovery software out there. With the ability to recover deleted files from NTFS and FAT-formatted volumes, preview deleted files of certain types (image and text files) without performing recovery, surface scan ( which allows you to recover data from drives that have been formatted) and the ability to recover archived, hidden, encrypted and compressed files it packs quite a punch. Its interface is very easy to get a hang of and provides an explorer-like view along with colour coded & recovery percentage indicators.
However, its file detection system is not that reliable and needs to be improved further. The software could be made portable as well so that it doesn’t consume any space on the hard disk and thereby not consume space that a file which we wish to recover once consumed. To know more about Panda free data recovery software’s features click here.
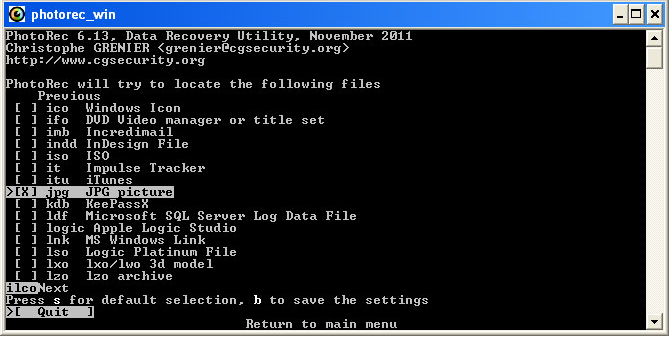
Definitely one of the best free data recovery software out there, PhotoRec is widely acclaimed for its powerful file recovery over a wide variety of devices ranging from digital cameras to hard-disks. It is compatible with almost all major platforms such as Microsoft Windows, Linux, Mac OS X etc. Don’t be fooled by its name either, it comes packed with the ability to recover more than 440 different file formats. Features such as the ‘unformat function’ and the ability to add your own custom file types do come in handy. Although I wouldn’t advise this free data recovery software to beginners as it is completely devoid of a GUI and uses a command line interface which may intimidate some users.
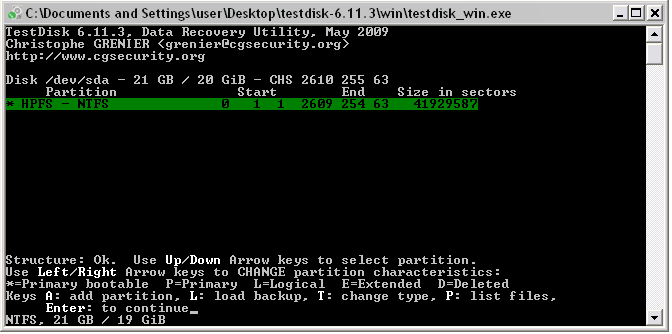
A list of best free data recovery software can hardly be termed as being complete without a mention of TestDisk. Packed with features and a file recovery system that can easily overshadow that of any other data recovery software, TestDisk has a lot to offer for both novices and experts. It allows users to recover/rebuild the boot sector, fix or recover deleted partition table besides being able to reliably undelete files from FAT, exFAT, NTFS and ext2 file systems. It is available on all major platforms such as Microsoft Windows, Mac OS X etc and is in fact quite popular as it can be found on various Linux Live CD’s. Although being a command line tool it may not be suitable for some users.
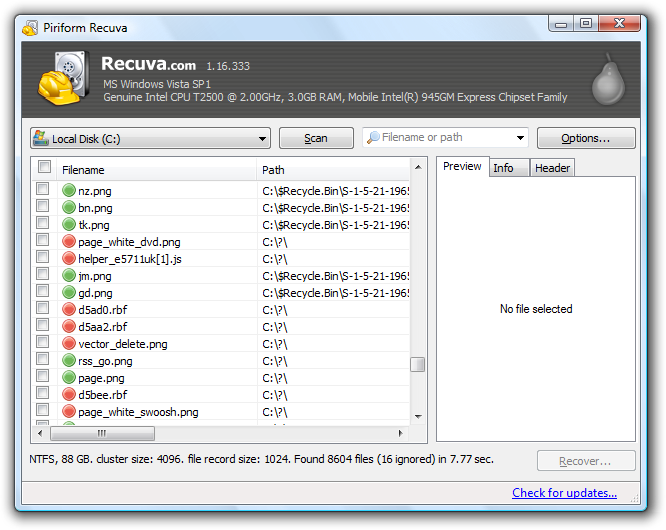
Editor’s Recommendation: I would personally recommend Piriform’s Recuva to all our readers hands down. The fact that Recuva is on the top of this list may not come across a surprise to most of you. With superior file recovery , an advanced deep scan mode, a secure overwrite feature that uses industry & military standard deletion techniques and the ability to recover files from damaged or newly formatted files , Recuva is undeniably one of the best free data recovery tools out there. Its portability (the ability to run without installation) is one feature that sets it apart from the others.
The User Interface wouldn’t let you down either with a file-recovery wizard and an application manual mode available to your disposal which provides colour coding (indicating the probability of the recovery of a file) along with the ability to preview files before undeleting them. Recuva is definitely a notch above all others and undoubtedly the most complete and reliable free data recovery software available today.
How Much RAM Does Your PC Need? Probably Less Than You Think
Random Access Memory, usually shortened to “RAM” or simply “memory,” is one of the most important parts of any computer. But how much do you need? Current new PCs and similar devices range from around the two gigabyte mark to 16GB or more.
How much memory you really require will depend on two factors — how much you want to do, and how much you’re willing to spend. This article will focus on computers running a desktop operating systems like Windows, Mac OS X, Linux, or Chrome OS.
An introduction to RAM
Memory capacity is often confused with the long-term storage offered by a solid state or mechanical hard drive. Sometimes even manufacturers or retailers will mix up these terms. A desk is a useful analogy to consider the difference between memory and storage. Think of RAM as the top of the desk. The bigger it is, the more papers you can spread out and read at once. Hard drives are more like the drawers underneath the desk, capable of storing papers you’re not using.
The more RAM your system has, the more programs it can handle simultaneously. RAM isn’t the only determining factor, and you can technically open dozens of programs at once even with a very small amount of RAM, but doing so will slow your system down. Think of the desk again. If you have far too many papers on it, it becomes cluttered, and your work will slow as you try to find whatever paper you need at a particular moment. You’ll be forced to frequently dig into the drawers to store what won’t fit on top of the desk and retrieve papers you need.
Related: Want to upgrade your RAM? Do it now while prices are low
A computer with more RAM might feel like it’s performing faster, especially when you use many programs at once, but more memory doesn’t actually increase its processing speed. Only a faster CPU can do that. More RAM won’t increase the amount of files or programs your computer can hold, either. That’s what the desk drawers — the hard drive or solid state drive – are for.
Standard RAM shouldn’t be confused with video memory, a statistic associated with computer video cards. High-end 3D games rely on video RAM, usually expressed as “GDDR3” or similar, whereas standard memory will simply be referred to as memory, RAM or DDR3/4.
RAM-heavy applications
The biggest RAM-hogs on most home computers are the operating system itself and the web browser. There’s not much you can do to make Windows or OS X use less memory, but more RAM in your computer means that you can have more browser tabs open in Chrome, Firefox, Internet Explorer, et cetera. In addition, some websites will use more RAM than others. A simple text news story is relatively light on memory, while something like Gmail or Netflix uses quite a lot.
(Bill Roberson/Digital Trends)
Other programs tend to use more RAM as they increase in complexity. A chat program or a game like Minesweeper will use almost no RAM, while a gigantic Excel spreadsheet or a huge Photoshop project might use more than a gigabyte all by itself. Modern 3D games also use quite a lot of RAM — often three or four gigabytes, and some use a bit more than that.
That means your need for RAM is entirely dependent on the programs you use. Let’s say you have two Windows computers, one with two gigabytes of RAM, and one with sixteen, that are otherwise identical. If you have no programs open they’ll operate similarily. Load a big Excel spreadsheet, though, and only the latter will still seem responsive.
Choosing RAM for PC tablets
Most Windows tablets will come with somewhere between two and four gigabytes of RAM. This is enough for basic tasks only. A few browser tabs, some email, and one video at a time is fine, but heavy multitasking will quickly become frustrating on most tablets. Because basic PC tablets are intended for these specific light-duty tasks, they’re usually fine (though not exactly quick) with two to four gigabytes.
A few more expensive Windows tablets (usually ones that use Core i3 processors or better) are more similar to laptops without the keyboard. In these machines, try to get as much RAM as your budget will allow. For example, Microsoft’s Surface Pro series comes with up to 8GB. If you intend to use your tablet for occasional work or intense web browsing sessions, it might be worth the upgrade.
Choosing RAM for laptops
New laptops start at two gigabytes of RAM (especially for budget machines and Chromebooks) and go up to eight gigabytes, with some very expensive models offering 12 or 16GB. Systems towards the bottom of this scale are suited only to general web browsing, email, video, and perhaps some casual gaming.
Four gigabytes is about as low as you want to go in Windows or OS X. This is an ideal combination of capability and price for most people. If you intend to run dozens of browser tabs at once, or you plan to do more intensive tasks like high-resolution photo editing, consider a bump up to eight gigs.
Related: Should your next laptop have a quad-core processor? Absolutely!
An upgrade from 4GB to 8GB usually costs about $100 from the manufacturer, but can be more expensive if it’s paired with a faster processor or bigger storage drive. 12GB or more is ideal for powerful laptops often referred to as “desktop replacements,” and is usually only available in the most expensive models.
Choosing RAM for desktops
Small desktop PCs and inexpensive all-in-one models actually have more in common with laptops than typical “tower” PCs, and might come with as little as two gigabytes of memory. Again, four gigabytes is about as low as you want to go for a traditional computer.
RAM for desktops is less expensive than RAM for tablets or laptops, so it’s often easier to find computers with more memory at lower prices. Eight gigabytes is a comfortable middle ground for desktops. If you’re planning on using it as your primary work machine, especially for intense programs or dozens of browser tabs, Office documents, and similar uses, consider upgrading to 12 or 16GB.
(Ian woolcock/Shutterstock)
For the tip top of the desktop world, the sky’s the limit. The most expensive desktops can handle huge amounts of RAM, up to 64GB or more. Most users won’t be able to effectively use more than 16GB even if they try, but high-end programs like 3D modeling or 4K video editing may benefit from these pricey upgrades.
Conclusion
In summary, two gigabytes should be considered the bare minimum, and is only suited for entry-level specialty tablets and laptops, like Chromebooks. Four gigabytes is the comfortable minimum for a Windows or OS X machine, and eight gigabytes provides room to grow. Anything beyond that is only of interest to enthusiasts and power users.
Related: Installing RAM is easier than you think
Remember, RAM is not like a processor, which speeds up all your applications. Installing 16GB is pointless if you never use more than eight. It’s important to consider your needs carefully so your PC doesn’t under-perform and you don’t over-pay.
So there is some trend going on with facts about countries and our member StarOfTheSea94 decided to give you 20 facts about Bulgaria. So if you are one of those that didn’t really have a chance to study about Bulgaria this fact list about this beautiful country might spark an interest to learn more about it. These facts about Bulgaria will show you their scientific, historical, actual, geographical and other interesting information and we are sure you didn’t know about 90% of it so thank us for that! You can even leave a comment if you think something interesting about Bulgaria should be included. So here are some cool 25 intriguing facts about Bulgaria, check them out below:
1. Bulgaria is the only country in Europe that hasn’t changed its name since it was first established. This happened in 681 AD.
2. The oldest gold treasure in the world was found in Bulgaria (in 294 graves were found 3000 gold objects dating back more than 6000 years).
3. Bulgarians shake their heads to mean yes and nod for no.
4. The Bulgarian folk song “Izlel e Delyu Haydutin” by the Bulgarian folk music singer Valya Balkanska was sent in deep space on the board of the US Space Probe – Voyager I, as part of a collection of our civilization’s finest cultural artifacts – a message to an alien intelligence.
5. Lactobacillus Bulgaricus, the bacterium that is responsible for giving Bulgarian yoghurt its unique flavour and consistency, can be found only in Bulgarian air.
6. The Bulgarian army has never lost a single flag in battle.
7. John Vincent Atanasoff was a physicist and inventor of Bulgarian descent, best known for inventing the first electronic digital computer.
8. Nearly one third of Bulgaria is covered in forests.
9. The roses grown in Bulgaria’s “Rose Valley” produce most (70-85%) of the world’s rose oil – a component in most perfumes.
10. The Bulgarian Orthodox Church is the oldest Slavic Orthodox Church.
11. With the accession of Bulgaria to the EU on January 1, 2007, Cyrillic became the third official alphabet of the EU.
12. The first air-dropped bomb in Military History was developed by the Bulgarian Air Force during the first Balkan War and was used on October 16th, 1912 by Lieut. Radul Milkov and Lieut. Prodan Tarakchiev.
13. The Rila Cross is a wooden cross with 140 microscopic scenes from the Bible featuring more than 1,500 figures. The largest of them is no bigger than a grain of rice.
14. Stefka Kostadinova won the high jump of the World Championships in Rome with the sensational 2.09 metres. It has been 28 years since then and no other woman has managed to match or beat this record.
15. Another world record is hold by Yordanka Donkova in 100 metres hurdles. With time of 12.21 min. this record hasn’t been broken for 27 years.
16. Bulgarian actor Zahary Bacharov has a role as tribal leader Loboda in the fifth season of HBO’s hit television series Game of Thrones.
17. In 1976 UNESCO declared the ancient Bulgarian calendar as the most accurate in the world.
18. Rayna Kasabova was a Bulgarian air force pilot and the first womаn in the world who participated in a military flight.
19. Vanga is a famous Bulgarian prophetess. It’s believed that lots of her predictions came true.
20. The Cyrillic script was developed in the First Bulgarian Empire during the 9th century AD at the Preslav Literary School by disciples of the Greek brothers Cyril and Methodius. The Bulgarian Saint Clement of Ohrid is often associated with the creation of the the Cyrillic.
How to build a gaming PC: a step-by-step guide to building the best PC
1. INTRODUCTION
There are two schools of thought when it comes to equipping yourself with a killer new PC. The first is the more risk-averse, recommending you pay someone else to do all the hard work for you.
That way you're delivered a machine that simply works, the moment you ease it from the box. The second school considers such behaviour sacrilegious. Instead, it's forever faithful to its central belief – thou shalt always build, no matter what.
Cheaper chips
Traditionally, self-builds had the advantage of being the cheaper option. The difference may have been slight in some cases, but it was generally always there. Even if a system builder had exactly the components you wanted to build your own machine with, you could generally shop around and pick up the exact same parts for less and save a pretty penny by putting it together yourself.
Many of the more expensive systems do still have the potential for decent savings, but that margin has disappeared in some of the machines we've looked at recently, especially at the cheaper end. This leaves the main reason to build as making sure you don't waste money on components you don't really need. You get to spend the money where it matters most to you.
Say, for example, you wanted to build a machine that will deftly play GTA V, but also have enough raw grunt to handle this year's other big PC gaming release, The Witcher 3: Wild Hunt, then you could set out to build a rig that really pushes graphics performance above all else.
Which is what we're focusing on over the next few pages. A pure gaming machine. But you can follow the general gist of this guide to build whatever it is you want – focusing on whichever area you need your machine to excel in.
2 cOMPONENT SELECTION
Cheaper chips
Traditionally, self-builds had the advantage of being the cheaper option. The difference may have been slight in some cases, but it was generally always there. Even if a system builder had exactly the components you wanted to build your own machine with, you could generally shop around and pick up the exact same parts for less and save a pretty penny by putting it together yourself.
Many of the more expensive systems do still have the potential for decent savings, but that margin has disappeared in some of the machines we've looked at recently, especially at the cheaper end. This leaves the main reason to build as making sure you don't waste money on components you don't really need. You get to spend the money where it matters most to you.
Say, for example, you wanted to build a machine that will deftly play GTA V, but also have enough raw grunt to handle this year's other big PC gaming release, The Witcher 3: Wild Hunt, then you could set out to build a rig that really pushes graphics performance above all else.
Which is what we're focusing on over the next few pages. A pure gaming machine. But you can follow the general gist of this guide to build whatever it is you want – focusing on whichever area you need your machine to excel in.
Intel has stolen a lead over AMD of late, and as games continue to make more and more use of multiple core architectures, we don't see that lead diminishing. If you've got a bit more cash and have a penchant for overclocking, then the unlocked Core i5-4690K is a great buy, but as overclocking isn't guaranteed to net you a boost in your games, this Core i5-4590 makes more sense financially.
It still boasts a refresh of the Haswell core, turbos up to 3.7GHz from its base of 3.3GHz and has a healthy 6MB of L3 cache. The retail spin includes a cooler, which is fine if you're not overclocking.
Motherboard
Asus H97M-E - £72 (around US$114 or AUS$147)
The H97 chipset that you'll find powering this motherboard is almost identical to the top-end Z97 chipset, but with one notable exception – it doesn't officially support overclocking. Given that we've suggested using a locked processor, that isn't an issue, and means we can go for a more price conscious system.
The Asus H97M-E is a bargain motherboard, that give your Socket-1150 Core i5-4590 plenty of room to breath, while supporting USB 3.0 and SATA 6GB/s interfaces as well as an M.2 slot. The only other point of note is that this Asusmotherboard only has one full-length PCI Express 3.0 slot, which means that SLI/CrossFire is out, but we really don't see that as an issue right now.
Graphics card
AMD Radeon R9 290X - £260 (around $413, or AUS$531)
Nvidia may have incredible graphics chips right now, but when it comes to knock-out value, it's hard to beat AMD's R9 290X. Available for as little as £260 if you shop around, the R9 290X has benefited from successive driver updates recently, putting it neck and neck with the more expensive GeForce GTX 970. AMD's chip runs hotter than Nvidia's, but beyond that there isn't much in it.
Both cards will happily run GTA V at high/highest settings, and will handle the likes of The Witcher 3 too (if the recommended specs don't change). If you tend to side with the Nvidia camp, there's nothing wrong with buying that card over this, despite the whole 3.5GB VRAM debacle.
Storage
Crucial MX100 512GB SSD - £145 (around US$230, or AUS$296)
We've been totally won over by SSDs now, and can't imagine loading from a spinning drive, even if our wallets depended on it. There is a slight problem here of course, which is that games are getting bigger and bigger: GTA V weighs in at 65GB.
Factor in the size of the OS itself and a few more games, and those affordable 128GB SSDs aren't as tempting as they once were. We see 256GB as the bare minimum these days, and even that's going to be swallowed up by a modest Steam collection. This is why we recommend the delightfully affordable.
Power supply
XFX Core Edition 550W - £49 (around $77, or AUS$100)
Intel has really hammered down on its power draw with its latest processors and motherboard chipsets, which means you don't need a particularly meaty power supply in order to run them. SSDs aren't as hungry as hard drives either, so it's really only the graphics card that's going to tax your PSU of choice.
Better yet, the R9 290X isn't too demanding, so the whole system is still going to be sat at something under 400W, even under full load. The extra power capacity gives you options for upgrading as you go, and it also means that the PSU is running efficiently. Go with a name you can trust and you shouldn't have a problem, which is why we've gone for the XFX unit.
If there's one area where modern games are more exacting than their predecessors, it's on the memory front. Speed isn't so important, but capacity is. These days, 4GB has become the absolute minimum, with 8GB now the recommendation. And if you can stretch to it, jumping straight to 16GB isn't an awful idea.
In the interests of keeping the overall costs down, we've built this machine around a pair of 4GB DIMMs. You don't have to doggedly track down the particular model number, just go with whatever deal you can find as you're buying the rest of the components. Big names make sense for easier upgrades later of course, but beyond that you've basically got a free rein.
Chassis
Corsair Carbide 200R - £48 (around US$76, or AUS$98)
We've recently built several machines using smaller chassis, just because they no longer limit your component selection, but it's still great to go back to building in a bigger case. The Corsair Carbide 200R impressed us the moment we saw it, and it continues to set the standard by which we judge other chassis.
The tool-free design makes it easy to build in, and there's plenty of room for the R9 290X, due to the fact the drive cages are split at just the right point to accommodate this long card. Cut-outs make cable management as easy as you could hope for, and there's plenty of room for extra cooling should you need it as well. This is an incredible case for the money.
3.PIECE IT ALL TOGETHER
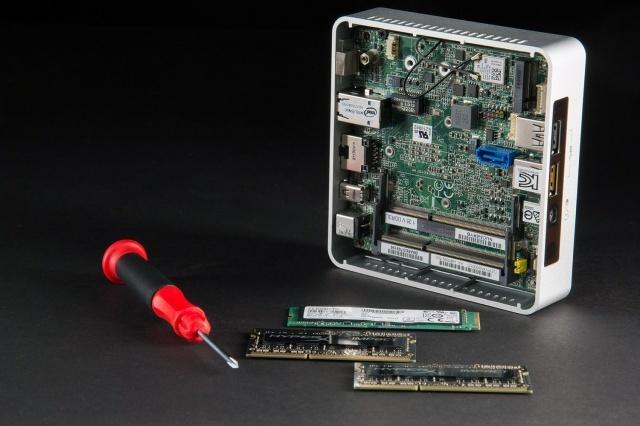
It's time to piece it together, and you'll need this screwdriver:
The Carbide 200R may be a tool-free case, but you'll still need a screwdriver when it comes to securing your motherboard in place.
Before we start, it's worth pointing out that we've made some assumptions when it comes to kit you already own. We take it for granted, for instance, that you have a screen you can plug your new PC into. We also suspect you already have a keyboard and mouse. We assume you've an internet connection - as you may have noticed there's no optical drive. Honestly, we just don't use them any more, and the only thing we can think of doing with them is ripping old music CDs, and even that seems like a hassle.
If you do need one, for whatever reason, we'll work on the basis that you've got one laying around from an old PC that you can cannibalize for the purpose. Failing that, you can pick one up for around £10.
Let's build!
1. Inside out
Remove the motherboard on top of the antistatic bag in which it arrived and then drop the processor in place. Slot in the two memory sticks and gently slide your graphics card into place.
2. Grease-up
Before you attach the CPU cooler to the board, remember to dab on a blob of thermal grease [Image A]. This will ensure that there is good contact between the top of the chip and cooling plate, filling any small scratches and bumps on either surface with thermally conductive goo. A blob roughly the size of a couple of grains of rice will suffice. Don't worry about spreading it; simply attaching the cooler will ensure that it squidges out in a nice even layer.
3. Power play
to the processor socket on this motherboard. Do this without the PSU attached to the mains, just to ensure that everything is plugged in before you give it a jolt. Make sure the main ATX cable is attached, as well as the 8-pin CPU power cable [Image B]. You'll need to attach the 6-pin and 6+2-pin PCIe connectors to the graphics card, too.
Image A
4. Naked boot
Don't worry about attaching your drives at this point. Connect your screen to your graphics card and plug in your keyboard. Power up the PSU and start up the barebones machine – short the power pins on the front panel connector with a screwdriver to get your machine up and running. Check the manual for the PWRBTN location on the mobo.
5. Bios beware
What we're checking for here is that the machine starts up, its fans spin, it gets to the POST screen and it allows you into the BIOS. When it reaches the motherboard logo screen, hit [Delete] and the rig should enter the BIOS setup. Make sure the motherboard is reporting the correct CPU and the right amount of RAM.
6. Start again
Hurrah, the core is working as it should so far! Now shut down the machine and unplug the PSU. Disconnect the power cables from the motherboard and remove the graphics card. You can leave the RAM, CPU and cooler in place as you drop it into your waiting case.
Image B
7. Steady supply
Before you drop the heart of your rig into its new chassis, get the PSU in place first. The Cthulhu's maw of tentacles sprouting from the power supply is much more difficult to manage when the other components are already in place. Orientate the PSU so the intake fan is positioned to suck in air from the outside.
8. Board meeting
Now it's time to get the good stuff in, so attach the mobo backplate into the chassis. Pulling the mass of cables out of the way – you don't want to accidentally trap any leads – screw the mobo risers into the chassis and drop the board in place.
9. Drive time
The next component to add to your Carbide 200R is the bargainous MX100 SSD. You have plenty of options as to where you actually mount this drive, but we've gone for the racks at the front bottom of the case. Attach the SATA cable and you're ready to move on.
10. Be discrete
It's now time to install your Radeon R9 290X. Ensuring you're not trapping any errant wires, drop the graphics card into the primary PCIe slot and screw the bracket into the chassis to keep it safe and secure.
Image C
11. Panel power
Plug the chassis front panel connectors to the motherboard pins [Image C]. It's worth consulting the manual to locate the connector for the front panel audio and USB headers. You know where the power pins are – the reset switch, storage and power lights will be in the same place. Attach the cables securely.
12. Cable ties
obstruct the airflow throughout the chassis. Plug in the long motherboard power cable first, and then the CPU, GPU and storage power connectors, and make sure the fans are powered too.
13. Clear air
That's all the essentials taken care of, so now you're ready to connect your screen, keyboard and mouse. Leave the side off the case when you boot up for the fi rst time so you can ensure all the fans are spinning properly. Press the power button and your build should spring into life. Once
14. RAM-ing speed
In the BIOS, check that the CPU temperature is normal (anything below 40-50ºC) and make sure the storage drive is now visible and set as the primary boot option. It's also worth nipping in to check the RAM settings and get the sticks running at their rated frequency using the relevant profiles. Save your BIOS settings and exit.
Image D
15. OS Install
With modern rigs, you're unlikely to have an optical drive to install your operating system from, so you'll need to create a USB install on another PC [Image D]. Check out http://goo.gl/XCqsWo to read our easy guide to making a Windows 8.1 install. If you're feeling brave (and haven't bought a Windows licence), you can download an ISO of the Windows 10 preview installation, which we've been using for a while and had absolutely no problems with.
16. Boot and go
With your chosen USB media attached, boot from it via the BIOS and go through the setup procedure. Whatever OS you're running, this is pretty painless these days. Once completed, the most important thing will be to make sure that you have net connectivity. When you're done, update your graphics card drivers.
A PC for the games to come
We've put together a great PC without spending a fortune. This is testament to the current state of the PC industry – there's incredible hardware at the high end, but aim slightly lower than that and you have the perfect combination of great performance and fantastic value for money.
Here is a machine that will last you at least a couple of years of cutting-edge gaming, yet it doesn't have the kind of price tag that you'd expect. With the hardware rolling in at under £800, there's a lot to like here.
We've built this machine with a specific purpose in mind – getting the most out of the serially delayed GTA V (and as an aside, the soon-to-be- released The Witcher 3: Wild Hunt). Whatever reason you're building your machine for, the same underlying logic behind component selection and the building process remains the same.
Embark on a wild hunt
As for this build, the good news is that all those delays to the release of GTA V appear to have been spent tweaking and honing the engine to make sure that it's optimised for PC. We ramped pretty much every setting we could find to maximum and the game continued to run at 60fps.
One setting we would recommend hunting out is the High- Resolution Shadows setting, which can be found under the Advanced Graphics setting menu – this just makes an incredible difference to how great the game looks. To be fair, this machine is probably overkill for GTA V.
You could build a much cheaper gaming PC that would still hit 60fps in Rockstar's latest. Ultimately, we've aimed so very much higher here because we just wanted to build a rig that will be able to handle anything that's going to be released this year. To that end, we're happy with what we've achieved for.