Translate

Showing posts with label Computer Help's. Show all posts

2022/07/07

HOW your PC to get faster internet speed?

                                              HOW your PC to get faster internet speed?


-Windows-Search- Create Restore Point on Local Disk C.

-Configure Restore Settings-Turn ON System Protection and space to Min. %1.

-Check for Update and Update.

-Windows-Search- Power Plan-Choose Power Plan-Show additional Plans

-Choose HIGH PEFORMANCE-Change Plan Settings-Change Advanced Power settings

-Turn off Hard Disk after - 5 min.

Down- Processor Power Management-Minimum Processor State - 100%

                                                             -Maximum Processor State - 100%

-Windows-Search- CMD- Command Prompt right click and - RUN AS ADMINISTRATOR

-TUPE-   SFC /Scannow

- DISM /Online /Cleanup-Image /ScanHealth

- DISM /Online /Cleanup-Image /RestoreHealth - in case something is corrupt.

- Download TCP Optimizer 4: https://www.speedguide.net/downloads.php

-Windows-Search-TCPoptimizer.exe and RUN AS ADMINISTRATOR

-Click on CUSTOM SETTINGS - 

               - CHANGE - Connection Speed-100+Mbs

               - Check on Modify All Network Adapters 

               - TCP Windows... - normal

               - W.S.Heuristics - disable

               - C.C.Provider - ctcp

               - R.S.S. - enable

               - R.C.C. - enable

               - TTL - 64

               - ECN - disable

               - C.O. - disable

               - TCP C.O. - disable

               - L.S.O. - disable

               - TCP 1323 T - disable 

-Click on ADVANCE SETTINGS - 


Apply Changes and REBOOT.

Thanks

2019/01/17

14 КОМБИНАЦИИ НА КЛАВИАТУРАТА, ЗА КОИТО МАЛКО ХОРА ЗНАЯТ

14 КОМБИНАЦИИ НА КЛАВИАТУРАТА, ЗА КОИТО МАЛКО ХОРА ЗНАЯТ

 Така че, представяме на вашето внимание  14 комбинации с бутон „Win“, за който много от вас може би не са знаели.

1. ALT + Backspace Кой от нас поне не е изтрил част от текста случайно? Е, тази комбинация отменя последното премахване и възстановява изгубената дума или изречение. Не е необходимо да въвеждате текста отново!

2. CTRL + ALT + TAB Тази комбинация Ви позволява да видите всички отворени прозорци и да се движите между тях.

3. ALT + F4 Този пряк път е предназначен за затваряне на прозорец или програма.

4. F2 Бутонът F2 ви позволява да преименувате файлове и / или папки.

5. CTRL + SHIFT + T Тази комбинация отново отваря последния затворен раздел.

6. Windows + L Комбинацията от клавишите, показани на фигурата, ви позволява да излезете от системата („излизане“).

7. CTRL + SHIFT + N Искате ли да създадете нова папка? Няма нищо по-лесно. Натиснете CTRL + SHIFT + N.

8. CTRL + SHIFT + N (Chrome) В Google Chrome същата комбинация отваря нов раздел в режим „инкогнито“ в нов прозорец.

9. CTRL + T И този пряк път създава нов раздел във всеки браузър.

10. CTRL + ALT + DEL В зависимост от версията на Windows, тази комбинация отваря диспечера на задачите или центъра за защита.

11. CTRL + SHIFT + ESC Отваря диспечера на задачите.

12. ALT + TAB Комбинацията от тези бутони ви позволява да навигирате между прозорците на браузъра.

13. CTRL + Esc Отваря менюто „Старт“.

14. Windows + TAB Тази комбинация Ви позволява да виждате всички отворени прозорци на вашия компютър.

Както вече споменахме по-горе, използвайки тези комбинации от клавиши, ще опростите значително работата си и ще спестите време.

2019/01/16

How to Access Windows 10 BIOS in 6 Easy Steps

How to Access Windows 10 BIOS in 6 Easy Steps


Windows 10 offers many personalization options, but if you want to change something integral like how your computer turns on, you'll have to do so in the BIOS. 
What are the BIOS, you ask? BIOS stands for basic input/output system, and it controls the behind-the-scenes functions of your laptop, such as pre-boot security options, what the fn key does, and boot order of your drives. In short, BIOS is connected to the motherboard of your computer and controls most everything.
While they are plenty of customizable options you can achieve from the front-end of Windows 10, only BIOS can change certain settings. 

How to enter Windows 10 BIOS

  1. In 'Settings,' select 'Update & security.'
  2. Select 'Recovery.'
  3. Choose 'Restart now.'
  4. After your computer restarts, select 'Troubleshoot' from the menu that appears.
  5. Click 'Advanced options,' then choose 'UEFI Firmware Settings.'
Accessing BIOS on Windows 10 is not the most intuitive process. This article will take you through it step-by-step, with photos. 

Windows 10 BIOS

The BIOS used to be accessible on older devices by hitting F1 or F2 as the computer powered on. If you own a device that's been made in the past four years, it probably turns on too fast to hit a key in time. That's where this guide picks up. 
Another important note: newer devices typically contain a newer version of BIOS called User Extensible Firmware Interface (UEFI). UEFI is expected to completely replace BIOS eventually. 
Now, let's dive into how to get to your Windows 10 BIOS. 

How to access BIOS Windows 10

You can access BIOS through the front-end of your Windows 10 device. Here's how: 

1. Open 'Settings.'

You'll find 'Settings' under the Windows start menu in the bottom left corner. 
how-to-enter-windows-10-bios

2. Select 'Update & security.'

This is the last option on the page. 
how-to-access-bios-windows-10

3. Under the 'Recovery' tab, choose 'Restart now.'

In 'Update & security,' choose 'Recovery' from the sidebar menu.
windows-10-bios
There will be a button to 'Restart now.' Once you click on this, it will restart your computer right away. So be prepared for that — have anything of importance saved and closed. 

4. Select 'Troubleshoot.'

After your computer restarts, a new screen will appear in place of the typical login screen. From this menu, choose 'Troubleshoot.'
bios-windows-10

5. Click on 'Advanced options.'


how-to-get-to-bios-windows-10

6. Select 'UEFI Firmware Settings.'

It's the last option on the menu. 
how-to-open-bios-windows-10
Once you click on this, you'll be inside your BIOS, or UEFI. From there, you can make specific changes on how your computer starts, when security software runs, and more. Exercise caution when poking around in the Windows 10 BIOS, however. Any changes you make can have unexpected repercussions if not made correctly. 


2018/08/08

system restore points

How to create Windows 10 system restore points automatically on startup

You can create system restore points every time Windows 10 starts, and in this guide, we'll show you how to do it.
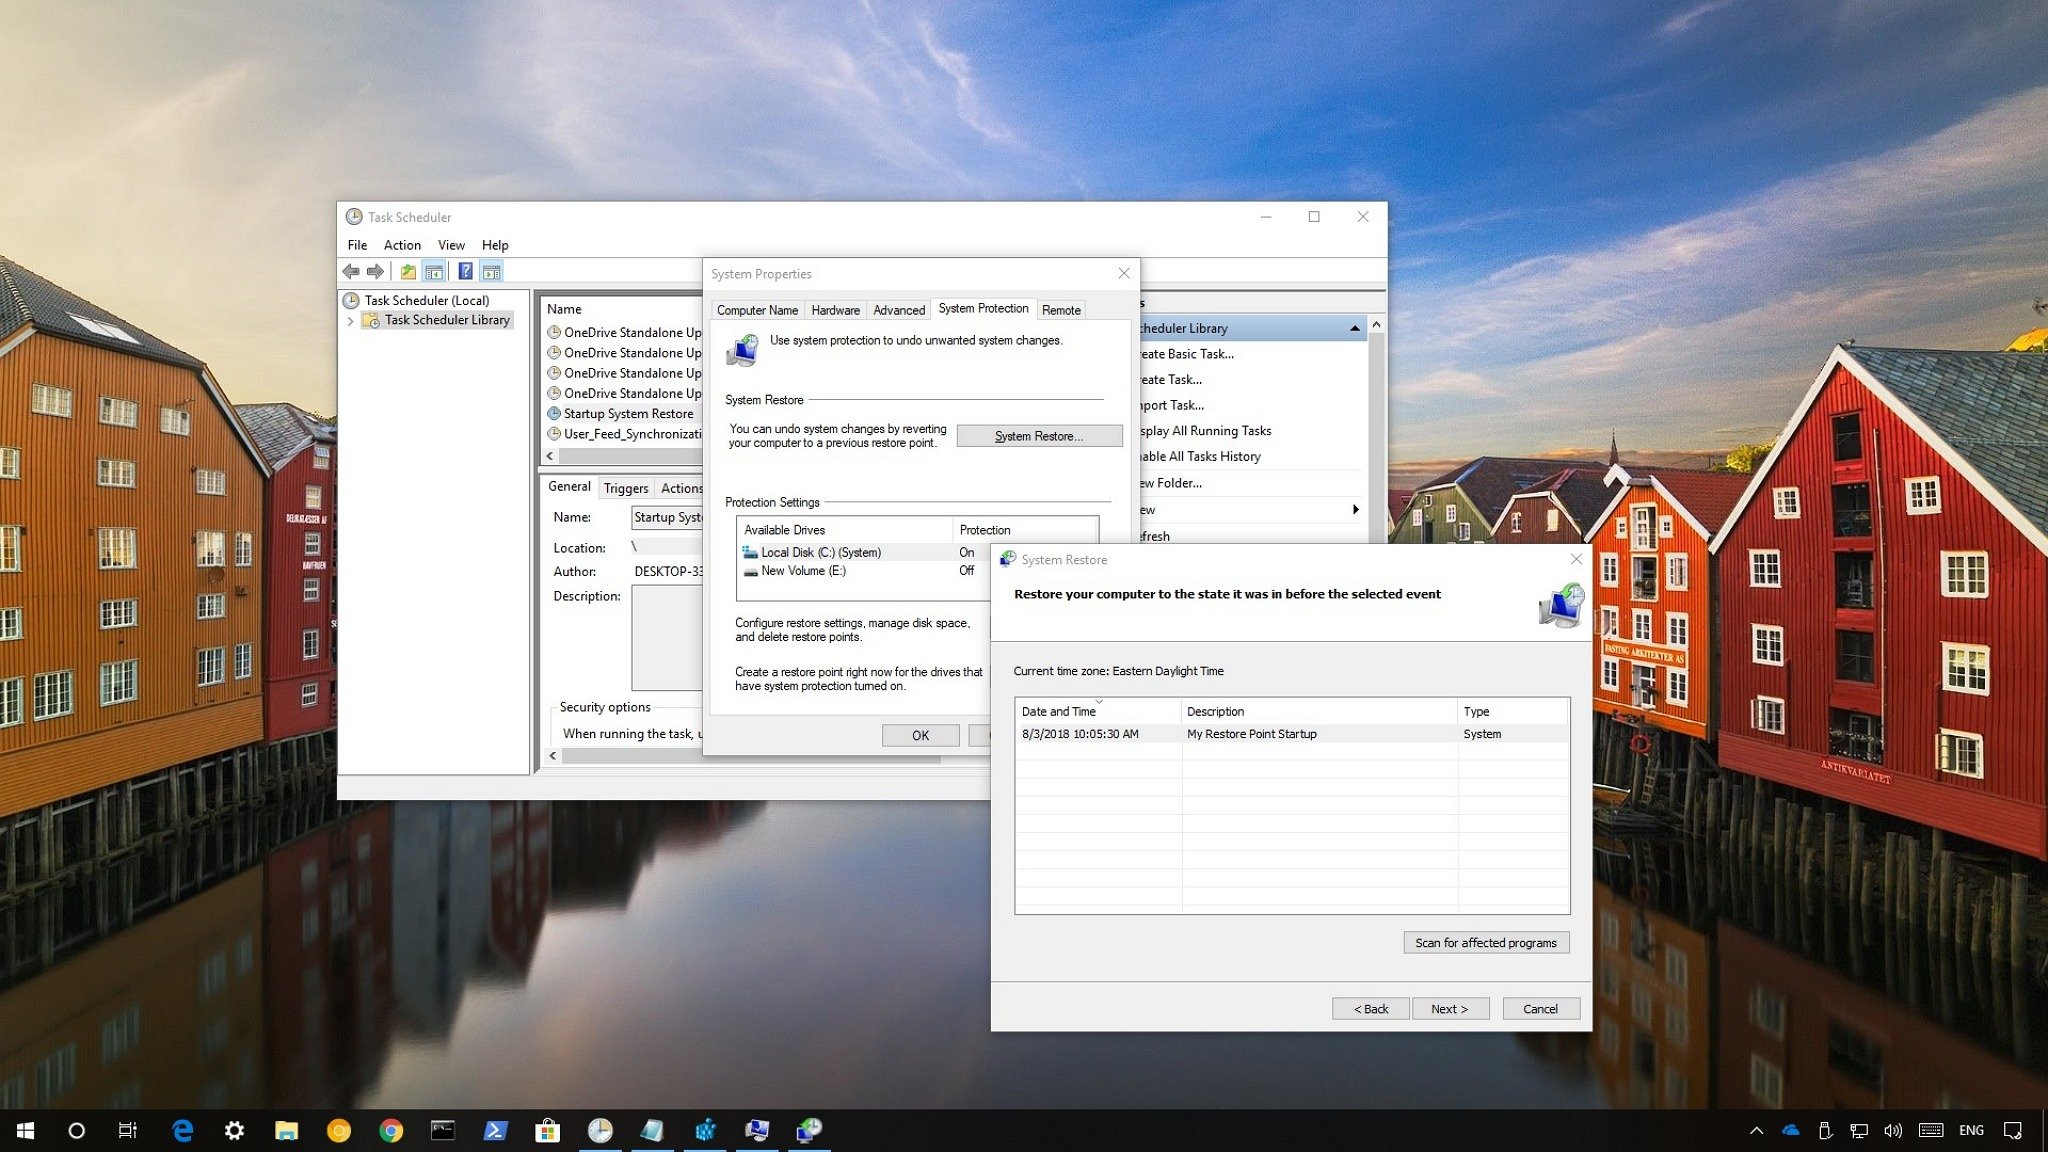
On Windows 10, System Restore is a feature that works like a time machine that takes your computer to an earlier point in time to reverse system changes using a restore point. This feature is particularly useful to recover from a number of issues when your device isn't working correctly without affecting your files.
Usually, new restore points are created automatically before a significant event occurs, such as when installing a new app, driver, or software update, and you can even trigger them manually. The only caveat is that using a restore point that isn't recent may end up undoing many unnecessary changes. However, if you want to make sure there is always a fresh restore point available, you can configure System Restore to generate additional checkpoints every time you start Windows 10.
In this Windows 10 guide, we'll walk you through the steps to use Task Scheduler along with a PowerShell command to create restore points automatically during startup.

How to create system restore points at startup

To create automatic restore points during startup, you must enable System Restore, disable the restore point creation frequency option, and use Task Scheduler to create a task to automate the restore point process every time your computer starts.

Enabling system restore point service

On Windows 10, System Restore comes disabled by default, but you can use these steps to enable the feature:
  1. 1.Open Start.

  2. 2.Search for Create a restore point and click the top result to open the experience.

  3. 3.Under "Protection Settings," if your device system drive has "Protection" set to "Off," click the Configure button.


4.Select the Turn on system protection option.
  1. 5.Click Apply.
  2. 6.Click OK.
Once you've completed the steps, you can continue with the steps below to configure System Restore to create restore points during startup.
If you want to disable System Restore, you can use the same instructions, but on step No. 4, make sure to select the Disable system protection option.

Disabling system restore point frequency

When you enable System Restore, Windows 10 doesn't create additional automatic restore points if there's another restore point that has been created within the last 24 hours. Although this restriction won't apply when triggering a new restore point manually or automatically as a result of an app, driver, or update installation, it'll prevent Task Scheduler from creating restore points during startup. However, it's possible to avoid this problem by disabling the frequency option using these steps:
Warning: This is a friendly reminder that editing the Registry is risky, and it can cause irreversible damage to your installation if you don't do it correctly. It's recommended to make a full backup of your PC before proceeding.
  1. 1.Use the Windows key + R keyboard shortcut to open the Run command.
  2. 2.Type regedit, and click OK to open the Registry.
  3. 3.Browse the following path:
    HKEY_LOCAL_MACHINE\SOFTWARE\Microsoft\Windows NT\CurrentVersion\SystemRestore
    Quick Tip: On Windows 10, you can now copy and paste the path in the Registry's address bar to quickly jump to the key destination.
  4. 4.Right-click the SystemRestore (folder) key, select New, and click on DWORD (32-bit) Value.

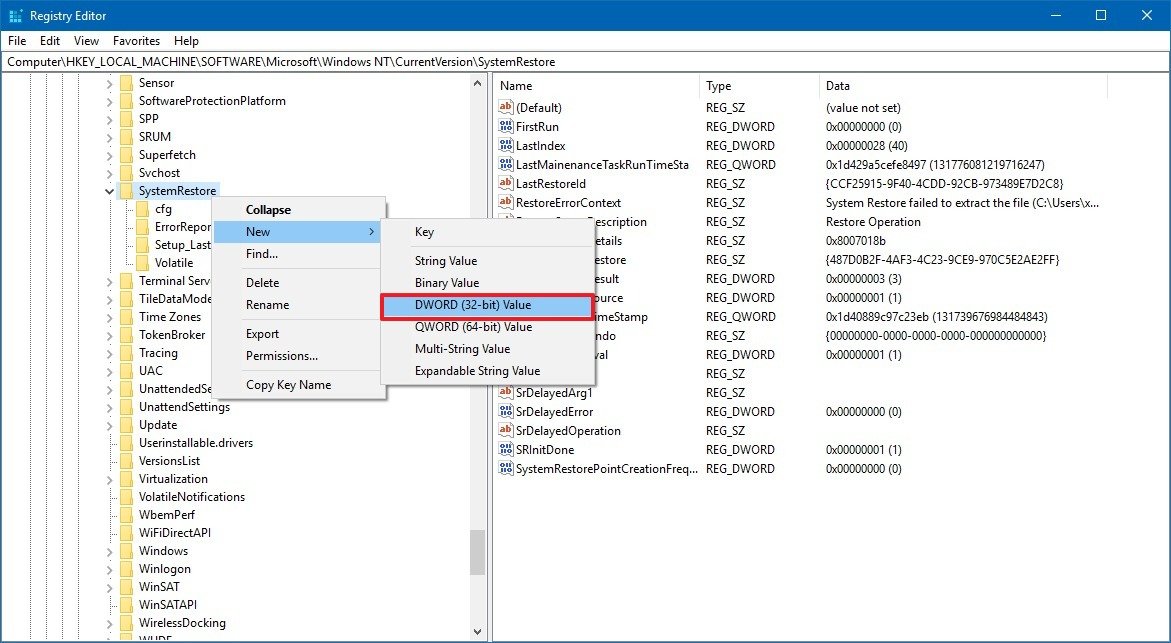
  1. 5.Name the key SystemRestorePointCreationFrequency and press Enter.
  2. 6.Double-click the newly created key and make sure its value is set to 0.
  1. Name the key SystemRestorePointCreationFrequency and press Enter.
  2. Double-click the newly created key and make sure its value is set to 0.
  1. 7.Click OK.
After completing the steps, Task Scheduler should be able to run the task with the corresponding command to create new restore points at every startup.
Windows 10 is very savvy at controlling the number of restore points that can be stored on your device, as such, you shouldn't be worrying about running out of space when disabling this feature.
If you no longer want to create new checkpoints at startup, you can always revert the Registry changes using the same instructions, but on step No. 4, make sure to right-click the SystemRestorePointCreationFrequency DWORD and select the Delete option, and then delete the task using the steps below.

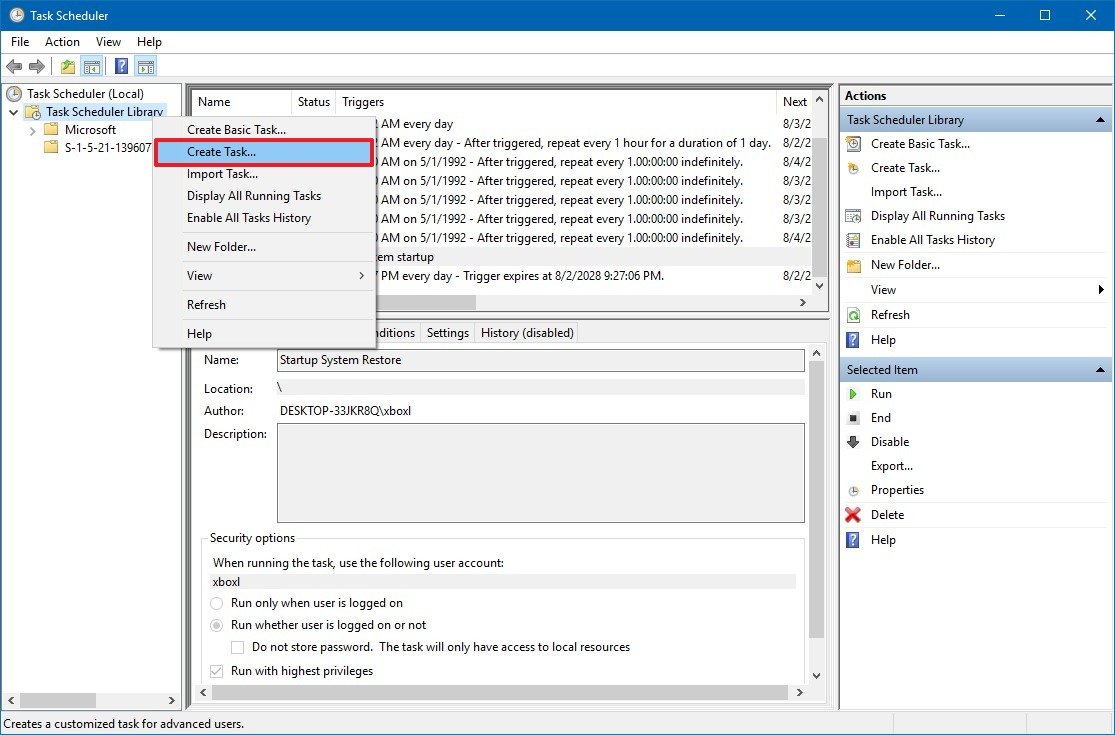
Creating a system restore point during startup

The next step is to use the Task Scheduler to create a new task that will run at startup to trigger a new restore point using these steps:
  1. 1.Open Start.
  2. 2.Search for Task Scheduler, click the top result to open the experience.
  3. 3.Right-click the Task Scheduler Library folder.
  4. 4.Click the Create Task option.

  1. 5.Click on the General tab.
  2. 6.In the "Name" field, type a descriptive name for the task. For example, My Restore Point Startup.
  3. 7.Under "Security options," select the Run whether the user is logged on or notoption.
  4. 8.Check the Run with highest privileges option.

  1. 9.Click on the Triggers tab.
  2. 10.Click the New button.
11.Use the "Begin the task" drop-down menu and select the At startup option.
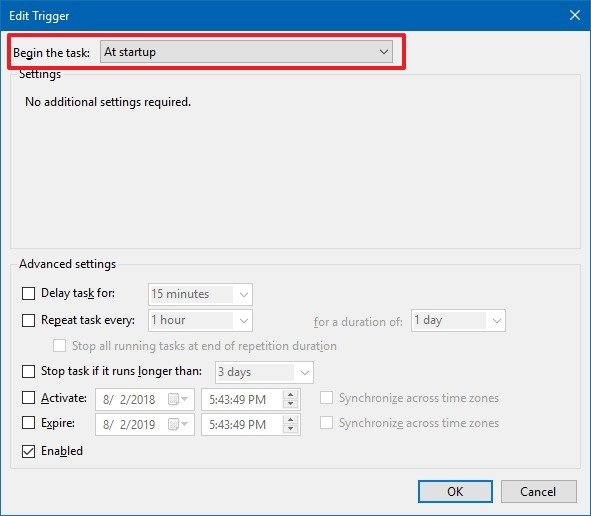
12.Click the OK button.13.Click on the Actions tab.14.Click the New button.

  1. 15.Use the "Actions" drop-down menu and select the Start a program option.
  2. 16.In the "Program/script" field, type the following command:
    powershell.exe
  3. 17.In the "Add arguments (optional)" field, type the following command:
    -ExecutionPolicy Bypass -Command "Checkpoint-Computer -Description \"My Restore Point Startup\" -RestorePointType \"MODIFY_SETTINGS\""

  1. 18.Click the OK button.
  2. 19.Click the Conditions tab.
  3. 20.Under "Power," clear the following two options:
    • Stop if the computer switches to battery power.
    • Start the task only if the computer is on AC power.

  1. 21.Click the OK button.
  2. 22.Specify the password for your account.
    1. 23.Click the OK button.
    Once you've completed the steps, the new task will appear in the Task Scheduler Library folder, and it'll run to create a new system restore point every time you start your device.
    You can always stop running the task by right-clicking the task inside the "Task Scheduler Library" folder and selecting the Delete option.

    Checking system restore points

    After following the above instructions, you can make sure that system restore points are being created by restarting your device, waiting around five minutes, and using these steps:
    1. 1.Open Start.
    2. 2.Search for Create a restore point and click the top result to open the experience.
    3. 3.Click the System Restore button.
    4. 4.Select the Choose a different restore point or click the Next button.
    After completing the steps, if the task ran as expected, a new restore point with the "My Restore Point Startup" description should appear in the list.
    If you're not seeing new restore points being created, review the steps as the problem is likely a typo or mistake in the command.
    Moving forward, every time you turn on or reboot your device, Windows 10 will create a restore point that you can use to revert system changes if your computer isn't working correctly without affecting your files or removing many of the configurations you may have recently made.

How to Copy Your Windows Installation to an SSD

How to Copy Your Windows Installation to an SSD


If you’re looking to upgrade your computer to a solid-state drive but don’t want to start everything back up from scratch, here’s how to transfer your data onto your new hard drive.

How to Copy Your Windows Installation to an SSD

If you're still using a traditional, spinning hard disk on your computer, you're missing out. Swapping it out for a solid-state drive (SSD) is one of the best upgrades you can make in terms of speeding up your computer. Your computer will boot faster, programs will launch instantly, and games won't take so long to load..
You could reinstall your Windows installation from scratch, if you wanted to, and start new with a fresh, squeaky-clean system. But while it seems simpler, it's actually more of a hassle. As long as you follow these instructions to the letter, you should be back up and running in no time, with all your data intact.
You'll need a few things before you get started:
Samsung SSD 860 Pro 1

What You'll Need: An SSD

Obviously, in order to upgrade to an SSD, you'll need to...well, buy an SSD. We have some recommendations here, though if you're on a pretty strict budget, we have a separate list of cheap SSDs as well. Make sure to buy one big enough to fit all your data—if you have a 500GB hard drive now, you should probably spring for a similarly sized SSD. The only exception is if you're on a desktop computer, and have room for multiple hard drives. In that case, you could store Windows and your programs on the SSD while putting your music, movies, and other data on a second, larger hard disk.


What You'll Need: A USB-to-SATA Dock

During this process, you'll need both your SSD and your old hard drive connected to your computer at the same time. If you're using a laptop with only one hard drive slot, that means you'll need an external adapter, dock, or enclosure that can connect your bare SSD to your computer over USB. (Again, desktop users may not need this if they have room for two drives inside their PC—you can just install it internally alongside your old hard drive.)


What You'll Need: EaseUS Todo Backup for Windows

There are many different drive cloning tools on the market, but when cloning a hard drive to SSD, I recommend EaseUS Todo Backup. Download the free version, enter your email and subscribe to the newsletter to get the download link, but it's worth it, and you can just unsubscribe later. When installing, don't worry about setting your default folder for backups—we won't be using that feature, so you can put it anywhere for now. It'll bug you a few times to upgrade to the paid home version, but just tell it to stick with the free version. That's all you'll need.


Once you've gathered up those necessities, it's time to get started.

Back Up Your Data (and Free Up Space, if Necessary)

Before you start messing with drives and formatting partitions, it's absolutely necessary to back up your data first. A simple misclick can result in you erasing everything, so do not continue until you've backed up all of your data. If you aren't backing up your computer, here's our favorite software for the job—though for today's purposes, copying your important data to an external drive will do in a pinch.
If you're upgrading to an SSD that's smaller than your current hard drive, you'll want to take extra care here. This isn't as common as it once was, thanks to bigger, less expensive SSDs, but if that's the case for you, you'll need to delete some files and free up space on your hard drive before cloning it. Otherwise, your data won't fit. In that case, I recommend making sure that data is backed up to an external hard drive before continuing, unless you're okay with deleting it all permanently. Once your data is safe and secure, continue onto the next step.

Plug in and Initialize Your SSD

Plug your SSD into the SATA-to-USB adapter, and then plug that into your computer. If it's a brand new drive, you probably won't see the drive pop up in Windows Explorer, but don't worry; it just needs to be initialized first. Open the Start menu and type "partitions" in the search box. Click the "Create and format hard disk partitions" option, and Disk Management will open. It'll prompt you to initialize the drive using either the GPT or MBR partition table. I'll be using MBR for my SSD, since I have an older motherboard in this PC that doesn't have UEFI, and thus can't boot from GPT disks. If you have a newer PC, you might be able to use GPT, but when in doubt, use MBR.
If you aren't prompted to initialize the drive, and don't see it in Disk Management, double-check that it's properly connected to your computer, and that the enclosure or dock is turned on (if necessary).
Once the drive has been initialized, you should see the drive show up in the bottom pane of Disk Management, as unallocated space. You still won't see it in Windows Explorer, but that's okay, since EaseUS will be able to see it. Close Disk Management and continue to the next step.

Clone Your Hard Drive

Open EaseUS Todo Backup and you'll be greeted with an empty window. Click the "Clone" icon in the left sidebar—it's the one with two squares, near the bottom—and select the hard disk with your C: drive as the source. Be sure to check the box for the entire Hard Disk, not just the C: partition itself, since you'll need to clone the "System Reserved" partition as well. Click Next.
On the next page, you'll choose the target disk. In this case, that's your SSD. Again, select the entire disk by checking the box next to "Hard Disk," and make absolutely sure you're selecting the SSD, since whatever drive you select in this step will be erased. Thankfully, our SSD is empty, unallocated space, so we don't need to be worried about erasing anything important.

Align Your Partitions

Before moving on, click the "Advanced Options" button and check the "Optimize for SSD" button. This is important, since it'll align the partitions in a way that ensures you're getting the maximum speed out of your SSD. Click OK, then click Next. EaseUS will ask to confirm your choice, and give you a preview of how much space will be used on your SSD. Click Proceed to begin the process.


Wait...and Wait, and Wait

This may take a few hours, especially if your hard drive and SSD are rather large. So go binge-watch some Netflix and come back in a while. When it’s done, click the "Finish" button. You should see your new SSD in Windows Explorer, complete with all your data.

Install Your SSD

Next, shut down your computer. It's time to install that SSD in your computer permanently. If you have a laptop with only one hard drive slot, you'll need to remove your old hard drive and replace it with your SSD. This is a bit different on every laptop, but you can get a general idea of the process with our guide here. If you have a desktop PC with more than one hard drive slot, you can leave your old hard drive in as extra storage, and just install your SSD alongside it.


Reboot From Your New Drive

Once you're finished installing the SSD, you'll need to tell your computer to boot from it. (This may not be necessary on laptops with just one drive, but if you experience problems booting, it can help on some PCs.) Turn your computer on and enter its BIOS/UEFI setup—this is a bit different on every PC, but it'll usually say something like "Press DEL to enter setup" on the boot screen, so you'll want to press the corresponding key as it starts up.
From there, look for your BIOS' boot options. These will be in a different spot depending on your computer, but once you find them, you'll want to select the option to change the boot sequence. Choose your SSD from the list as the first boot drive, then head back to the BIOS' main menu to exit, saving your settings. Your computer will reboot, and if all went well, it should plop you back into Windows faster than ever before. Open Windows Explorer and check to confirm that your SSD is, in fact, the C: drive. If everything looks good, you're ready to rock, and your computer should feel significantly snappier without having to reinstall a thing.


2018/05/08

How to Use the Parental Controls in Windows 10

How to Use the Parental Controls in Windows 10


Parental controls can help keep your children safe when they use the computer. For example, you can restrict which programs they can run and which websites they can visit, limit how much time they can spend on the computer each day, and also get detailed reports on their activity. Here's how to turn on and tweak the parental controls for each child account in Windows 10


https://www.laptopmag.com/articles/parental-controls-windows-10

To use Windows' parental controls, you'll need two things: You have to log into Windows with your Microsoft account (not a local account) and the account you want to manage has to be set up as a child account in Windows. With Windows 10, your child will also have to use a Microsoft account to log in. This is a change from previous versions of Windows, but it allows you to apply the parental control settings across all the Windows devices your child uses and manage the settings from the web. If your child doesn't have a Microsoft account or an email address, Windows 10 will prompt you to create one when you set up the child account.


parentalcontrols win top


Once you have the child account created in Windows, you can start using the parental controls available from the Microsoft Family web portal (previously called Family Safety). In the steps below, we'll walk through all of the settings that can help you manage your children's computer usage.

Log onto Microsoft Family and Review Your Child's Computer Activity

1. Sign in to https://account.microsoft.com/family#/ with your Microsoft account. A link to this page is also available under your Accounts settings (in the Settings app, Accounts > Family & other users).

parentalcontrols win managechildaccount

 Click your child's name.
3. Review and adjust the Activity reporting settings on the main account page for your child. Activity reporting and weekly email reports are on by default. You can uncheck or toggle these settings off and also view your child's web browsing activity and apps usage on this page.
parentalcontrols win activity reporting
Block specific sites or apps your child has previously accessed by clicking the "Block" link next to them. For URL blocking and web browsing reporting to work, your child will need to use Microsoft Edge or Internet Explorer, so you'd have to block Chrome and other browsers if you want these features.

parentalcontrols win activity web

Adjust Parental Control Settings

From here, you can navigate to one of the parental control settings using the dropdown box at the top of the page (it currently says "Recent activity").

parentalcontrols win menu

Here's what you can change for web browsing, apps and games, screen time, purchases, and Xbox privacy settings:

Web Browsing Settings

1. Toggle inappropriate content blocking off or on. Adult content is blocked by default. You can change that setting if you want here.

parentalcontrols win webbrowsing2

2. Add URLs for any websites you want to allow your child to always be able to access or always want to block.

parentalcontrols win urls

Apps, Games & Media Settings

1. Allow or don't allow kids to download mature apps and games. By default, inappropriate apps and games (e.g., mature movies and games) are blocked.

parentalcontrols win apps


2. Select the appropriate age ratings for apps, games, and media from the Windows Store with the age dropdown box.


parentalcontrols win ageratings

Screen Time Settings

1. Turn on time limits. These are off by default.

parentalcontrols win screentime
2. Choose the times your child can use the computer. For each day, you can set a start and end time, as well as a time limit (e.g., 4 hours on Saturdays but 2 hours on weekdays. You can also block access all day). If the child exceeds the time limits or it's not within your set timeframes, a warning will popup and require an adult to log in to regain access to the computer.

parentalcontrols win screentime limits

Purchase & Spending Settings

1. Review your child's spending in the Store. This page shows your child's purchase history with the Microsoft Store and the Xbox store.
2. Add money to your child's Microsoft account. If you want to allow your child to make some purchases--without racking up thousands on virtual coins--you can add money to his or her Microsoft account and keep your credit card out of it.

parentalcontrols win purchase

Xbox Privacy Settings


Xbox Privacy Settings

This takes you to the privacy settings web page for Xbox. If your child has an Xbox account, you can set whether your child can see other's Xbox Live profiles, use video on Xbox Live, share or see custom content such as images in games, and more. In addition to these global Xbox settings, you can also tweak specific Xbox One Online and Xbox 360 Online settings, such as restricting downloads to only free games or blocking multiplayer games.


Portulaca Oleracea

  La maggior parte delle persone non sa quanto sia importante questa pianta: Portulaca Metodo semplificato con istruzioni: Ricerca della Por...