Translate

Showing posts with label Computer's. Show all posts

2017/12/18

How to set up a Windows 10 laptop for your kid

How to set up a Windows 10 laptop for your kid


Use Microsoft's Family Settings to create a safe environment for your child.
If you are buying a Windows laptop for your child as a holiday present or because it's required for school, then you need to know how to set it up with Microsoft's parental controls to cordon off certain corners of the Internet. You can even set up time limits and sign up to get a weekly report on your kid's online activity. Let's get started.

Create an account for your kid

Microsoft allows you to create separate accounts for children, which you, as the adult in the room, can then manage. After signing into your own Microsoft account on your kid's laptop, go to Settings > Accounts > Family & other usersand click Add a family member. Next, select Add a child and then click The person I want to add doesn't have an email address to create an account if your child doesn't already have a Microsoft account.
create-account-for-child-windows-10After creating an account for your child, you will then need to log in to your account and, to prove you are an adult, provide your credit card information and agree to a $0.50 charge, which Microsoft will donate to charity. Upon making your tiny charitable donation, your kid's account will no longer be listed as "pending" on the Family & other people page in Settings, and you can start setting parental controls.

Family safety first

From Settings > Accounts > Family & other users, you'll see a link for Manage family settings online below your accounts in the Your Family section. The link will open Microsoft's Family Settings website. Make sure you sign into your own account on this site; if you are signed in under your child's account, you won't be able to access the family settings.
After signing in to your own account, click Family in the top right to view your family members. Under your child's account, you'll see four items listed: Activity, Screen time, Content restrictions and Spending.
For Activity, the setup is simple. Toggle on Activity reporting, which shows you the searches and web history of your child along with the apps and games he or she has used. You can view this information on the Activity page and also click a toggle switch to get a weekly report emailed to you.
family-settings-activityFor Screen time, you can set time limits for the laptop or PC registered to your child's account as well as an Xbox. If your kid tries to use the laptop outside the time window you set, he or she will not be able to log into their account and will be told to either log into a different account or turn off the PC.
For Content restrictions, you can set an age restriction for apps, games & media as well as for web browsing. For the latter, you can blacklist sites you know you don't want your child accessing or you can create a whitelist and allow access only to the sites you specifically add. Microsoft tracks usage only in its Edge browser, but to prevent unfettered internet access from another browser, Microsoft blocks Chrome, Firefox, Opera and a few other browsers by default. Also in Content restrictions, you can require Microsoft Store purchases to get your approval first.
family-settings-content-restrictionsFor Spending, you can add money to your kid's account as sort of a digital allowance for the Microsoft Store. 

2017/01/16

How To Use Blue Light Filter In Windows 10 And Save Your Eyes From Strain

How To Use Blue Light Filter In Windows 10 And Save Your Eyes From Strain


Short Bytes: Microsoft has added blue light filter option in its Windows 10 operating system. This feature was added in Windows 10 Build 15002. To use this option, you need to go to the display settings and look for the Blue light setting. Here, you get the choice to let Windows reduce blue light automatically or choose the settings manually.
Ever felt the problem of watery eyes when you wake up from sleep to work on your laptop screen? We’ve already told you about a widely popular app named f.lux, which works on Windows, Linux, and mac OS. Recently, Google and Apple also launched Night Mode feature in Android and iOS, respectively.

Now, Microsoft has decided to add an inbuilt feature in Windows 10. But, before going ahead and discussing it further, let me tell you the need for options/programs to decrease the blue light. Can’t I just decrease the brightness and reduce the strain?
Even after decreasing the brightness, blue light emissions from screen are still high enough to swell your eyes with water. There’s a receptor cell named Melanopsin beside rods and cones in our retina. Melanopsin is blue light sensitive. Well, I think that’s enough biology, let’s tell you about the newly introduced Blue Light Settings in Windows 10.

Windows 10 Creators Update: Blue Light Filter

Recently, Microsoft launched Windows 10 Insider Build 15002. It’s a massive release that brings along many new features like Blue Light reduction mode, Dynamic Lock, Microsoft Edge improvements, Start and Shell improvements, etc.

How to use Windows 10 Blue Light filter?

Note: Please make sure that you’re running the latest Windows 10 Insider Build 15002. If you’re not running it, to do so, you need to read How to join Windows 10 Fast Ring from this tutorial and grab the latest build.
Windows 10 Blue Light Filter setting is very easy to set up and use. This means that it comes with a cleaner and fewer configuration options. You get the option to adjust the screen’s color temperature automatically, toggling it on and off, and set personalized hours.
To enable the Blue Light mode in Windows 10, you need to follow these steps:
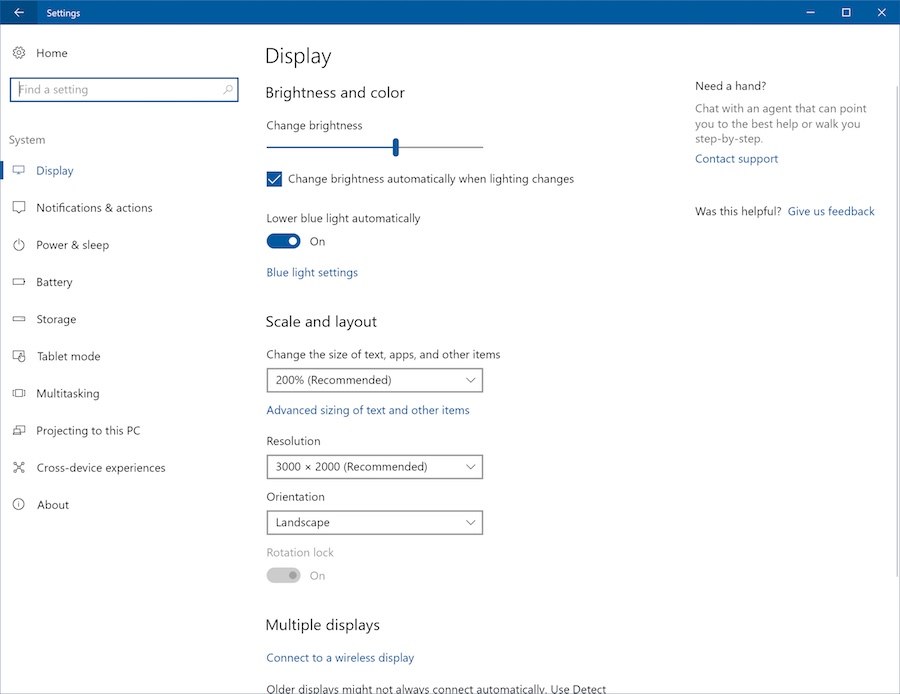
  • Simply open the Settings app on your Windows 10 PC. Now, look for the display option and click on it.
  • Near the top, you’ll find a toggle below Lower blue light automatically. Now, turn this toggle to On.
  • After enabling Windows 10 Blue Light Filter, you need to click on Blue light settings for further options.
settings-display-windows 10 creators update

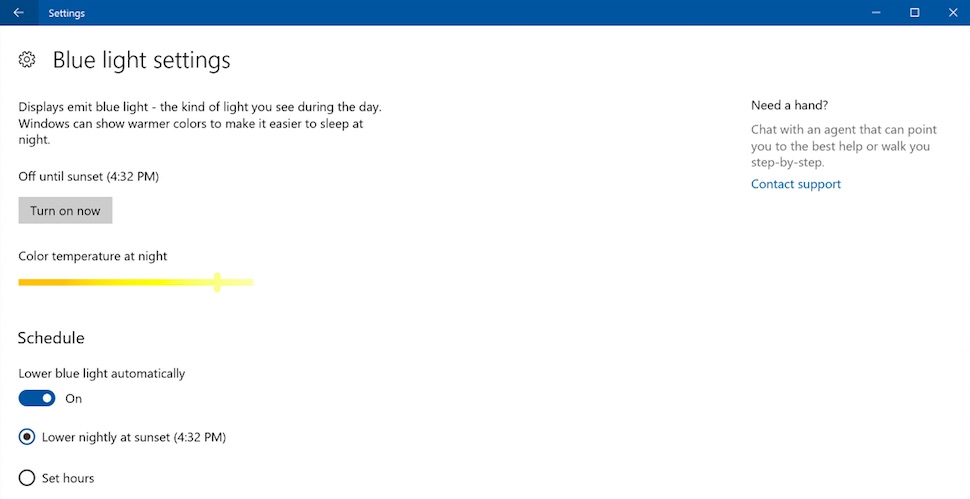
The Blue light settings page tells you that displays emit blue light and Windows 10 can show warmer color to make it easier to sleep at night. Here, click on the Turn on now button to enable it automatically.

blue light settings windows 10

  • From the other options, you can disable the automatic option and configure the options manually. There’s a slider for changing the Color temperature at night.
  • You also have the option to manually set the hours for lowering blue light.
Did you find this Windows 10 tip interesting? Don’t forget to tell us your views and comments.


2016/10/02

Linux дистрибуции, които приличат на ОС Windows

Linux дистрибуции, които приличат на ОС Windows

Когато някой Windows потребител реши да премине към Linux, най-често избира Linux дистрибуция, която прилича на Windows 7 или Windows XP. 


Това е съвсем разбираемо, понеже разликите между Windows и Linux са наистина огромни. Потребителите много по-лесно се ориентират в средата на познат интерфейс. Това е съвсем логично и всички статистики и изследвания показват, че хората наистина търсят в Google предимно дистрибуции на Linux, които приличат на Windows и по-точно, на Windows 7 и Windows XP.
Има много Linux дистрибуции, които приличат на Windows, а тук ще разгледаме някои от тях, в които са положени специални усилия за максимална прилика с ОС Windows.
Трябва да отбележим, че много Linux потребители буквално презират идеята за разпространение на Linux чрез имитация на Windows интерфейса. Но преходът от Windows към Linux не минава гладко за всички. Основната причина за това е, че за много потребители опитът за ползване на компютъра се базира на Windows и често адаптирането към Linux изисква известни усилия. И ако външният вид и интерфейсът могат да помогнат, защо да не се възползваме?

Chalet OS
Ако Windows 10 ви е накарала да преминете към Linux или поне да опитата тази ОС и сте почитател на класическия външен вид и меню на Windows 7, то Chalet OS може да е точно за вас. Тази операционна система предлага комфорта и уютния интерфейс на Windows 7, съчетани със стабилност, гъвкавост, безопасност и другите удивителни свойства на Ubuntu 16.04.
Обърнато е особено внимание, Chalet OS да бъде интуитивно позната на Windows потребителите. Налична е и помощ, в която са описани промените, които са направени, за да се постигне същия външен вид, като на Windows 7.


Създателите на Chalet OS много добре разбират, че преходът от Windows към Linux може да отблъсне потребителите, които през целия си живот са виждали само ОС Windows. Ето защо те са променили някои от стандартните приложения, за да направят прехода съвсем лесен.


За тази цел се използва специалната програма Style Changer, в която са вградени на практика всички теми, предлагани за Windows. Всичко става само с един клик. А ако искате още настройки - има ги. Това си е Linux,

В Style ChangerChalet OS е вграден интересния инструмент Start Point, на който всеки би трябвало да обърне внимание. Този софтуерен инструмент може да придвижи начинаещите на светлинни години напред.


Ако искате да разберете как са игрите в Linux - погледнете Start Point. Необходима е по-голяма производителност и по-бърза работа? Отново Start Point. Изобщо, Start Point е пътеводител по приложенията в Linux. Тази програма постепенно става все по-популярна и е едно от най-добрите неща в Chalet OS.


Chalet OS съвсем не е създадена само за миграция от Windows към Linux. Това е едно готово решение за дома и бизнеса.

Zorin OS
Смяната на операционната система всъщност е промяна на навиците и машиналната памет, създадена при използването на предишната ОС и това може да бъде неприятно и образно казано, огромна бариера при адаптацията към нова ОС. Механичното натискане на горещи клавиши, проверката за вируси и какво ли още не.


Zorin OS е специална Linux дистрибуция, която прилича на ОС Windows и по външен вид, и по интерфейс. Запитване сред Linux потребителите относно каква ОС e най-добре да се използва след Windows показва, че най-честият отговор е Zorin OS.

Инсталираният софтуер е подбран по такъв начин, че доколкото е възможно, интуитивно да замести Windows. Няколко игри, плеър, графичен редактор, уеб-браузър, офис-пакет и други, дават възможност за лесно изпълняване на ежедневната работа.
Подобно на много Linux дистрибуции и тук има Software Center за изтегляне и инсталиране на приложения с един-два клика. Предварително са инсталирани Wine и PlayOnLinux, които дават възможност за стартиране на почти всички програми и игри за Windows.
Свършена е наистина много работа и това е една много добра операционна система.

Kubuntu
Ако сте се замисляли за преход към Linux, няма как да не сте чували за Ubuntu. Действително, Ubuntu е един отличен начин за започване на пътешествието по Linux. Но опитайте Kubuntu, вместо Ubuntu, която използва Unity.


Kubuntu е навярно най-интересната дистрибуция и предлага една елегантна и полирана KDE среда.


Ubuntu има малко по-различен десктоп от Windows и някои други различия, които затрудняват начинаещите. Но ако работите с Kubuntu, менюто и индикациите на десктопа ще бъдат познати, което дава една комфортна среда за начинаещите, а и не само на тях.


Всичко работи плавно и удобно, менюто е класическо, инсталирането и премахването на програмите е лесно. Препоръката на по-опитните Linux потребители е след Windows, най-добре да се започне с Kubuntu, понеже това е официална Ubuntu дистрибуция, на която много от останалите Linux системи се базират.


Linux дистрибуциите за Windows потребители правят прехода към свободната операционна система по-лесен. Това е един нелош начин за вникване във философията на Linux, която печели все повече почитатели.

Linux дистрибуции, които приличат на OS X

Linux дистрибуции, които приличат на OS X


От много години операционната система Mac OS X на Apple е еталон за много добър дизайн. Ако за производителността и качеството може да се спори, дизайнът и външният вид на Mac OS X далеч изпреварва Windows и може да се каже, някои по-стари Linux дистрибуции.


Но тази операционна система е не само платена, но и се инсталира само на устройствата на Apple и не може нормално да се инсталира на обикновен, стандартен компютър. Възможно е използването на хакнати версии или да се избере по-правилния път и да се инсталира свободната операционна система Linux.
Външният вид и интерфейсът на MacOS се харесва на много хора и това е причината да бъдат създадени няколко Linux дистрибуции, които се опитват да копират дизайна на OS X. Тук ще разгледаме по-популярните от тях.


1. ElementaryOS Loki
ElementaryOS е една от най-добрите Linux дистрибуции, които приличат на OS X. Напълно е възможно, след като я инсталирате, да изгубите желание да използвате други Linux дистрибуции. ElementaryOS Loki се базира на Ubuntu и използва собствена графична среда с име Phanteon, базирана на Gnome 3. Сегашната версия на ElementaryOS се базира на стабилната Ubuntu 16.04 LTS, а това означава, че се се използва най-новия потребителски и системен софтуер.


Потребителският интерфейс, темата и иконките са създадени по такъв начин, че максимално да приличат на MacOS. Дори имената на програмните прозорци и иконките на приложенията много приличат на MacOS. Elementary е изцяло съвместима с програмните пакети на Ubuntu, а това означава, че може да бъде инсталирана всяка една програма от хранилищата. Тази ОС се развива изключително активно и има голям брой привърженици.

2. Ubuntu с тема Macubuntu
Това не е специално създадена дистрибуция, която да прилича на MacOS. Но Ubuntu е най-популярната Linux дистрибуция, създадена от компанията Canonical, която има най-голяма общност от потребители и специалисти, най-много документация и софтуер. Освен това Ubuntu е един добър вариант за начинаещи. Напълно е възможно да не поискате да си сменяте дистрибуцията с друга, само заради MacOS стила. Можете да постъпите по друг начин и да смените само темата на Ubuntu.


Темата Macubuntu ще промени вашата ОС и тя много ще заприлича на MacOS. Като в ElementaryOS получавате красиви заглавия на прозорците, като единственото, което може би ще направите е да преместите стартовия панел долу.

3. Dream Linux
Dream Linux е бразилска дистрибуция, базирана на тестови хранилища на Debian и изцяло съвместима с неговата пакетна база. Идеята на проекта е да се създаде дистрибуция, изцяло подходяща за ежедневна работа при минимум настройки.


Използва се леката графичната среда XFCE, която е доста променена, за да изглежда също като MacOS. Инсталирането е лесно, понеже е вграден помощник, който води стъпка по стъпка. Dream Linux се базира на Debian и мнозина считат, че е по-стабилна от Ubuntu. Но има проблем с обновяванията - последната версия излезе през 2012 година.

4. Elive
Тази базирана на Debian дистрибуция много прилича на OS X. Вместо стандартните Gnome или KDE се използва малко известната графична среда Enlightenment. Благодарение на нея, получавате интерфейс, който много прилича на Mac. Темата е пипната внимателно, а стартиращият панел е много добър.


Друга особеност на тази дистрибуция е, че може да се стартира в Live режим. Записвате я на флаш стик и стартирате оттам.
5. Linux Deepin
Това е една китайска дистрибуция, също базирана на Debian, която изглежда много красиво. Тук се използва собствена графична среда с име DDE или Deepin Desktop Envitronment, базирана на Gnome 3. Мениджър на програмните прозорци е Gala, който се базира на Mutter, включени са множество собствени приложения.


Интерфейсът на Deepin изглежда напълно прилично, използва се красив док-панел в долната част на екрана, има удобно меню и уникален панел с настройки, който се появява отдясно. Deepin не копира чак толкова много MacOS, но прилича.

Според различните мнения на потребителите, на OS X най-много прилича ElementaryOS, но всеки само може да пробва и да се убеди.


2016/09/29

BitTorrent’s “Altruistic Mode” Ensures Your Torrent Downloads “Never Complete”

BitTorrent’s “Altruistic Mode” Ensures Your Torrent Downloads “Never Complete”


BitTorrent Inc. has added a new feature that’s strange, confusing, and interesting at the same time. Known as Altruistic Mode, the features promotes the philosophy of giving more taking less on the torrent network.
The Altruistic Mode is designed to make sure that your sharing ratio remains more than 2:1 i.e. while downloading a torrent, you upload 2Gb data for every 1GB download. Many of the loyal torrent users seed to benefit the network and the download speed of other users. But BitTorrent says that this does not guarantee a 2:1 ratio. That’s where the Altruistic Mode comes handy and helps a swarm. “Because of this Altruistic Mode downloads will often never complete,” writes Bram Cohen, the creator of the BitTorrent protocol.
bittorrent altruistic mode
In a blog post, Cohen explains various aspects of the mode depending on the normal download mode:
  • If Download Mode would upload at a greater than 2:1 ratio then an Altruistic Mode peer will have very similar behavior.
  • If Download Mode would upload at a ratio between 2:1 and 1:1 then Altruistic Mode will upload less and download a lot less than Download Mode would, resulting in a 2:1 upload to download ratio.
  • If Download Mode would upload at a ratio of less than 1:1 then Altruistic Mode will do very little uploading or downloading.
“What Altruistic Mode approximately does is that as long as there are two peers which are interested it keeps downloading, because for each new piece it downloads it can upload to two peers, but if there is only one interested peer it stops downloading because the peer can only get at best the same amount of upload as download and possibly be a net drain in that case.”
Cohen considers 2:1 as an ideal ratio considering the complexities and the possibility that a ratio higher than 2:1 could harm the peers and a complete copy of the file may not exist. For now, Altruistic Mode is an experiment.
“We are hoping that it’s sufficiently understandable and useful that users embrace it and that we don’t get too many complaints about downloads never finishing or that the upload ratio remains unchanged, which as explained above are completely expected behaviors under some conditions.”
Given the fact that the downloads may never complete, BitTorrent’s ambitious feature may not be welcomed by many users. However, if Altruistic mode becomes a success Cohen has further plans.
Cohen concludes, “If this goes well we may roll out another feature in the future where a peer starts out in Altruistic Mode and later switches to regular Download Mode, which would not change the upload ratio significantly but would help other peers download faster at the beginning, so peers who want to get a complete file eventually but aren’t in a rush can allow other peers who care about getting it sooner to finish first.”
The Altruistic Mode is available on BitTorrent 7.9.9 and uTorrent 3.4.9. And it won’t be turned on by default in the clients.

2015/12/07

Windows 10 Tip: Find Control Panel and Other Familiar Windows 7 Tools

Windows 10 Tip: Find Control Panel and Other Familiar Windows 7 Tools


The Windows 10 interface, while rather intuitive, does take a bit of getting used to if you’re coming from Windows 7. You might have a hard time finding the settings or features that you need to tweak Windows to work how you like.
The cool things is, that the familiar Control Panel and other traditional admin utilities are still available, and they are easy to find.

Familiar Utilities in Windows 10 via hidden Quick Access Menu

If you were a Windows 8.1 user, you should already be familiar with what we referred to as thePower User Menu (really called the Quick Access menu). To access it in Windows 10, just right-click the Start button and you’ll see a menu of a lot of the familiar built-in utilities you used in Windows 7 – including the Control Panel.
Or if you’re more of a Keyboard-Kung Fu practitioner, you can use the key combo: Windows Key+X to bring it up.
Hidden Power User Menu - Hibernate
While you can access a lot of these features going through the new Settings app in Windows 10, these familiar tools come in handy until you get acclimated to the new OS.
All of these open on the Desktop like you’re used to, and not in a Universal app that you aren’t familiar with. In the example below I launched the Control Panel, Command Prompt, and Device Manager. And in case you’re wondering – yes they all still work the same as they did before.
Traditional Utilities Windows 10
It probably safe to assume that a lot of the older-style features will be replaced at some point in the future. But it’s nice to see some familiar friends that you’re used to help make it easier to get around.
Notice that this menu also provides another way to power down your system as well. And, if you want to put your PC in hibernation mode, check out article: How to Enable Hibernate mode in Windows 10.

How to Switch from Windows 10 32-bit to 64-bit Versions

How to Switch from Windows 10 32-bit to 64-bit Versions


As with previous releases, Windows 10 is available in 32 and 64-bit architectures. Windows 10 64-bit comes in handy when you need to address 4 GB or more of RAM. In fact, Windows 10 64-bit supports up to 1 TB of RAM, while Windows 10 32-bit can utilize up to 3.2 GB. Because the memory address space is much larger for 64-bit Windows, that means, you need twice as much memory than 32-bit Windows to accomplish some of the same tasks. But you’re able to do so much more, you can have more applications open, do things like run an Antivirus scan in the background or run multiple VMs, without it affecting your system performance. Windows 10 64-bit is more secure too, malicious code cannot easily infiltrate it, drivers are more reliable since they must be signed before they can work.
Note: There is no in-place upgrade path from 32 bit versions of Windows to Windows 10 64 bit. The entire process is a clean install only. Which means, you’ll need to back up your personal files, reinstall software applications and reinstall hardware drivers. Compatibility is a critical consideration if you decide to switch to 64-bit Windows 10. You’ll need 64-bit device drivers for any hardware devices. Also, there is no 16-bit subsystem in Windows 10 64-bit, which means, your applications must be 32 or 64-bit only. Also, there is no upgrade path to move from the 64 to 32-bit version…clean install only.

Switching Between 32-bit Windows 10 to 64-bit

Is My Computer 64-bit Capable?
Before you can start the process to migrate to 64-bit, you need to find out if your system is capable. If you’re already running a 32-bit version of Windows 8 or later on your system, you can find out by doing the following:
Press Windows key + X to bring up the hidden quick access menu and select System.
Architecture 1
Look under System > System type and there it will list whether the processor is x64 based processor or not. In my case I have 64-bit capable processor. Once you have confirmed this, you can move on to the next step.
System Type WIndows 10
For Windows 7 and Earlier:
You can determine if your processor is 64-bit capable by using a free tool called CPU-Z. Click the CPU tab and look in the Instructions field, look for the instruction set called AMD64 or EM64T. If you see them, then your processor is 64 bit capable. If you’re running a 32-bit version of Windows, whether Windows 8 or Windows 7, you need to consider carefully the steps to migrate from it to 64-bit Windows 8. Regardless of the ubiquity of 64-bit computing, key factors such as hardware and application compatibility remain an issue, especially for legacy systems.
cpuz
Please note, some older 64-bit processors might not be capable of running 64-bit Windows 10. To install Windows 10 on your PC, the processor (CPU) must support the following features: Physical Address Extension (PAE), NX, and SSE2. Most CPUs have support for these features, so if you receive this error, it is likely because the NX feature is not enabled on your system.
Does Your System Meet All Requirements?
Having just a 64-bit capable processor is not the main reason to go with 64-bit Windows. Think about your other hardware such as your video card, audio device, printer and any other critical device or application you are using? Also, if you have less than 4 GBs of RAM, I strongly suggest you stick with 32-bit Windows 10, or max out the installed RAM before you migrating.
The first thing to do is to create an inventory of both your hardware and software programs. After doing that, go to the manufacturers website and check if there are any 64-bit drivers available. The manufacturer might not have native 64-bit Windows 10 drivers yet, but they just might have 64-bit Windows 7 and Vista drivers which might work. The reason why is Windows 8, Windows 7 and Vista all share the same driver model. Application compatibility is an important consideration, for instance, if you are running applications designed for Windows XP or apps that are not fully 32-bit, you might want to reconsider your decision. Older applications that are 32-bit but might contain 16-bit code and will not work with 64-bit Windows. So, you need to carefully think this true. If it ain’t broke, don’t try fixing it.
Backup Your Computer
Once you have gathered all the necessary prerequisites, you need to backup your personal data. There is no upgrade path from 32-bit versions of Windows to Windows 10 64-bit. Yes, that means you will have to reinstall all your drivers and applications. Some additional configuration might be required on your part, too.
Other Considerations
Users who want to switch from 32-bit versions of Windows to Windows 10 64-bit should be aware the migration is a multi-step process. Due to changes how the compliance check is done for the free upgrade offer for Windows 10. Windows 10-64 bit requires a custom install, but before you can perform that, you need to first upgrade from your current 32-bit version of Windows to Windows 10 32-bit. Ensure you are signed in with a Microsoft account and also ensure Windows 10 is activated. You can do so by going to Settings > Update & security > Activation.
Activated
Download Windows 10 64-bit
After having everything in order, you need to download Windows 10 64-bit ISO media and create a bootable copy. Please note, you must download the appropriate edition of Windows 10 for the version/edition of Windows you are migrating to. If you upgrade to the wrong edition, ie. Windows 7 Home Premium to Windows 10 Pro, you will have to purchase a license for Windows 10 Pro or  go back to Windows 7 Home Premium and upgrade to Windows 10 Home.
For instructions on getting the Windows 10 ISO, read our article: How To Download Windows 10 ISO for a Clean Install (Updated)
For UEFI Based Systems
If your computer is UEFI based, these are normally systems that come pre-loaded with Windows 8 or later, you’ll need to prepare the ISO file for such a configuration or you will receive an error message during setup. The thumbdrive needs to be formatted as FAT32 and use the GPT partitioning scheme. To do this, you need to use Rufus, a small tool you can download for free.
Rufus is an awesome free utility that we covered in our article on how to create a Windows 10 bootable flash drive.
After you have installed Rufus:
  • Launch it
  • Select ISO Image
  • Point to the Windows 10 ISO file
  • Check off Create a bootable disk using
  • Select GPT partitioning for EUFI firmware as the Partition scheme
  • Choose FAT32 NOT NTFS as the File system
  • Make sure your USB thumbdrive in the Device list box
  • Click Start
  • Close when complete
Rufus
Performing a Custom Installation
If you attempt to start the installation of a 64-bit version of Windows from within a 32-bit version of Windows, you will receive an error message.
Which is understandable, since you are running a 32-bit version of Windows. To begin the installation, restart the computer and boot from the disc or USB flash drive which contains the installation files. Then follow the onscreen instructions for setting up Windows 10 — i.e. choose your language, keyboard layout, accept the EULA.
When you get to the following screen, make sure to select Custom: Install Windows only (advanced).
vbox 20
Select the Primary Partition then click Next. You will receive the following warning message:
The partition you selected might contain files from a previous Windows Installation. If it does, these files and folders will be moved to a folder named Windows.old. You will be able to access the information in Windows.old, but you will be able to use your previous version of Windows.
Just click OK and wait while the installation is completed. Your computer will be restarted several times during the process.
vbox 21
When setup is complete, you can retrieve any personal files from the Windows.old folder which you’ll find in your local C: drive.
Windows OLD2015
Verify Windows 10 64-bit was  successfully installed by going to Settings > System > About.
confirm

БЪЛГАРСКИЯТ СИМВОЛ IYI и ЕКСПЛОАТИРАНЕТО МУ В ТУРСКАТА ФИЛМОВА ИНДУСТРИЯ И ЛИТЕРАТУРА

  БЪЛГАРСКИЯТ СИМВОЛ IYI и ЕКСПЛОАТИРАНЕТО МУ В ТУРСКАТА ФИЛМОВА ИНДУСТРИЯ И ЛИТЕРАТУРА Имаме 11000 последователи , които са посочили за пър...