OctoPrint - WiFi setup and troubleshooting
A number of people who have followed the instructions for setting up OctoPi on your Raspberry Pi experience problems getting connected to WiFi. This thread is intended to detail a couple of common problems people have experienced and things to try to resolve them. This page assumes that your WiFi network is up and working and that other devices are able to connect to it without a problem.
We are also assuming that you have already successfully downloaded the OctoPi image and "burned" it on to your SD card. The OctoPi image can be found at https://octoprint.org/download/ 5.5k. The page also includes basic installation directions as well as a video describing installation process. There are also a number of other OctoPrint/OctoPi videos on YouTube which describe basic set-up as well as advanced options.
Basic Setup - Edit Info to Log On to Your WiFi Network
NOTE: there is now an easier way to edit the WiFi settings than the method described below. Instructions for using the Raspberry Pi Imager 352 to download and install OctoPrint and edit the WiFi settings can be found at OctoPrint.org - Download & Setup OctoPrint 5.5k
I've left the description below for those who prefer to edit WiFi settings via other methods, or who may run into problems and need to adress this by other methods. The trouble-shooting methods found in later sections of this write-up should still be helpful.
Heads-up!
Before editing the files noted below, read the troubleshooting section below about using the appropriate text editor while editing this file 4.3k.
With the SD card plugged in to your computer (you may need an adapter for your computer to accept the SD card if it doesn't already include the appropriate slot). You access the card just as you would an external disk or thumb drive mounted on your computer. The file you will need to edit is in the /boot/ directory of the SD card (if you are editing on a Windows or Mac computer, the /boot/ directory will likely be the only directory you can see.) Look in the "boot" directory of the SD card. The file you need to edit varies depending on which version of OctoPi you downloaded. The process for OctoPi 0.14 and earlier differs from that of OctoPi 0.15 and later. I strongly suggest you use the latest stable release, but descriptions for both are included below. See the section below appropriate to your version.
OctoPi 0.15.0 or newer
In the /boot/ directory, open octopi-wpa-supplicant.txt with the appropriate text editor. (The use of /boot/octopi-network.txt which was used in OctoPi version 0.14 has been discontinued in version 0.15). There are instructions within that file for editing your network settings. Be sure to use an appropriate text editor. For most WiFi networks, you'll edit the section that looks like this:
## WPA/WPA2 secured
#network={
#  ssid="put SSID here"
#  psk="put password here"
#}
Uncomment the 4 lines which have a single # front of them by deleting the # (do not delete any spaces after the #), then enter your WiFi network SSID (your network's "name") and the password in the indicated places. Note that the SSID and password are case sensitive. (A common problem when cutting and pasting this information is accidentally including leading or trailing spaces which are not part of the SSID or password.) For a network named JoesWiFi with a password of 12345, it should look like this:
## WPA/WPA2 secured
network={
  ssid="JoesWiFi"
  psk="12345"
}
In OctoPi 0.15, you will also need to set the WiFi Country. The setting for this is also found in the /boot/octopi-wpa-supplicant.txt file. Scroll to near the bottom of the file and find the section that begins with "# Uncomment the country your Pi is in..." By default, the line for the United Kingdom is uncommented (the "#" is removed from the front of the line). If you are in some country other than the UK, comment out the United Kingdom line by putting a # in front of it, then remove the # from in front of the country you are in (do NOT remove the # from the middle of the line). If your country is not in the list, follow the link provided in the file to find the complete list, and create a new line for your country. For example, if you are in Switzerland, you would scroll down the page to find that the 2 letter code is "CH", and create a new line that looks like this:
country=CH # Switzerland
Your WiFi's SSID is hidden? You'll need to to some additional changes or your Pi won't be able to find your network after all!
Within the brackets
{ ... }add a new linescan_ssid=1For example, if it is the WPA/WPA2 section you adjusted earlier, you now want it to look something like this:
## WPA/WPA2 secured
network={
 ssid="JoesWiFi"
 psk="12345"
 scan_ssid=1
}
Save the changes and exit the text editor. Do not simply yank the SD card from the reader slot. Find and use the menu command to Eject/unmount the SD card from your computer, wait a few seconds for the unmounting process to complete, and then remove it from the card reader slot. Make sure the Pi is powered down, and then install the SD card in your Pi and boot it up by turning on the power to the Pi. Note that the first boot may take some time: be patient.
TROUBLESHOOTING The WiFi Connection
Try some of these suggestions if you are unable to connect to your Pi via your Wifi network:
Editing the octopi-wpa-supplicant.txt file (or octopi-network.txt in OctoPi 0.14 or earlier) with the wrong text editor
Some text editors, including Apple's TextEdit (included with macOS) and WordPad (included with Windows) make changes to the files you edit which render them unusable by the Pi's Raspian operating system. (I've heard that Windows NotePad can also cause problems, but have not personally verified that). There are several good, free options out there you can download with will avoid these problems.
For the Mac, I use BBEdit 942 (after 30 days, the freely downloaded version reverts to a limited demonstration version, but that limited version still does everything you need it to to edit files on your Pi.)
For Windows, one of the more popular choices is NotePad++ 2.2k. (also free)
Note that if the file has already been edited with an inappropriate text editor, your best bet is starting over with a clean, unedited copy of that file. Simply editing it again with the correct editor is unlikely to fix the damage.
Note:
If you really want to use Apple's TextEdit on your Mac, it can be fixed by making a few changes to it's default preferences. Launch TextEdit and go to TextEdit>Preferences. Under Format, choose "Plain Text". Under Options, uncheck "Smart Quotes" and "Smart Dashes". Close the preferences pane, then quit TextEdit and relauch. It will now work without messing up your Pi's files. If you have already edited a file before making these changes, you may need to start with a clean copy of the file to get it to work. A telltale sign that TextEdit has screwed up your file: the quotation marks around the SSID and password will show up as "curly" quotes rather than the desired "straight" quotes.
Weak/Inadequate Power Supply
This is a common cause of a wide range of intermittent and hard to diagnose issues, and especially causes problems with the extra load put on the Pi by running WiFi, BlueTooth, a camera, etc.
The Pi needs a solid source of 5+VDC. A minimum of 2 amps. (2.5 Amps is recommended for the Pi 3 and 3B+, particularly if the Pi is powering a camera or USB devices.)
A charger is not the same as a power supply. Chargers are generally not required to provide tightly regulated voltage or may not be able to provide the peak current that the Pi requires. That old phone charger probably won't work, or if it does, it may cause you intermittent problems. Get an appropriately rated power supply from a reputable source.
Likewise, plugging your Pi into the USB port of your laptop computer is not likely to work reliably. Those ports are usually limited in their current output. If you're lucky, the bare Pi might boot with nothing else attached to it, but WiFi will likely not work, nor things you attach to the Pi's USB port.
On a related note: you need a good quality cable to connect your power supply to the Pi. Many USB cables have conductors that are too small to carry 2.5 amps without an unacceptable voltage drop. A sub-par cable can show the same symptoms as a weak power supply.
Follow this link to find out more about Pi Undervoltage/Power Issues 495 and the little lightning bolt or or thermometer icon that will pop up in the menu bar of a Pi running Octoprint version 1.3.10 or later if it has detected any undervoltage or overtemperature issues:
![]()
WiFi signal strength
If you are using the built-in WiFi in a Raspberry Pi-3, a Pi-3B+, or Pi-0W, be aware that the signal strength from the tiny internal antenna may be weaker than other WiFi devices. Try moving your Pi closer to the router as a test (even if that is not possible to do when you are printing, the test will at least let you know if this is the issue). If this solves your connection issue, try relocating your Pi or your router. Sometimes even a small move can make a big difference. Minimize the number of walls or other obstacles blocking the signal, move things out from behind metal boxes or other electrical devices. (My router sat behind a metal electrical service box in my basement. It worked Ok for other devices in my home, but not the Pi. Building a shelf that positioned it just a couple of feet away made a significant difference in signal strength and WiFi reliability for my Pi.)
Hidden SSID
Your WiFi network's SSID might be hidden after all. Please refer to the corresponding Heads-up boxes in the basic setup guide above and adjust the network configuration file (octopi-wpa-supplicant.txt for OctoPi 0.15.0 and newer, octopi-network.txt for OctoPi 0.14 and older) as described there.
Electrical Interference
Electrical interference from some appliances can cause interference with the Pi's WiFi reception. Items such as florescent lights, dimmer switches, some LED lights (typically, it's the power supplies in 110V LED lights, not the lights themselves), some electric motors, etc. Electrically "noisy" devices often create radio frequency interference, which can wreak havoc with the Pi's WiFi signal. This can cause intermittent problems which are hard to diagnose as those appliances turn on and off.
Copying text from places which do not have "Pi-friendly" formatting
(This is an issue with similar symptoms to using the wrong text editor.)
Cutting and pasting commands or text from some sources can cause problems. There can be subtle differences in the text: for example the site from which you copied may have substituted those "curly" shaped quotation marks for the straight ones that the Pi recognizes, or it may have wrapped what should be one long line into two lines (some sites do that wrap without actually causing a break in the line when you copy it - others put a line break in, which messes up the Pi).
The differences can be hard to spot and can have you pulling your hair out. This is one of the reasons it is recommended to put code in a Code Block when posting (that's what the symbol </> in the icon menu above is for).
Copying files vs. burning the image to an SD card
This one is not really a "WiFi" problem, since the Pi won't boot at all in this case, but for someone new to this - especially if they are running a headless set-up, it may appear that their WiFi is not working (in fact, nothing is working).
Some people make the mistake of simply copying the downloaded OctoPi .IMG file to their SD card (for example, by dragging and dropping the file to their card). This is how you install NOOBS, but it will not work to install an .IMG file such as OctoPi. If installed by simply copying to the SD card, the Pi will not boot. One symptom of this is that when you power up the Pi, all that happens is the red light comes on, but you never see the green light flash at all.
OctoPi must be installed by burning the .IMG file to your SD Card. To do this follow the directions on the OctoPi Download Page 5.5k. Scroll down the page a bit. That page has a link to instructions to install an .img file to an SD card, like any other Raspberry PI image (Do not use a NOOBS-type installation).
The instructions linked above mention using Etcher 90 (available for Windows, macOS, or Linux) to burn the image to your SD card. Other OctoPi/OctoPrint help videos may mention using Apple Pi Baker 79 (for macOS) or Win32 Disk Imager 129 (for Windows) to burn the image. Any of these will work fine. (I generally use Apple Pi Baker or Win32DiskImager, since they also allow you to make a backup .img file of your SD card, once you have everything set up and working to your liking. Since SD cards can and do fail, having a backup can save you a lot of hassles down the road)
Damaged or defective SD Card
It's possible your SD card is damaged. This can cause all sorts of problems (including failing to boot), not just WiFi issues. The most common cause of SD card failure is probably inserting or removing the SD card while the Pi is powered up. This is a definite no-no. It's also possible (though a bit less likely) to damage the card by not shutting your Pi down properly prior to turning off the power to the Pi (you can shut down from the "System" menu that shows up at the top of the OctoPrint web page if you are logged in as an Admin user, or by entering the sudo shutdown -h now command from the Pi's command line).
You should also use a good quality, class 10 SD card. There are a lot of knock-off or forged cards out there with questionable quality, often masquerading as top brands. Some are not the size they claim to be, and some are just plain poor quality. Save yourself the hassle and buy a reputable brand from a reputable retailer.
Lastly, SD cards can simply wear out over time. The rated read/write cycles are high, but not infinite. If you have a card that has been working but starts getting flaky, it may be time to replace it.
I broke my octopi-wpa-supplicant.txt, can I get a new one?
If you accidentally delete part of the file, or need a correct one to reference, you can find a clean config file here:
OctoPi wpa supplicant clean file (OctoPi 0.17) (gist.github.com) 3.2k
Other Diagnostic Commands
If all else fails, here are a couple of diagnostic things you can do to help narrow down the problem.
Even if those don't lead to success, please make sure to provide the result of these steps and the output of these diagnostic commands when asking for help on the forums - they will help others help you!
Is your Pi connected to the WiFi network?
There are several ways to check this (note: these are also good ways to find out your Pi's IP address).
Access your router's set-up/control page
If you have access to your router's set up page, there is usually an option to show all connected devices. The details of doing this are beyond what I'll go into here, since each router brand/model is different. In short, you access the page by entering the router's IP address in your web browser's address bar. The IP address varies, but two commonly used setups are 192.168.1.1 and 192.168.0.1 You'll most likely need a username and password to log on to your router (get those from your ISP, if they will give them out). Then poke around the various options. Look for something that says DHCP, or LAN, or WLAN and see if it brings up a list of connected devices. Look for a device named "octopi" in that list (if you have renamed your octopi hostname to something else, look for that name). If you see the name in the list as an active device, your Pi is connected and is using the IP address indicated.
Use a network scanner
There are a number of free apps you can download. I use the free Angry IP Scanner 3.3k (works on Windows, macOS, and Linux - I have not tried running the Linux version on a Pi). Fing 540 is also a good free option (runs on Windows, macOS, Linux - and has a Pi version. You can also find the Fing app for Android and iOS devices.) Log on to your WiFi network with your computer or phone, launch the app and tell it to scan the network. Look through the result for a device named "octopi" (or whatever name you have given your OctoPi setup). Note that some IP scanners will remember devices from a previous scan and show them even if they are not presently on the network (in this case, usually dimmed out). You are looking for active devices. (If you app shows both active and inactive, yu can usually set a filter to show only active devices.) If you see the name in the list as an active device, your Pi is connected and is using the IP address indicated.
Connect to the Pi via Ethernet or plug in a monitor and keyboard
If your Pi is connected to your local network (or directly to a computer) via an Ethernet cable, you can SSH into it to enter commands on the command line. You can also access the Pi by plugging in a keyboard and monitor. In either case, log into your Pi and enter the following command:
ifconfig wlan0
If your Pi is connected to the WiFi network, the beginning of the output should look something like this:
wlan0     Link encap:Ethernet  HWaddr xx:yy:zz
          inet addr:192.168.aa.bb  (followed by other stuff)
The four-part number is the IP address assigned to your Pi by your router for WiFi access. (The "192.168." start of the number is a very common sequence for home WiFi networks. The "aa.bb" part may be a variety of numbers. Another common starting number sequence is "10.". Unless you have an unusual network/router setup, yours will likely look similar. Large corporate or school networks will likely be different.)
If the Pi is not connected to a WiFi network, the beginning of the output from that command will likely look something like this:
wlan0     Link encap:Ethernet  HWaddr xx:yy:zz
          UP BROADCAST MULTICAST  MTU:1500  Metric:1
In other words, there's no line listing "inet addr:" for wlan0.
Can your Pi even see your WiFi network?
If you are able to log into your Pi through an Ethernet connection or with an attached monitor and USB keyboard, the following command will show all of the WiFi networks your Pi can see (whether it can connect to them or not):
sudo iwlist wlan0 scan
Several lines down in the output from that command, you should see a line that looks like:
ESSID:"yourWiFi"
Where "yourWiFI" is your WiFi network name (the SSID, the same name you use when connecting a device to the network). If you have more than one WiFi network in the area, the output will show a similar block for each network (generally a couple dozen lines of info for each WiFi network).
If you do see your WiFi's SSID, a couple of lines above that you should see a line that starts with "Quality...". It looks something like this:Quality=43/70 Signal level=-67 dBm
This shows numbers relating to the quality of the connection and the signal strength. These numbers can be useful when troubleshooting a noisy or weak signal (repositioning the Pi in relation to the Wifi access point can often help improve the signal). [We could use some examples of what is considered good or bad numbers here]
If you do not see your network listed in the output, then the Pi is simply not seeing the the network at all. There could be a number of causes. See some of these further up: WiFi Signal Strength, Hidden SSID, Weak/Inadequate Power Supply, Electrical Interference.
Still not working?
Please use the OctoPi WiFi/network connection troubleshooting megatopic 5.0k to seek help!
Note: This first post in this topic is a wiki, so others can edit and add to it. If you do edit this post, please try to follow the formatting here to help separate the various various issues (I just copy the heading line from an existing section, paste it in, and edit to make a new one). Don't let formatting fears stop you from posting a fix that may be helpful to others. I'll try to stop in and clean things up from time to time if it's needed. When editing, please leave this paragraph at the bottom of the page.
https://community.octoprint.org/t/wifi-setup-and-troubleshooting/184
Download & Setup OctoPrint
OctoPi
Guy Sheffer maintains “OctoPi”, a Raspbian (and thus Debian) based SD card image for the Raspberry Pi that already includes OctoPrint plus everything you need to run it:
- OctoPrint plus its dependencies
- MJPG-Streamer for live viewing of prints and timelapse video creation, compatible with various USB webcams and the Raspberry Pi camera
Recommended hardware: Raspberry Pi 3B, 3B+, 4B or Zero 2. Expect print artifacts and long loading times with other options, especially when adding a webcam or installing third party plugins. Setups not using recommended hardware are not officially supported.
Please note that the Raspberry Pi Zero and Zero W are not recommended explicitly since severe performance issues were observed, caused by the WiFi interface when bandwidth is utilized (e.g. the webcam is streamed), negatively impacting printing quality. See also here. The Zero 2 however is recommended.
Installing OctoPi
OctoPi is available through the Raspberry Pi Imager, which you can use to download and setup OctoPi. You can install it yourself, or alternatively simply buy one of the available
Installing OctoPi using the Raspberry Pi Imager
🤚 Before you begin
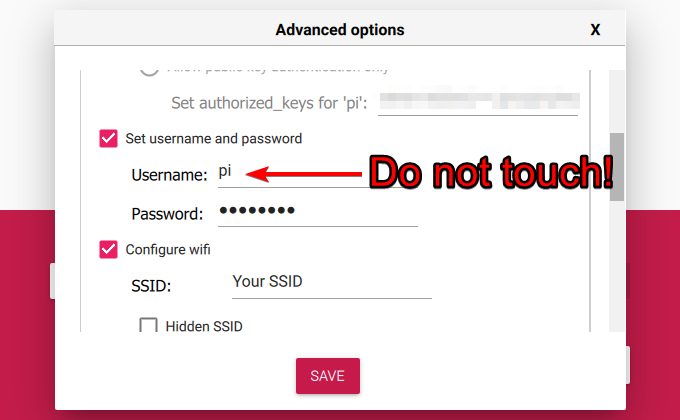
Read and follow these instructions precisely. Most importantly, leave the system username as “pi”, do not change it to anything else or OctoPrint won’t work!
If you haven’t already, download and install Raspberry Pi Imager on your computer
Find the OctoPi image under “Choose OS”, by selecting “Other Specific Purpose OS” > “3D printing” > “OctoPi” and then the “stable” version.
Open advanced options by clicking on the button with the gear, or by using the keyboard shortcut
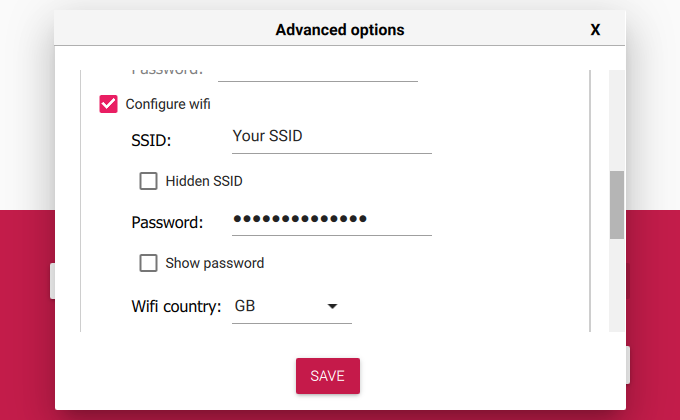
ctrl+shift+xand then:Configure your wifi options: Set your SSID, password and WiFi country:
Change the system password in “Set username and password” by entering a new password to use for the system user “pi”. This is not the password you’ll use for logging into OctoPrint but one that you’ll have to use to log into your Pi via SSH should you ever need to. Leave the username as “pi”, do not change it to anything else!
Optionally: Change the configured timezone in “Set locale settings”
Optionally: Change the hostname in “Set hostname”
Install the image to your SD card, then plug everything in to your Raspberry Pi and boot it up. Do not format the SD card after installing, even if prompted to do so. This will break the installation and you will have to start over!
Access OctoPrint from your browser via
http://octopi.localor the hostname you chose (if your computer supports bonjour) orhttp://<your pi's ip address>.httpsis available too, with a self-signed certificate (which means your browser will warn you about it being invalid - it isn’t, it’s just not recognized by your browser).
Please also refer to OctoPi’s README, especially the “How to use it” section.
Alternative Initial Setup
If you decide against using the Raspberry Pi Imager, here are some alternative steps to get started:
Flash the image to your SD card through whatever alternative means you’ve chosen.
With the SD card still attached to your computer, set up the Wifi connection using the
octopi-wpa-supplicant.txtfile on the root of the installed card when using it like a thumb drive. Important: Do not use WordPad (Windows) or TextEdit (MacOS X) for this, those editors are known to mangle the file, making configuration fail. Use something like Notepad++, Atom or VSCode instead or at the very least heed the warnings in the file. If your computer doesn’t see the card right away after flashing, try ejecting and inserting it again. Do not format the SD card after installing, even if prompted to do so. This will break the installation and you will have to start over!Please also refer take a look at the full WiFi setup guide in the FAQ that also includes troubleshooting tips.
Plug everything into your Raspberry Pi and boot it up
Log into your Pi via SSH (it is located at
octopi.localif your computer supports bonjour or the IP address assigned by your router), default username ispi, default password israspberry. Runsudo raspi-config. Once that is open:- Change the password via “Change User Password”
- Optionally: Change the configured timezone via “Localization Options” > “Timezone”.
- Optionally: Change the hostname via “Network Options” > “Hostname”. Your OctoPi instance will then no longer be reachable under
octopi.localbut rather the hostname you chose postfixed with.local, so keep that in mind.
You can navigate in the menus using the arrow keys and
Enter . To switch to selecting the buttons at the bottom useTab .You do not need to expand the filesystem, current versions of OctoPi do this automatically.
You also do not need to manually enable the RaspiCam if you have one, that is already taken care of on the image as well.
Access OctoPrint through
http://octopi.local(if your computer supports bonjour) orhttp://<your pi's ip address>.httpsis available too, with a self-signed certificate (which means your browser will warn you about it being invalid - it isn’t, it’s just not recognized by your browser).
Please also refer to OctoPi’s README, especially the “How to use it” section.
Image Downloads
Raspberry Pi Imager will download the latest version of OctoPi for you, but if you want to download the images yourself you can do so here.
Stable OctoPi
cbfed6287b209cdefb48d76443d4f42778c2e5033c3697ca235e48143a17a7c1Raspberry Pi 3B, 3B+, 4B or Zero 2 strongly recommended, Raspberry Pi Zero/Zero W not officially supported!
Image compatible with Raspberry Pi A, B, A+, B+, 2B, 3A+, 3B, 3B+, 4B 1/2/4/8GB, 400, Zero, Zero W and Zero 2.
OctoPi Release Candidate
The current OctoPi Release Candidate 1.0.0rc2 can be found here:
Image compatible with Raspberry Pi A, B, A+, B+, 2B, 3A+, 3B, 3B+, 4B 1/2/4/8GB, 400, Zero, Zero W and Zero 2.
OctoPi Nightlies
You can also get the 32bit nightlies here or the highly experimental 64bit nightlies here.
Further resources
- For customizing OctoPi, take a look at CustoPiZer.
- Scripts to build the image yourself can be found in OctoPi’s Github repository.
Octo4a
Filip Grzywok maintains “Octo4a”, an Android app that allows you to use an Android based smart phone as an OctoPrint host. Root is not required!
Check out the Octo4a README for information on how to obtain the app, install and run it.
Video
There’s also a video guide on how to get Octo4a up and running by Thomas Sanladerer.
Docker
There’s also an official OctoPrint Docker image, octoprint/octoprint. It is maintained by Brian Vanderbush and team on GitHub.
Please refer to its entry on dockerhub for more details on usage and configuration.
octoprint_deploy & octoprint_install
octoprint_deploy is a guided script for creating multiple OctoPrint instances. This enables control of multiple printers on a single piece of hardware. It is compatible with OctoPi and also functions as a general Linux installer for OctoPrint, video streamers, haproxy, etc.
The related octoprint_install serves as a single instance Linux installer.
Both are maintained by Paul Paukstelis.
Installing manually
The generic setup instructions boil down to
- Installing Python 3, including pip.
- Creating a virtual environment somewhere:
python -m venv OctoPrint - Installing OctoPrint into that virtual environment:
OctoPrint/bin/pip install OctoPrint - OctoPrint may then be started through
./OctoPrint/bin/octoprint serveor with an absolute path/path/to/OctoPrint/bin/octoprint serve
More specific setup instructions for the most common runtime environments can be found below.
Linux
For installing OctoPrint on Linux, please take a look at the setup instructions for Raspbian on the forum. They should be pretty much identical on other Linux distributions.
Windows
For installing the OctoPrint server on a Windows system, please take a look at the setup instructions for Windows on the forum.
Mac
For installing the OctoPrint server on a Mac, please take a look at the setup instructions for MacOS on the forum.


