Translate

2018/08/08

Японско лечение с вода: Излекувай тялото си по естествен начин

Японско лечение с вода: Излекувай тялото си по естествен начин


Ранните сутрешни часове са „златните часове”. Навиците, които имаме и нещата, които правим преди денят още да е започнал като жабуренето с кокосово масло (зехтин), пиенето на вода с лимон, измиването на зъбите, медитацията и молитвите са примери за здравословно започване на деня. Според японците можем да добавим още един навик в списъка си, и това е Японското лечение с вода, което е темата на днешната статия. От десетилетия японците пият вода на гладен стомах

Пиенето на вода очевидно е полезна практика за здравето. Водата е източник на живот и необходим компонент за всяка клетка в човешкото тяло. Без вода няма живот. От години се провеждат научни изследвания за въздействието на пиенето на вода. Последните разкрития са изключителните ползи, предлагани от пиенето на вода на гладен стомах. Най-добре е това да се прави незабавно след събуждане, но нека продължим със статията.

Може да ви е полезно също да прочетете: Преобразете здравето си с жабурене с кокосово масло
В Япония е популярно да се пие вода веднага след събуждане всяка сутрин. Освен това, научни експерименти са доказали полезността на този навик.
Японското медицинско общество намира отдавна съществуващите и сериозни заболявания, както и съвременните болести за лечими с вода на 100%.

Японското лечение с вода е успешен лек за следните заболявания:

Главоболие, болки в тялото, сърдечни проблеми, артрит, ускорен пулс, епилепсия, затлъстяване, бронхит и астма, туберкулоза, менингит, бъбречни и на уринарния тракт заболявания, повръщане и диария, гастрит, маясъл, диабет, запек, всички очни заболявания, менструални смущения, рак, заболявания на ушите, носа и гърлото.
МЕТОД НА ЛЕЧЕНИЕ
1. Със събуждането си сутрин преди да си измиете зъбите, изпивайте по 640 мл (21.6 унции) т.е. 4 чаши по 160 мл не студена вода;
- Водата не трябва да съдържа флуорид;
- Има още една версия на тази терапия в Yahoo! News, но те препоръчват пиенето сутрин на 1.5 литра (50.7 унции) вода. По мое мнение това е измама, защото пиенето на твърде много вода е опасно за здравето:
„Обратното на обезводняването е заболяване, познато като хипонатремия, което означава „нисък натрий” и понякога се нарича интоксикация с вода.
Пиенето на твърде много вода в рамките на твърде късо време затруднява бъбреците и може да причини внезапно спадане на нивата на натрий в кръвта. Натрият е един от телесните електролити (други са калий, хлор, фосфор, магнезий и калций). Спад в нивата на натрия позволява на вода да навлиза в мозъка и да причинява отичането му. Резултатите включват летаргия, дезориентация, объркване, припадъци, кома и смърт”.
За този полезен навик: 10 причини да пием лимон с вода

Пиенето на твърде много вода може да доведе до:

  • Забавен метаболизъм
  • Намалена умствена яснота
  • Главоболия
  • Безсъние
  • Студени ръце/крака
  • Снижено емоционално равновесие
„Бързото изпиване на твърде много вода залива вътрешността на клетките и отмива натрия от тях. Изчерпването на натрия в тялото, наречено хипонатремия, може да доведе до спукване на клетките или поради прекомерното налягане върху тях отвън или от налягането вътре в прекомерно оводнените клетки.
Като цяло навлизаме в опасната зона когато приемаме повече вода, отколкото бъбреците ни могат да обработват за един час. А това количество за човек с изключително здрави бъбреци е около 890 мл (30 унции) вода на час (моля ви не пийте толкова много вода!). Пиенето на твърде много вода за твърде кратко време може да се окаже фатално и определено трябва да се избягва.
2. Измийте зъбите и устата си, но не пийте и не яжте нищо през следващите 45 минути;
3. След 45 минути можете да закусите както обикновено;

4. След закуска, обяд и вечеря не яжте и не пийте нищо в продължение на 2 часа;

5. Възрастните или болни хора, които не се затрудняват да пият по 4 чаши вода от самото начало,  могат да започнат с малки количества вода и постепенно да увеличават количеството до достигането на 4 чаши на ден;

6. Горният метод на лечение лекува заболяванията на болните, а на здравите предоставя насладата на здравословния живот;

Следва списък с броя дни необходими за лечението, контролирането и снижаването на основни заболявания:
1. Високо кръвно налягане – 30 дни
2. Гастрит  – 10 дни
3. Диабет – 30 дни
4. Запек – 10 дни
5. Рак – 180 дни
6. Туберкулоза – 90 дни
7. Пациентите с артрит трябва да следват горното лечение само 3 дни през първата седмица, а от втората седмица нататък – всеки ден.
Този метод на лечение няма странични ефекти, обаче при започването на лечението може да уринират по-често. Добре е да спазваме това лечение и да превърнем процедурата в рутинна част от живота си.
Източници:
Бъдете здрави
Очаквайте още полезни статии за това как да поддържаме здравето си, как да не остаряваме и как да се предпазваме от болестите.
Ако статията ви харесва, молим ви да я споделите. Някъде някой може да се нуждае именно от тази информация. 
Авторски права и ограничения свързани с тях
zdravivsekiden.com дава право на Потребителите да ползват всички услуги, които са предоставяни в Сайта само за лични нужди с нетърговска цел, при условие, че не се нарушават авторските права на zdravivsekiden.com или на трети лица, свързани пряко или косвено с материалите на Сайта. Не се разрешава материалите на този Сайта да се променят по никакъв начин, нито да бъдат копирани, публично разпространявани или раздавани за каквато и да било обществена или търговска цел. Употребата на публикуваните в този интернет Сайт материали в други сайтове е забранена.
Материалите на този Сайт са под закрилата на закона за Авторското право и сродните му права и всяка непозволена употреба може да бъде нарушение на авторско право, права върху търговски марки или други законови разпоредби.
Ако знаете колко приятели, които водеха здравословен начин на живот, погребах - СВЕТЛАНА КАЗИНА

Ако знаете колко приятели, които водеха здравословен начин на живот, погребах - СВЕТЛАНА КАЗИНА


Пътешественик и художник, Светлана Казина се мести да живее в планината Алтай преди около 20 години, в малка къща без течаща вода и често без ток. Тя обича живота и го живее с удоволствие. С помощта на камерата си всеки ден изучава света и се изненадва от разнообразието му.
„В природата има всичко необходимо, за да бъдем щастливи“, казва Светлана. Но въпреки това смята, че начинът ни на живот не трябва да бъде здравословен, а щастлив.

Болестите не идват от факта, че околната среда е лоша, водата е мръсна, храната е пластмасова, а ние се движим малко.
Болестите не се интересуват дали си в град или в село. Повярвайте ми, човешкото тяло е идеалната машина за приспособяване към всякакви условия и храна. Ето, ние, селяните, не можем да ядем вашата прахообразна храна, да пием водата ви и да дишаме градския въздух. Но не защото всичко това е мръсно. А защото е различно. Несвойствено за нашето тяло.
А вие, като дойдете на село, с извинение, се подрисквате от нашата речна вода, от кравето мляко, от агнешкото и всичко останало, а от височините тук главите ви се пръскат като дини.
Но това не значи, че едното място е по-лошо от другото. Просто мястото, което обитаваме, е различно. Ние сме адаптирани тук, а вие – там. В горите, по селата, в планините боледуват също толкова, колкото и в града, така че спокойно! И в градовете има дълголетници.
Дълголетник не означава, че някой ще живее 100 години и ще умре здрав. Ако човек живее в хармония с природата, ако се моли, медитира, храни се с покълнала зърна пшеница, ходи облечен като Исус или като богинята Кали и дарява доходите си на домове за сираци, не означава, че ще живее 100 години и ще умре здрав.
Какво те кара да мислиш, че ако живееш на плажа в поза лотос, няма да се разболееш? Ако знаехте колко приятели съм погребала, които водиха изключително здравословен начин на живот! Сред тях са спортисти, лекари, лечители и хора, които работеха върху своя духовен растеж денонощно. Непушачи, трезвеници, смирени, но умираха от рак.
Никога няма да разберете защо идва болестта. Престанете да се притеснявате от понятията „не трябва“, „диета“ и „грях“. Това не удължава живота. Защото болестта не е в тялото, болестта е в главата!
Затова просто живейте с удоволствие! Правете всичко за удоволствие.
Научете се най-накрая да ядете това, което ви харесва, а не това, което е полезно. Просто яжте, а не преживяйте!
Не можете да спрете да пушите? Недейте! Но не пушете с угризение на съвестта, а с удоволствие. Въобще не е нужно да спирате да пушите. Нужно е да не искате да пушите. Забраната винаги работи наобратно.
Захвърлете омразната си работа или се научете да извличате удоволствие от това, което правите, каквото и да е то.
Не се лъжете от призивите на модата, времето, интернет и т.н. Не поставяйте себе си в подчинение на чуждите и фалшивите образи на високо духовните водачи. Не бъдете последователи на снимките с третото око, ин-янките и мандалите. Накъдето и да погледнеш, списъкът с афоризми на далайлами, гурута, старейшини, внезапно помъдрели актьори и никога не съществували мъдреци, става все по-голям. Гледам ги и се питам: как изобщо се озовах тук, сред толкова високо духовни хора?
Кълна се, понякога ми се повръща от такива „високо духовни“ личности, зад които в действителност седят обикновените хора, като всички нас с акне, кариеси, киселини в стомаха, досадни съседи и роднини, нещастна любов и т.н. Бъдете такива, каквито сте! Бъдете себе си!
Направи това, което искаше и мечтаеше да правиш още от детството си.Научи се да свириш на китара, пиано, отиди на курс по планински ски, акварел, мозайка, глина и др. Няма хора, на които да им липсва творчески потенциал, казвам ви това като художник. Не мечтайте за мотор, а си го купете! Не спестявайте мечтите, те умират и гният в задните улички на мозъка ви!
Винаги си мечтал да отидеш в планината, но вместо това по цял ден висиш в офиса? Отиди в планината!
Живееш в планините, но искаш да работиш в офис? Отиди в града! Всичко е в твоите ръце!
Харесвате уединението? Уединявайте се с удоволствие. Страх те е от самотата? Отиди при хората.
Намерете радост и удоволствие във всичко. Дори и в това, в което, на пръв поглед, не може да има.
И най-важното: начинът на живот не трябва да бъде здравословен, а щастлив!
Като цяло ще ви разкрия най-важната тайна на живота и самия смисъл на живота: такъв няма!
Има просто Живот. Сутрин, следобед, вечер, нощ и отново сутрин. Има планета, хора, флора и фауна. През седмицата и през празниците. Щастие и нещастие. И има смърт. И идва във всеки един момент, във всяка възраст. Имате ли време да живеете според мечтите на другите хора, наложените идеи и социалните норми?
Живейте с удоволствие и не търсете причините за болестите и смъртта сред роднини и известни личности. Това не можем да разберем. Но животът е даден. И трябва да живеем в Радост. Не тревожете другите. Помагайте им! 
Е, ако искате да търсите смисъла на живота, тогава помислете, че е в това – да живеете в радост. Всичко това не означава, че е лошо да бъдеш търсещ, че е лошо да изследваш. Не, не е така. Ако го правиш с радост, то е за здраве.
Всички мои приятели, роднини и непознати, докато умираха, ми признаха: „Търсих нещо цял живот, нещо правех, тичах, бягах нанякъде, а най-важното е било под носа ми. Любимите хора. И всичко, което искам да направя с тях, вече няма да мога… „
Умолявам ви, не забравяйте, че щастието не е в селото или в града, не е в планините или в равнината, то е в главата ви! Живейте, както искате, и не сравнявайте щастието си с друг.
Никой няма да разбере вашето щастие. Ако нямаше оценка и сравнение на щастието, на религиите и на ценностите, нямаше да има и войни…


system restore points

How to create Windows 10 system restore points automatically on startup

You can create system restore points every time Windows 10 starts, and in this guide, we'll show you how to do it.
On Windows 10, System Restore is a feature that works like a time machine that takes your computer to an earlier point in time to reverse system changes using a restore point. This feature is particularly useful to recover from a number of issues when your device isn't working correctly without affecting your files.
Usually, new restore points are created automatically before a significant event occurs, such as when installing a new app, driver, or software update, and you can even trigger them manually. The only caveat is that using a restore point that isn't recent may end up undoing many unnecessary changes. However, if you want to make sure there is always a fresh restore point available, you can configure System Restore to generate additional checkpoints every time you start Windows 10.
In this Windows 10 guide, we'll walk you through the steps to use Task Scheduler along with a PowerShell command to create restore points automatically during startup.

How to create system restore points at startup

To create automatic restore points during startup, you must enable System Restore, disable the restore point creation frequency option, and use Task Scheduler to create a task to automate the restore point process every time your computer starts.

Enabling system restore point service

On Windows 10, System Restore comes disabled by default, but you can use these steps to enable the feature:
  1. 1.Open Start.

  2. 2.Search for Create a restore point and click the top result to open the experience.

  3. 3.Under "Protection Settings," if your device system drive has "Protection" set to "Off," click the Configure button.


4.Select the Turn on system protection option.
  1. 5.Click Apply.
  2. 6.Click OK.
Once you've completed the steps, you can continue with the steps below to configure System Restore to create restore points during startup.
If you want to disable System Restore, you can use the same instructions, but on step No. 4, make sure to select the Disable system protection option.

Disabling system restore point frequency

When you enable System Restore, Windows 10 doesn't create additional automatic restore points if there's another restore point that has been created within the last 24 hours. Although this restriction won't apply when triggering a new restore point manually or automatically as a result of an app, driver, or update installation, it'll prevent Task Scheduler from creating restore points during startup. However, it's possible to avoid this problem by disabling the frequency option using these steps:
Warning: This is a friendly reminder that editing the Registry is risky, and it can cause irreversible damage to your installation if you don't do it correctly. It's recommended to make a full backup of your PC before proceeding.
  1. 1.Use the Windows key + R keyboard shortcut to open the Run command.
  2. 2.Type regedit, and click OK to open the Registry.
  3. 3.Browse the following path:
    HKEY_LOCAL_MACHINE\SOFTWARE\Microsoft\Windows NT\CurrentVersion\SystemRestore
    Quick Tip: On Windows 10, you can now copy and paste the path in the Registry's address bar to quickly jump to the key destination.
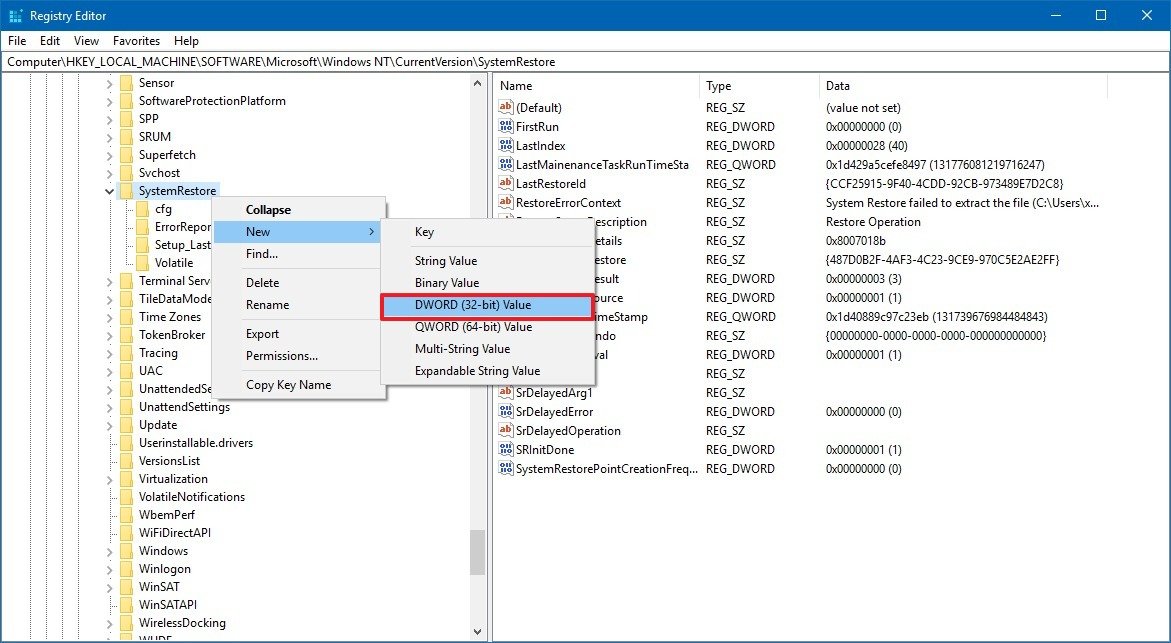
  4. 4.Right-click the SystemRestore (folder) key, select New, and click on DWORD (32-bit) Value.

  1. 5.Name the key SystemRestorePointCreationFrequency and press Enter.
  2. 6.Double-click the newly created key and make sure its value is set to 0.
  1. Name the key SystemRestorePointCreationFrequency and press Enter.
  2. Double-click the newly created key and make sure its value is set to 0.
  1. 7.Click OK.
After completing the steps, Task Scheduler should be able to run the task with the corresponding command to create new restore points at every startup.
Windows 10 is very savvy at controlling the number of restore points that can be stored on your device, as such, you shouldn't be worrying about running out of space when disabling this feature.
If you no longer want to create new checkpoints at startup, you can always revert the Registry changes using the same instructions, but on step No. 4, make sure to right-click the SystemRestorePointCreationFrequency DWORD and select the Delete option, and then delete the task using the steps below.

Creating a system restore point during startup

The next step is to use the Task Scheduler to create a new task that will run at startup to trigger a new restore point using these steps:
  1. 1.Open Start.
  2. 2.Search for Task Scheduler, click the top result to open the experience.
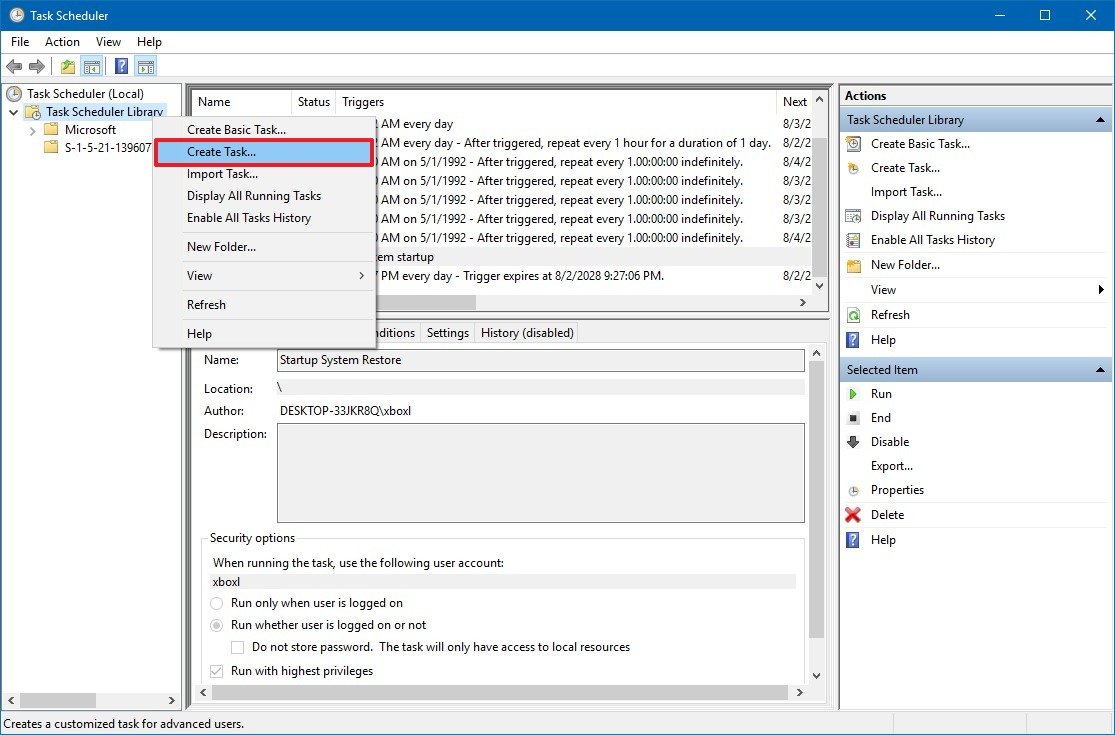
  3. 3.Right-click the Task Scheduler Library folder.
  4. 4.Click the Create Task option.

  1. 5.Click on the General tab.
  2. 6.In the "Name" field, type a descriptive name for the task. For example, My Restore Point Startup.
  3. 7.Under "Security options," select the Run whether the user is logged on or notoption.
  4. 8.Check the Run with highest privileges option.

  1. 9.Click on the Triggers tab.
  2. 10.Click the New button.
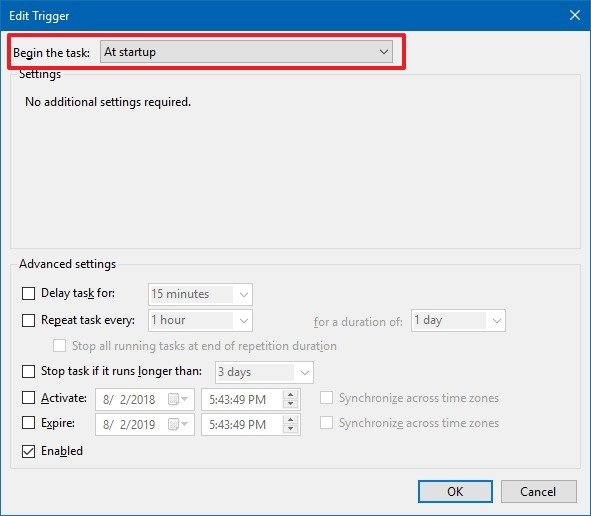
11.Use the "Begin the task" drop-down menu and select the At startup option.
12.Click the OK button.13.Click on the Actions tab.14.Click the New button.

  1. 15.Use the "Actions" drop-down menu and select the Start a program option.
  2. 16.In the "Program/script" field, type the following command:
    powershell.exe
  3. 17.In the "Add arguments (optional)" field, type the following command:
    -ExecutionPolicy Bypass -Command "Checkpoint-Computer -Description \"My Restore Point Startup\" -RestorePointType \"MODIFY_SETTINGS\""

  1. 18.Click the OK button.
  2. 19.Click the Conditions tab.
  3. 20.Under "Power," clear the following two options:
    • Stop if the computer switches to battery power.
    • Start the task only if the computer is on AC power.

  1. 21.Click the OK button.
  2. 22.Specify the password for your account.
    1. 23.Click the OK button.
    Once you've completed the steps, the new task will appear in the Task Scheduler Library folder, and it'll run to create a new system restore point every time you start your device.
    You can always stop running the task by right-clicking the task inside the "Task Scheduler Library" folder and selecting the Delete option.

    Checking system restore points

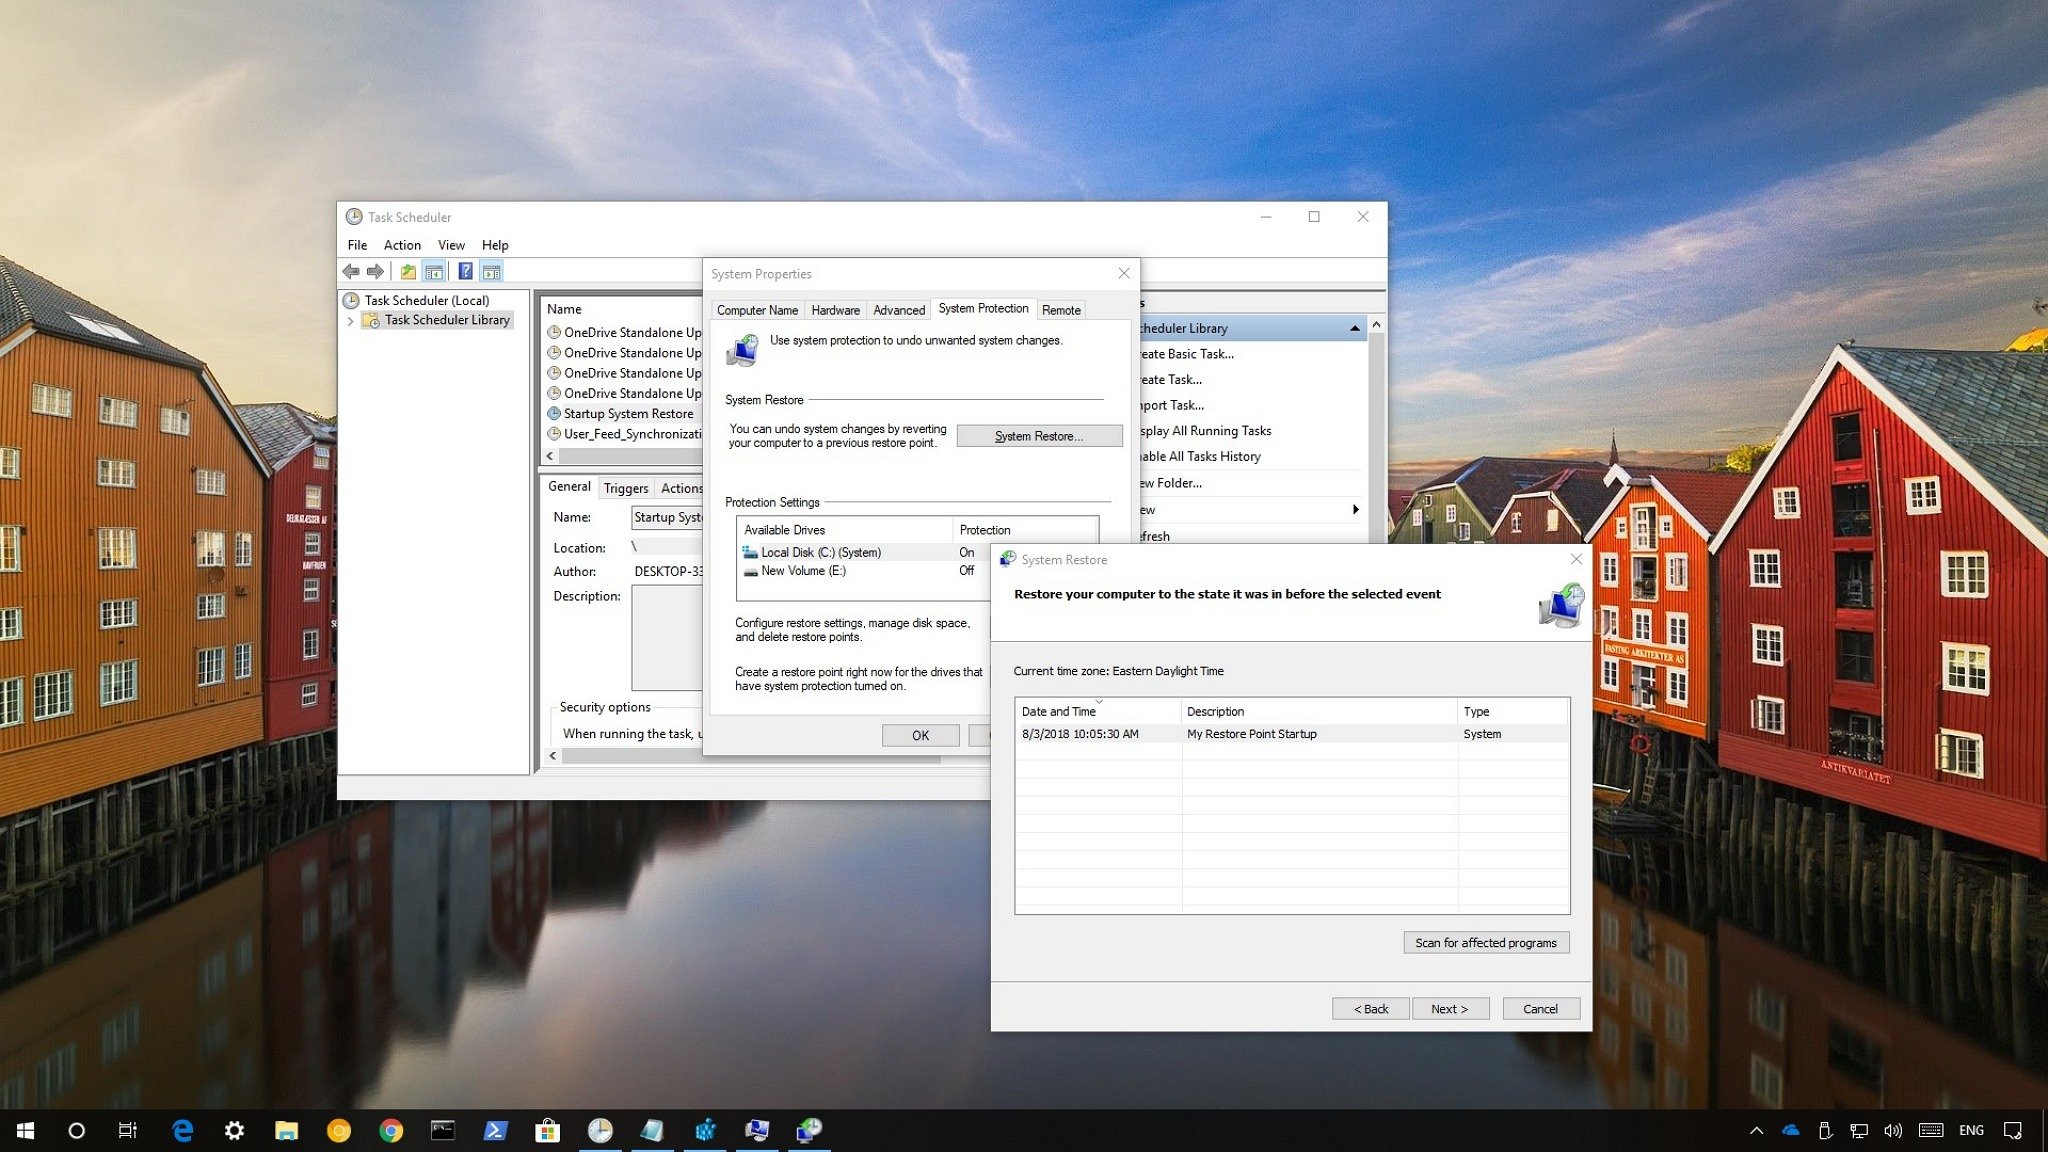
    After following the above instructions, you can make sure that system restore points are being created by restarting your device, waiting around five minutes, and using these steps:
    1. 1.Open Start.
    2. 2.Search for Create a restore point and click the top result to open the experience.
    3. 3.Click the System Restore button.
    4. 4.Select the Choose a different restore point or click the Next button.
    After completing the steps, if the task ran as expected, a new restore point with the "My Restore Point Startup" description should appear in the list.
    If you're not seeing new restore points being created, review the steps as the problem is likely a typo or mistake in the command.
    Moving forward, every time you turn on or reboot your device, Windows 10 will create a restore point that you can use to revert system changes if your computer isn't working correctly without affecting your files or removing many of the configurations you may have recently made.

How to Copy Your Windows Installation to an SSD

How to Copy Your Windows Installation to an SSD


If you’re looking to upgrade your computer to a solid-state drive but don’t want to start everything back up from scratch, here’s how to transfer your data onto your new hard drive.

How to Copy Your Windows Installation to an SSD

If you're still using a traditional, spinning hard disk on your computer, you're missing out. Swapping it out for a solid-state drive (SSD) is one of the best upgrades you can make in terms of speeding up your computer. Your computer will boot faster, programs will launch instantly, and games won't take so long to load..
You could reinstall your Windows installation from scratch, if you wanted to, and start new with a fresh, squeaky-clean system. But while it seems simpler, it's actually more of a hassle. As long as you follow these instructions to the letter, you should be back up and running in no time, with all your data intact.
You'll need a few things before you get started:
Samsung SSD 860 Pro 1

What You'll Need: An SSD

Obviously, in order to upgrade to an SSD, you'll need to...well, buy an SSD. We have some recommendations here, though if you're on a pretty strict budget, we have a separate list of cheap SSDs as well. Make sure to buy one big enough to fit all your data—if you have a 500GB hard drive now, you should probably spring for a similarly sized SSD. The only exception is if you're on a desktop computer, and have room for multiple hard drives. In that case, you could store Windows and your programs on the SSD while putting your music, movies, and other data on a second, larger hard disk.


What You'll Need: A USB-to-SATA Dock

During this process, you'll need both your SSD and your old hard drive connected to your computer at the same time. If you're using a laptop with only one hard drive slot, that means you'll need an external adapter, dock, or enclosure that can connect your bare SSD to your computer over USB. (Again, desktop users may not need this if they have room for two drives inside their PC—you can just install it internally alongside your old hard drive.)


What You'll Need: EaseUS Todo Backup for Windows

There are many different drive cloning tools on the market, but when cloning a hard drive to SSD, I recommend EaseUS Todo Backup. Download the free version, enter your email and subscribe to the newsletter to get the download link, but it's worth it, and you can just unsubscribe later. When installing, don't worry about setting your default folder for backups—we won't be using that feature, so you can put it anywhere for now. It'll bug you a few times to upgrade to the paid home version, but just tell it to stick with the free version. That's all you'll need.


Once you've gathered up those necessities, it's time to get started.

Back Up Your Data (and Free Up Space, if Necessary)

Before you start messing with drives and formatting partitions, it's absolutely necessary to back up your data first. A simple misclick can result in you erasing everything, so do not continue until you've backed up all of your data. If you aren't backing up your computer, here's our favorite software for the job—though for today's purposes, copying your important data to an external drive will do in a pinch.
If you're upgrading to an SSD that's smaller than your current hard drive, you'll want to take extra care here. This isn't as common as it once was, thanks to bigger, less expensive SSDs, but if that's the case for you, you'll need to delete some files and free up space on your hard drive before cloning it. Otherwise, your data won't fit. In that case, I recommend making sure that data is backed up to an external hard drive before continuing, unless you're okay with deleting it all permanently. Once your data is safe and secure, continue onto the next step.

Plug in and Initialize Your SSD

Plug your SSD into the SATA-to-USB adapter, and then plug that into your computer. If it's a brand new drive, you probably won't see the drive pop up in Windows Explorer, but don't worry; it just needs to be initialized first. Open the Start menu and type "partitions" in the search box. Click the "Create and format hard disk partitions" option, and Disk Management will open. It'll prompt you to initialize the drive using either the GPT or MBR partition table. I'll be using MBR for my SSD, since I have an older motherboard in this PC that doesn't have UEFI, and thus can't boot from GPT disks. If you have a newer PC, you might be able to use GPT, but when in doubt, use MBR.
If you aren't prompted to initialize the drive, and don't see it in Disk Management, double-check that it's properly connected to your computer, and that the enclosure or dock is turned on (if necessary).
Once the drive has been initialized, you should see the drive show up in the bottom pane of Disk Management, as unallocated space. You still won't see it in Windows Explorer, but that's okay, since EaseUS will be able to see it. Close Disk Management and continue to the next step.

Clone Your Hard Drive

Open EaseUS Todo Backup and you'll be greeted with an empty window. Click the "Clone" icon in the left sidebar—it's the one with two squares, near the bottom—and select the hard disk with your C: drive as the source. Be sure to check the box for the entire Hard Disk, not just the C: partition itself, since you'll need to clone the "System Reserved" partition as well. Click Next.
On the next page, you'll choose the target disk. In this case, that's your SSD. Again, select the entire disk by checking the box next to "Hard Disk," and make absolutely sure you're selecting the SSD, since whatever drive you select in this step will be erased. Thankfully, our SSD is empty, unallocated space, so we don't need to be worried about erasing anything important.

Align Your Partitions

Before moving on, click the "Advanced Options" button and check the "Optimize for SSD" button. This is important, since it'll align the partitions in a way that ensures you're getting the maximum speed out of your SSD. Click OK, then click Next. EaseUS will ask to confirm your choice, and give you a preview of how much space will be used on your SSD. Click Proceed to begin the process.


Wait...and Wait, and Wait

This may take a few hours, especially if your hard drive and SSD are rather large. So go binge-watch some Netflix and come back in a while. When it’s done, click the "Finish" button. You should see your new SSD in Windows Explorer, complete with all your data.

Install Your SSD

Next, shut down your computer. It's time to install that SSD in your computer permanently. If you have a laptop with only one hard drive slot, you'll need to remove your old hard drive and replace it with your SSD. This is a bit different on every laptop, but you can get a general idea of the process with our guide here. If you have a desktop PC with more than one hard drive slot, you can leave your old hard drive in as extra storage, and just install your SSD alongside it.


Reboot From Your New Drive

Once you're finished installing the SSD, you'll need to tell your computer to boot from it. (This may not be necessary on laptops with just one drive, but if you experience problems booting, it can help on some PCs.) Turn your computer on and enter its BIOS/UEFI setup—this is a bit different on every PC, but it'll usually say something like "Press DEL to enter setup" on the boot screen, so you'll want to press the corresponding key as it starts up.
From there, look for your BIOS' boot options. These will be in a different spot depending on your computer, but once you find them, you'll want to select the option to change the boot sequence. Choose your SSD from the list as the first boot drive, then head back to the BIOS' main menu to exit, saving your settings. Your computer will reboot, and if all went well, it should plop you back into Windows faster than ever before. Open Windows Explorer and check to confirm that your SSD is, in fact, the C: drive. If everything looks good, you're ready to rock, and your computer should feel significantly snappier without having to reinstall a thing.


БЪЛГАРСКИЯТ СИМВОЛ IYI и ЕКСПЛОАТИРАНЕТО МУ В ТУРСКАТА ФИЛМОВА ИНДУСТРИЯ И ЛИТЕРАТУРА

  БЪЛГАРСКИЯТ СИМВОЛ IYI и ЕКСПЛОАТИРАНЕТО МУ В ТУРСКАТА ФИЛМОВА ИНДУСТРИЯ И ЛИТЕРАТУРА Имаме 11000 последователи , които са посочили за пър...