Translate

2015/12/31

How to Set Compatibility Mode for Apps in Windows 10

How to Set Compatibility Mode for Apps in Windows 10

Most software created for previous versions of Windows run well in Windows 10, but you might have some older apps that don't work well or even at all with the new operating system. You can try to fix any issues you have running these older desktop programs in Windows 10 by changing their compatibility mode settings.
Windows has a built-in tool called Program Compatibility Troubleshooter that could automatically fix any compatibility problems for you. If the troubleshooter can't fix the problem, you can manually make an app run in compatibility mode, which will run the app using the settings from an earlier version of Windows. You can have the troubleshooter automatically search for apps that could have issues in Windows 10 or manually run the troubleshooter on a specific app. Here's how to do both.

How to Use Windows' Program Compatibility Troubleshooter

1. In the taskbar search box, enter run programs, then click "Run programs made for previous versions of Windows."


2. Click Next and the troubleshooter will try to detect potential issues with your apps.


1440447315 528.74812030075403
4. Select a troubleshooting option: use the recommended compatibility setting or choose compatibility settings yourself.

If you choose to use the recommended settings, the troubleshooter will test the app using a previous version of Windows so you can see if that resolves the issue.

If you choose the choose to troubleshoot the app, the troubleshooter will ask you which problems you're experiencing. Depending on your selection, the troubleshooter will offer tests and suggestions to resolve the problem, such as testing the display settings for the app.


5. Click the Test the program button and then click Next.
You can then either choose to save the settings for the app, try different settings, or report the problem to Microsoft and view help articles online.


You'll have to run the troubleshooter for each app you're having compatibility problems with.
MORE: Windows 10 Settings You Should Change Right Away

How to Run an App in Compatibility Mode

Alternatively, you can go into a app's properties to change its compatibility mode settings. With compatibility mode, you can force an app to use settings from an earlier version of Windows -- helpful if you know the app ran well in, say, Windows 7 or Vista. You can also change the display and color settings for the app.
1. Right-click on an app and select Properties. You can do this from the app's shortcut or by navigating in File Browser to the EXE file.


2. Select the Compatibility tab, then check the box next to "Run this program in compatibility mode for:"
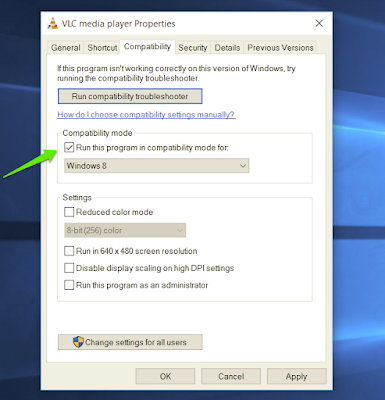
3. Select the version of Windows to use for your app's settings in the dropdown box.
select windows version


4. Hit Apply, then run your app and see if this fixed your issues.

How to Install Windows 10 Apps to an SD Card or USB Drive - See more at: http://www.laptopmag.com/articles/install-apps-sd-card-windows#sthash.Cva1ePQQ.dpuf

How to Install Windows 10 Apps to an SD Card or USB Drive 


These days, you can buy a low-cost Windows 10 laptop with as little as 32GB of internal storage. Fortunately, large games and other apps from the Windows Store don't have to take up precious storage space on your computer. With Windows 10 you can install apps to a separate drive, such as an SD card or USB Flash drive. Here's how to install or move Windows apps to a different drive.

How to Make Windows Install Apps to an SD Drive or Other Drive

In the steps below, we'll change where any new apps you install will be saved.
1. Insert an SD card, USB drive, or other external storage device that will be your new default location for installed apps.

2. Open Settings from the Start Menu.


3. Click on System.

4. Click on Storage in the left menu. You should see your SD card or other drive listed along with your internal drive.

5. Select your SD card or other drive in the "New apps will save to" option under Save locations.
6. Click Apply.
Any new apps you install from the Windows Store will be saved to your selected drive, keeping your internal storage space free for other things. Note that if you remove or disconnect the drive from your computer, the apps won't work. You'll have to reconnect the drive to use the apps.

How to Move Apps to a Different Drive

What about apps you've already installed? Luckily, there's a way to get them off your internal drive and onto a different one.
1. Navigate to Settings > System > Apps & features.
2. Select the app to move and click Move.
3. Click Move after verifying the drive you want to move the app to.

How to disable automatic updates in Windows 10: Stop downloads and schedule restarts

How to disable automatic updates in Windows 10: Stop downloads and schedule restarts


Windows updates can be annoying but we show you how to take control of them.


Although Windows updates can bring good things, they can be really annoying and tend to happen at the worst moments. Here's how to disable automatic updates in Windows 10.
While Windows updates can feel intrusive and frustrating, it's not advisable to switch them off and simply leave it. The updates bring not only bug fixes and new features but important security patches. Without the latest updates your PC may be left vulnerable.
We're going to explain how to stop updates downloading automatically but also how to make sure you get to choose when the restart happens – which is probably the thing which is getting on your nerves.
This information is here so you can have more control over when things happen, but do keep your system up to date.

How to disable automatic updates in Windows 10

In Windows 10 you're going to have to trick the system into not automatically downloading updates. To do this you'll need to switch your Wi-Fi connection to metered so that it thinks you're connected to a mobile network. Unfortunately you can't do this with an Ethernet connection.

Step One

Select the Start button.

Step Two

Select Settings.

Step Three

Select Network & Internet.
Step Four
Click Advanced options at the bottom of the list of Wi-Fi networks.

Step Five

Move the Set as a metered connection slider to on.

How to set scheduled restarts for Windows 10 updates

We've shown you how to do stop automatic Windows 10 update Downloads but if you have an Ethernet connection or you just don't want the system to reboot automatically then here's what to do.

Step One

Select the Start button.

Step Two

Select Settings.

Step Three

Click Windows Update.

Step Four

Select Advanced options.

Step Five

Choose Notify to schedule restart in the drop down menu.
Windows 10 updates


How to create an image backup in Windows 10 and restore it, if need be

How to create an image backup in Windows 10 and restore it, if need be


Robin Hayes plans to create an image backup of his C: drive using Windows 10’s own tools. But he’s not sure how he can restore that backup should disaster strike. I’ll cover both the backing up and the restoration.
An image backup copies everything on your drive—operating system, boot sector, programs, and data files—into one compressed but still very large file. If disaster renders your Windows installation useless, an image backup will allow you to get it up and running again quickly.
I recommend you create an image backup, saving it to an external hard drive, three or four times a year. This is in addition to the far more important daily file backup of your data.

Creating an image backup in Windows 10

1.   Plug in your external hard drive—which should have enough free space to hold everything on your internal drive. Make sure Windows can access the drive.
2.   In Windows’ Search field, type file history, and select Control Panel’s File History program.


1217 file history control panel


3.   In the File History dialog box, click System Image Backup in the lower-left corner.


1217 file history 2


4.   In the resulting Backup and Restore dialog box (don’t worry about the “Windows 7” label), click Create a system image.


1217 backup and restore


5.   Follow the resulting wizard.
The backup may take a few hours. You can continue to work as it backs up. However, I prefer to start the backup at the end of the workday so it doesn’t slow anything down.
When the backup is over, you may be asked if you want a System Repair Disc. If your PC has an optical drive, create the disc.
If not, create a Recovery Drive: Plug in a blank flash drive, open Control Panel’s Recovery tool, click Create a recovery drive, and follow the prompts.

Restore the backup

When Windows is in a seemingly hopeless condition, you’ll need to get into the recovery environment to restore the image. Here are three ways to do that:

  • If you can still boot into Windows: Select Start > Settings > Update & security.Select Recovery in the left pane, then select Restart now.
    1217 settings

  • If Windows won’t boot and you have a System Repair Disc: Insert the disc into your optical drive and boot your PC. When you’re asked to “Press any key…,” press any key. Then pick a language.
    1217 press any key
  • If Windows won’t boot and you have a Recovery Drive: Insert the Recovery flash drive into a USB port and boot your PC. If your PC skips the flash drive and attempts to boot Windows, reboot and enter your Setup screen (F2 usually works; if it doesn’t, check your manual). Look for a boot or boot order option. Once you’ve successfully booted the flash drive, select a language.
Once you’re in a recovery environment, select Troubleshoot, then System Image Recovery. Follow the instructions.

How to Activate Windows 10's God Mode


How to Activate Windows 10's God Mode

A legendary folder hidden in Windows 10 gives you quick access to a ton of handy settings in one place. The so-called "God Mode" folder provides links to a range of administration tools and tweaks in Windows. It's been around for a while in older versions of Windows is still alive and well. Here's how to activate the omnipotent "God Mode" in Windows 10.

1. Right-click on the desktop and go to New > Folder to create a new folder. - See more at: http://www.laptopmag.com/articles/god-mode-windows-10#sthash.f7tLq3h5.dpuf


2. Name the folder: GodMode.{ED7BA470-8E54-465E-825C-99712043E01C} (Complete with the period after GodMode and the curly brackets) - See more at: http://www.laptopmag.com/articles/god-mode-windows-10#sthash.f7tLq3h5.dpuf


Note that you can replace "GodMode" with any text you want, such as "JediMode" or "NinjaMode".

3. Open the GodMode folder to access over 260 commands, from administrative tools to backup tools to internet options and other important settings. - See more at: http://www.laptopmag.com/articles/god-mode-windows-10#sthash.f7tLq3h5.dpuf


You can also drag and drop any of the commands from your GodMode folder to your desktop for quick access in the future. - See more at: http://www.laptopmag.com/articles/god-mode-windows-10#sthash.f7tLq3h5.dpuf


Upgrade from Windows 10 Home to Pro using this product key

Upgrade from Windows 10 Home to Pro using this product key


If you’re running Windows 10 Home and want to know whether it’s worth moving on to Windows 10 Pro, there’s a straightforward way of switching between the two versions of Microsoft’s latest operating system.
All you need to do is swap your current Windows 10 Home product key for the default Windows 10 Pro one which Microsoft has made available to all users.
On the Microsoft Community Forums, Charles of Microsoft says:
From your Windows 10 Home running Version 1511, enter the Windows 10 Pro Default key under change product key.
VK7JG-NPHTM-C97JM-9MPGT-3V66T
This default key will not activate the system, just take you to Pro so you can activate using a valid Pro key that you will provide.
Once you have done this, the system will go through an upgrade process from Home to Pro, but will not be activated on Pro.
As you can see from the above, while this will upgrade your copy of Windows 10 Home to Pro, what it won’t do is activate it. If you decide you like the Pro version, you will need your own product key to activate the OS and use it permanently.
To switch product keys, open Settings and go to Update & security > Activation > Change Product key. Enter the product key from Microsoft (VK7JG-NPHTM-C97JM-9MPGT-3V66T) in the space provided. The upgrade process takes quite a while to complete so be patient.
If you want to buy a key for Windows 10 Pro, go the Activation page in Settings and click the Go to Store button.


Windows 10 Gets 'Free' Upgrade Rule Change

Windows 10 Gets 'Free' Upgrade Rule Change


For all the criticism thrown at Windows 10 – including a recent triple blow – there have also been several occasions where Microsoft MSFT +0.00% has made smart and sensible changes. And here is another…
Picked up by BetaNews, Microsoft used its official Microsoft Community forum to soft launch Windows 10’s new ability to upgrade versions seamlessly by using a ‘free’ product key. It also admitted the current upgrade process isn’t up to scratch:
“We are going to make these steps more visible and easier to find for folks. Sorry that has not been the case. The process is not really straight forward; I guess we were hoping folks would upgrade their 8 PCs to Pro and then upgrade to 10.  Well we have lots of people and lots of scenarios and lots of folks want to start fresh.”
Windows 10 now has support for version upgrades as well as Windows 7 and Windows 8 licence keys. Image credit: Gordon Kelly


So what is this product key and how does it work? Here are the steps:
  1. Go to ‘Change Product Key’ (easily found by typing this into Cortana)
  2. Enter the ‘free’ Microsoft key: VK7JG-NPHTM-C97JM-9MPGT-3V66T
After this your system will automatically begin the upgrade process to Windows 10 Pro. So why do I say ‘Free’? Because while Microsoft is freely giving out the key it stresses this only permits the upgrade to be carried out, it doesn’t give you a free copy – that still needs to be Activated and that then prompts the user for payment.
An additional caveat is users will need to be running Windows 10 version 1511 (the latest public version at the time of publication) for this feature to be supported.
Upgrade Value and Future Potential
Of course the obvious questions to ask here are: Is the upgrade worth doing? and What is the potential of this new functionality?
Looking at the upgrade aspect, if you have the money (at $199 Windows 10 Pro is $80 more than the $119 Windows 10 Home) then I’d say yes. Windows 10 Pro offers far greater control over upgrades and privacy settings than Home and last month this has been further upgraded. To the understandable frustration of Windows 10 Home users, no improvements will be coming to them.
Secondly there is a lot of potential giving Windows 10 the ability to respond to a new kind of product key. For Microsoft simplifying the up-sell path is a no brainer as Windows 10 momentum has dropped. It also makes for easy promotions across all forms of media and makes life a lot easier for users who regret purchasing the version they have (I’d love to see Microsoft offer a downgrade option, but that will never happen) and can change in a heartbeat. Given Microsoft’s comments, it also seems like further usability improvements are on the way.
Is this another sign Microsoft is warming to customer feedback? Yes and no. Given the importance of Windows 10 to the company I very much doubt it will lead to a softening of its ever more aggressive Windows 7 and Windows 8 upgrade tactics. Then again, if users are going to be pushed into upgrades, finding an increasingly flexible and powerful OS waiting for them on the other side will certainly soften the blow…

Portulaca Oleracea

  La maggior parte delle persone non sa quanto sia importante questa pianta: Portulaca Metodo semplificato con istruzioni: Ricerca della Por...